Welcome to the world 1 merchanting map guide. This map covers most of the main merching areas used in world 1, it is to be used as a rough guide to find the items you are after 🙂
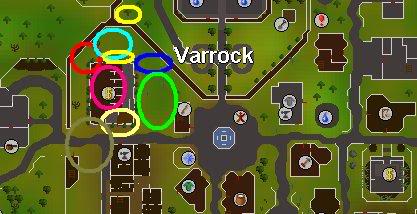
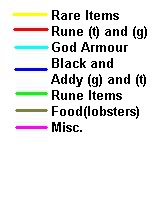
Runescape World 1 Merching Map
This website contains lots of things that are good, if you disagree, you have terrible taste in things.

Complete list of guides HERE
Welcome to the world 1 merchanting map guide. This map covers most of the main merching areas used in world 1, it is to be used as a rough guide to find the items you are after 🙂
Runescape World 1 Merching Map
1. Intro
2. What to wear & bring
3. What to pick up
Green dragon hunting is a very profitable experience. Killing 400 dragons (and only getting the bones) would be 1,000,000 GP and 123,200 XP.
Green dragons are located in different areas.
This is where I like to go:
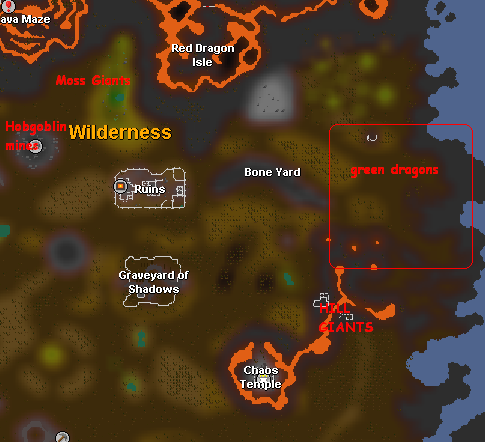
How to get to green dragons
It’s lvl 20 wilderness. You have to be careful of Pkers. Always check for white dots and be ready to evacuate.
This is an idea of what you should wear:
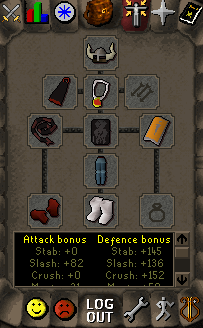
What to wear to kill green dragons
Black dragon hide is for mage defence. It’s good so you don’t get entangled as much and have a beter chance of running away if you’re tele-blocked. If you can’t wear black, then wear whatever hides you can. If you can’t even wear green, then wear rune plate.
This is what you should have in your invetory:
Green dragons killing inventory
Lobsters are the best for this. If you bring anything beter, (ie: sharks, swordfish) you’ll usualy end up having to drop food or eat early just to pick up dragon hides/bones. ALWAYS bring tele runes. It’s stupid not to. No honor? Well there’s no honor in killing people who are dragon hunting, but that doesn’t stop pkers.
If you have less then 70 defence, pick up anything you have room for. Hides, bones, unids, runes, etc.
If you have over 70 defence, ONLY pick up the dragon bones. 25 dragon bones in one trip is beter then 12 hides and 13 bones in one trip, even if the 25 dragon bones takes a little longer.
Detailed guide the the Saradomin encampment
After reading this guide, you should have everything you need to take down the saradomin boss: Commander zilyana. Both with a team and on your own.
::DISCLAIMER::
**Please remember, there is always an obvious danger when entering the God Wars Dungeon, just because you have read this guide does not mean that it is impossible for you to die. Death and loss off items is very possible in the dungeon, do not take the risk if your not prepaired for the worst.**
There are 7 major parts to this guide:
– Introduction
– Your gear
– Summoning
– getting kill count
– Fighting the boss
– So you want to solo?
– !! Rewards !!
Welcome to the saradomin encampment. The entrance is to the South of the main god wars lobby and the first time you go you will need two ropes so that you can get to the boss door.
Here there are a number of monsters that are killable:
-Knight of Saradomin (101-103)
-Saradomin priest (113)
-Spiritual warrior (125)
-Spiritual mage (120)
-Spiritual ranger (122)
(note that certain slayer levels are required to kill these monsters, consult your slayer tab in game)
In the Bosses room:
-Commander Zilyana
-Starlight
-Growler
-Bree
First of all many people consider two methods to kill the boss, range and meele. Meele is more comon now because of the faster rate of kills. When joining a team be sure that your team has someone with a ZGS it will freeze the boss for 20 seconds allowing for easy hits.
Remember that you will need a zammy and sara item, here is a list of the useable items:
Bracers
Sara/Zammy d’hide top and chaps
Holy and Unholy Symbols
God Capes and Treasure Trail God Capes
Stoles
God Swords
I personally use saradomin cloak and a zammy arrow
(90+ Att str 85+ def 70+ prayer)
This method requires no d hide.
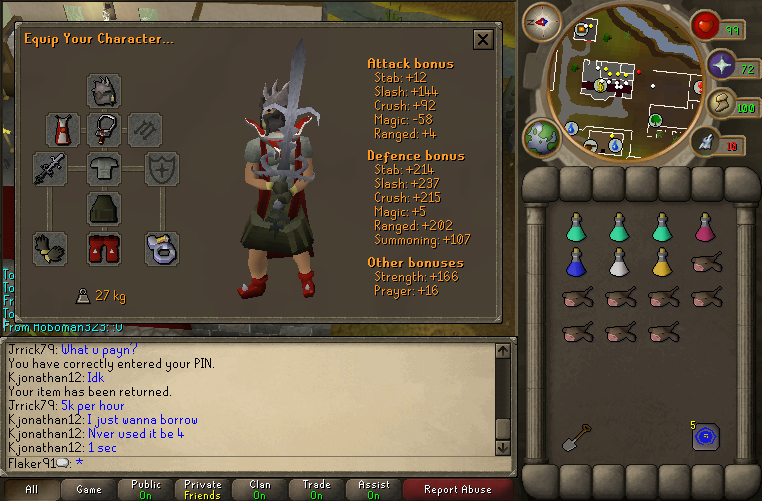
The godswords of runescape are acceptable weapons when fighting the boss, although, it is HIGHLY recomended that you stick to either a ZGS or an AGS if you have the money.
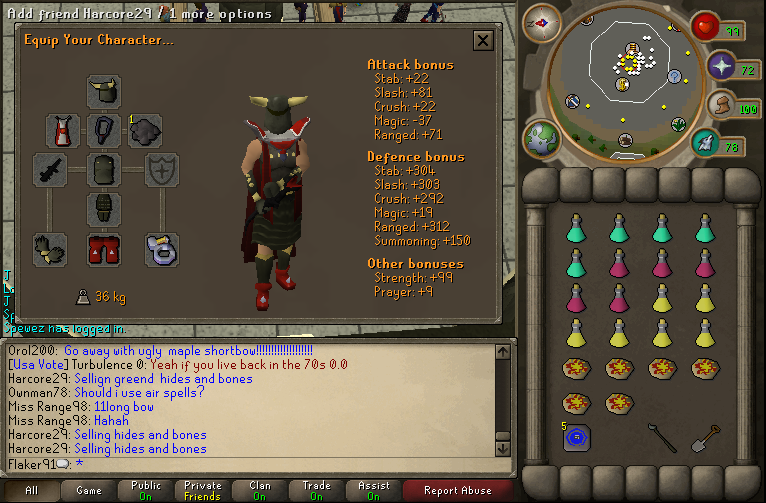
Verac’s armor is probibly the best setup that you could use, unless you know what you are doing, then you can use bandos if you have a team willing to bless your gravestone.
Veracs, especialy the helm provides the best protection against the boss as well as a nice prayer bonus, because you will be praying mage the whole time.
I tend to use climbing boots or dragon boots its up to you.
As far as your god item goes, youl need a Zammorak item and Saradomin item. If you have a ZGS your okay but if you dont it is acceptable to use zammorak robe bottoms to replace your veracs skirt until you get in the room.
You may also use the zammorak or saradomin godcapes (the free ones) as your item aswell.
What I tend to do is use my ZGS with veracs a saradomin godcape or saradomin vamps.
The ZGS is probibly the best godsword to use here, if you have a team of 5 with at least 2 or 3 ZGS users youl be okay for over 100 Kc.
If you have an AGS you will be an asset to any sara team, but please make sure that there is at least 1 ZGS user just in case.
If you have enough godswords on your team feel free to substitute a gs for veracs flail if you do not have the money for a gs. (DO NOT BRING A WHIP)
-inventory-
Your inventory solely depends on what familar you are using and what your set up is. For the set up described above this is a proper inventory:
Invo With unicorn
5 Saradomin Brews
8 super restores
4 spirit unicorn stallion pouches
a few hundred scrolls stacked
2 summoning potions
1 prayer potion
(the rest of the space can be used for alch runes or spots to hold drops)
Invo with Fruit bat
5 sara brews
8 super restores
4 fruit bat pouches
a few hundred scrolls stacked
2 summoning pots
1 prayer pot
(the rest of the space can be used for alch runes or spots to hold drops)
I do not recomend going without a famillar but if you must
7 super restores
16 sara brews
2 prayer potions
alch runes
**you may add or remove any of these items for your invo if you feel comfortable, these invo guides are simply that, guides. you can come up with your own invo.**
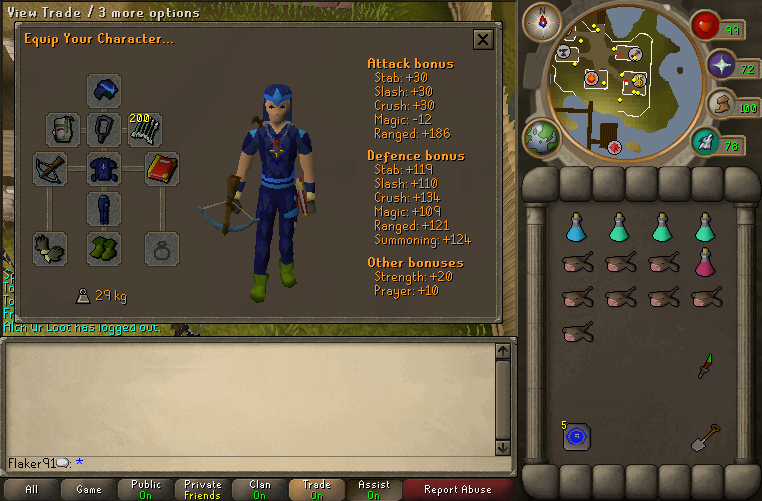
(90+ range and def, 70+ prayer)
Setup:
Torag or Verac helm is fine.
Zammy or sara d hide body. bring oposite item to compensate. (for example if you bring sara d hide bring another zammy item.
Archer Ring, ROW, ROL
Dragonfire shield, Granite/Obby shield, Rune Kite
Barrows Gloves > Vambs > Rune Gloves (if you use vamps and you have a sara d hide body bring zammy vamps or vis versa.)
Inventory:
With unicorn
8 saradomin brews
2 prayer pots
13 super restores
uni pouch
Scrolls
Tele tab
No Famillar
10 sara brews
2 prayer pots
13 super restores
tele tab
**you may add or remove any of these items for your invo if you feel comfortable, these invo guides are simply that, guides. you can come up with your own invo.**
The best famillar to use here is the spirit unicorn stallion. (req 88 summ) The Uni can last about 54 minutes and heal an unlimited amount in that time, the amount the unicorn can heal is only limited by the familars special move bar, and its time limit. It is always good to have a unicorn as you will need little to no sara brews and you will last a long time. (for example my longest saradomin trip with a zgs veracs and my unicorn with a team of 5 people all with similar sets and unicorns lasted me 6 hours and 30 minutes) bring around 4-5 pouches, and a few hundred scrolls.
You may also use the spirit Fruit bat. The fruit bat picks up fruit that you may withdraw and eat as an alternative to using your brews, the fruit bats special move also provides food to other team mates and is especialy helpfull to lower level teams. (req 69 summ) bring about 4-5 pouches and a few hundred scrolls.
Getting the kill count is very straight forward. Kill 40 saradomin npcs, you should go for the ones in combat to save some hp. If you can’t find a sara npc who is in combat then pray mage and attack a saradomin priest – easy to kill.
You do not need 83 slayer to get your kill count, it only speeds up the process a little bit.
by about 4-5 minutes actualy, you do however need a certain slayer level for a few of the other monsters, so please consult your slayer tab to see exactly which level.
THe stragety for fighting the boss is actualy very simple dispite all the hype that this boss gets for being, (the hardest gwd boss).
The commander targets one of your team members, when she spawns I suggest you select your quick prayers to be protect from magic. Once she spawns hit your quick prayers button to turn on protect from mage, that will protect from her sara sword spec. Even if she is not after you the spec will cause damage to every member of your team, (can do double 300). Once it is obvious who she has targeted the rest of the team will then proceed to attack her with whatever weapon they have. Try to negotiate who will use their ZGS spec first and second and whatnot, this will avoid double specing the boss. (which is useless). Each team member will attack the boss (except if you are her target.) untill she has chosen another target.
-if you are the target
If you are targeted by the commander, all you have to do is run around the edges of the room. Stay on the walls and continue to run unless she is frozen. If she gets frozen stop running save your energy and wait for her to chose another target. Once she does, join your team in attacking her.
DO NOT LET HER HIT YOU, I dont care what your defence level is, you cannot tank her, she hits with the speed of throwing darts and has the ability to do massive damage and possibly k0 in literaly 5 to 10 seconds, depending on your hp. If (and this will happen) she does get near enough to you to cause damage eat a shark, or use an uni spec or brew up or whatever at that exact moment, even if its a zero just get in the habit of eating when she hits you, just to be on the safe side.
-AFTER SHE IS DEAD
go for bree first, bree causes the most damage to whoever delivered the final blow to the boss, after bree kill starlight, and then growler. Gather your drops and heal up after they are all dead. (you will have time)
-now just repeat the process above and get some pro drops.
Soloing sara boss is not hard, you just need to know what you are doing, never meele, always take the ranger gear that is listed above.
The strategie is very simple run around the edges of the room praying magic, when youve got some distance on her, shoot her with your cross bow.
you may want to bring some purple sweets to increase your run energy.
((I DO NOT RECOMEND SOLOING))
just grab a team, its funner and youl get alot more kills.
The best part of fighting the sara boss. Here is a list of the best drops from the commander as well as her body gaurds.
-Godsword shard 1, 2, or 3
-Saradomin Sword
-Saradomin Hilt
-Dragon Med Helm
-Dragon Spear (<--- The best drop)
-Shield Left Half (dragon)
Shooting stars are a great method of mining experience, but also provide a nice reward. One star will land on every world every 2 hours. The stars can vary in size, from size 1 to size 9. The stars can land all over runescape, although a hint is given to the general area by using a telescope in your player owned house. The rewards you obtain from the stars depend on how much star dust you can mine.
Size 1 – Level 10 mining – Mining experience per star dust – 14
Size 2 – Level 20 mining – Mining experience per star dust – 25
Size 3 – Level 30 mining – Mining experience per star dust – 29
Size 4 – Level 40 mining – Mining experience per star dust – 32
Size 5 – Level 50 mining – Mining experience per star dust – 47
Size 6 – Level 60 mining – Mining experience per star dust – 71
Size 7 – Level 70 mining – Mining experience per star dust – 114
Size 8 – Level 80 mining – Mining experience per star dust – 145
Size 9 – Level 90 mining – Mining experience per star dust – 210
If you are lucky enough to be the first person to find the star then you will be awarded bonus experience for ‘tagging’ the star. This varies dependent on your mining level. It can be calculated as follows (level*75) for example 80 mining, would get (90X75) = 6,750 experience.
Runescape shooting star bonus experience for ‘tagging’ the star
As you begin to mine the star, it will degrade and change in size. As it changes in size the level requirement to mine the star will also decrease. So, if a size 9 star falls, and you only have 70 mining if you wait you will soon be able to mine the star once it has degraded 2 sizes.
Stars can be located by using your telescope in your player owned house. There are two types of scopes, Oak telescope which gives a 9 minute window for the landing – requires 44 construction. Or a teak telescope which requires 84 construction.
Example oak scope: The star looks like it will land in the next 1 hour 40 minutes to 1 hour 49 minutes.
Example teak scope: The star looks like it will land in the next 1 hour 47 minutes to 1 hour 49 minutes.

Runescape shooting star telescope
The telescope will also give a hint as to what area of the map the star will land in. Below are the areas of the map where the stars can land. And the sub locations under the area, which are more specific.
Crafting Guild Mine
Aboveground east of the Mining Guild entrance in East Falador
Rimmington Mine
Taverly Mine
Brimhaven Northwest Mine
Brimhaven Southwest Mine
Crandor Isle Southwest Mine
Jungle Mine
Shilo Gem Mine
Shilo Village bank
Fremennik Mine. Near the Keldagrim entrance.
Aboveground near the Jatizso Mine entrance
Aboveground near the Lunar Isle Mines entrance
Miscellania Mine
Neitiznot Runite Mine
Rellekka Mine.
Coal Trucks
East Ardougne Mine (near Legend’s Guild)
Port Khazard Mine
South Ardougne Mine
Yanille bank
Al Kharid bank
Chasm Mine
Duel Arena area
Enakhra’s Mine
Nardah bank
Sophanem Mine
Uzer Mine
Outside of Aubury’s Rune Shop
Lumbridge Swamp East Mine
South-east Varrock Mine
South-west Varrock
Burgh de Rott bank
Canifis Bank
Mos Le’Harmless Bank
Piscatoris Fishing Colony Mine
Near the Spirit Tree and the bank outside of the Grand Tree
Near the bank in Lletya
Wilderness volcano (previously Bounty Hunter) bank area
Hobgoblins’ Mine
Near the lever used to enter the Mage Arena
Pirates’ Mine
Runite Mine
Steel Mine
Skeletons’ Mine
As you finish mining the star a star sprite will appear and will reward you.
Runescape shooting star sprite reward
You can mine 200 star dust, maximum. However after you get 200 you can continue to mine for experience. But your reward at the end will increase no further. If you get 200 star dust the rewards are as follows:
* 50,002 coins
* 20 Gold ore (Noted)
* 152 Cosmic runes
* 52 Astral runes
* Have the ability to mine two ores at once for 15 minutes

Runescape shooting star 200 star dust
If you fail to get 200 your reward will be some what reduced.
Note: you may only have 200 star dust at once, if you attempt to mine another star and already have 200 star dust in your bank, You will not be able to mine anymore. You must cash in your 200 first. You may only cash in 200 star dust once a day, no more. But you can still mine multiple stars a day for experience.
Here are the names of the Call Of Duty 5 – World at War death cards, where to find them and what they do.

Death cards can be found on lots of the single player missions when you play world at war. There are 13 in total and they unlock cheats that you can use in co-op mode. Some of the cards make it easier, some of them make it harder! Also can be used in single player after you have played the game all the way through on a particular difficulty, you can go back and play it again on the same difficulty with cheats enabled (not multiplayer). Death cards are strapped to a soldiers helmet and you will see them propped up on a stick.
Mission: Semper Fi
Location: When you start the mission go to the right into the second hut.
What it does: Explode enemies when you shoot them directly in the head.
Mission: Little Resistance
Location: At a point in this mission you will be attacking a large bunker. You can use the tunnel to sneak closer, kill all the enemies through it and when you pop out the other side go right and it is in the long grass. Look closely!
Effect: Enemy soldiers will need more shots to kill them and generally take less damage from you.
Mission: Hard Landing
Location: Get most of the way through the level and you will enter a broken building. Before you exit the building and before going upstairs you should move further into the dark room to find this death card.
Effect: While you are downed you will have explosive pistol shots!
Mission: Vendetta
Location: Reznov will lead you into a building with a drinks bar and when he opens it up and walks through you should look behind the bar before you go into the next room.
Effect: Enemies will not drop their weapons when they are killed – Knifey knifey fun fun.
Mission: Their Land, Their Blood
Location: You will have to explode four tanks near the end of this mission. The final tank emerges from a barn, once you have defeated it go into the barn and look in one of the stable pens to find the card.
Effect: You will not be able to use firearms at all! Even more knifey knifey fun fun.
Mission: Burn ’em Out
Location: Between the first and the second mortar pits you will find this card hidden in a dark bunker on the left, easy to miss so if you get to the second mortar pit then you have gone past it.
Effect: Kill enemies to recharge your health or die! MWHAHAHAHAHAH!
Mission: Relentless
Location: You will go into caves with two different routes through. They both lead to the same room and the end of the mission but half way along the caves they join again and the death card is in this joining section.
Effect: Enemies receive less damage from grenades. Bit lame this one.
Mission: Ring of Steel
Location: As soon as you get in the asylum you need to stay left and continue to a little enclosed bit in the courtyard with the death card inside.
Effect: You will only be able to kill enemies with a direct headshot.
Mission: Eviction
Location: You will go through a kitchen area with loads of soldier in, kill them all and get to the next balcony bit with rpg soldiers etc. Kill them all but before proceeding on you should turn to your right where there is a big flaming hole in the floor. Drop down here and get the card.
Effect: Enemies can now come back from the dead like a god dam zombie.
Mission: Blowtorch and Corkscrew
Location: When you get the satchel charges blow up the first bunker. Then go towars the second one and look for a stone thing with a dead guy hanging off it and the death card.
Effect: If someone on your co-op team dies then just shoot them to revive.
Mission: Breaking Point
Location: Blow up all four mortar pits and before you go up the stairs to the big building, turn around and go in the little hut at the side with boxes in. The card is inside.
Effect: Kill three enemies in five seconds and you will be in rage mode. You’ll be invincible for a short amount of time, but will only have a knife.
Mission: Heart of the Reich
Location: At the very start of the mission look in the tunnel to the left of your starting point for this easy card.
Effect: Paint will splatter instead of blood when you shoot.
Mission: Downfall
Location: Finish the massive fight in the large theater room, and your team will break a door down. Look down the hallways (right side)for a dark room with a card inside.
Effect: The HUD is minimised, friendly fire is all good and you take damage twice as fast – Just like real life 🙂
Quests: Priest in Peril (n), Nature Spirit (n), In search of the mirique (u), Ghost Ahoy (u)
(n) = needed, (u) = usefull
100+ combat is usefull, 43+ prayer is needed
Succesfull: 70 prayer
I am showing several methods, which need different requirements.
The Methods are (levels needed/usefull):
Slayer Dart (55 slayer, 50 magic)
Ancient (70+ magic)
Black Salamander (70 strength, ranged and magic)
Ranged (85+ ranged)
Godsword (90+ strength, 80+ attack to make it quick)
Whip (95+ attack and strength to make it work)
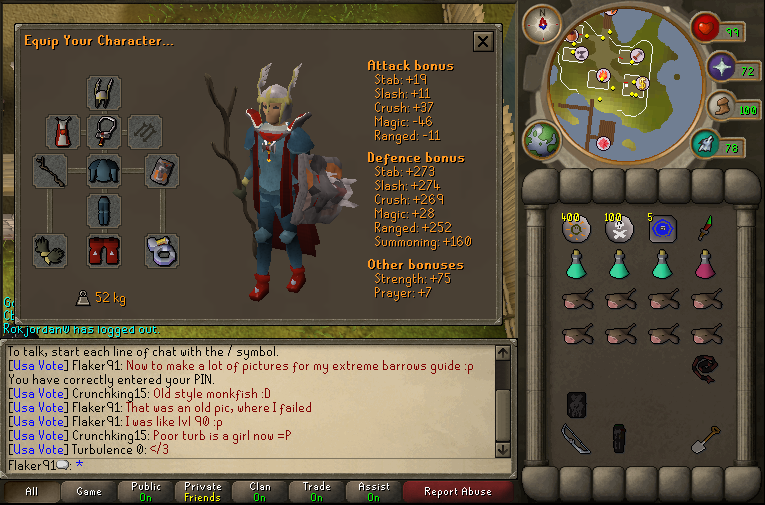
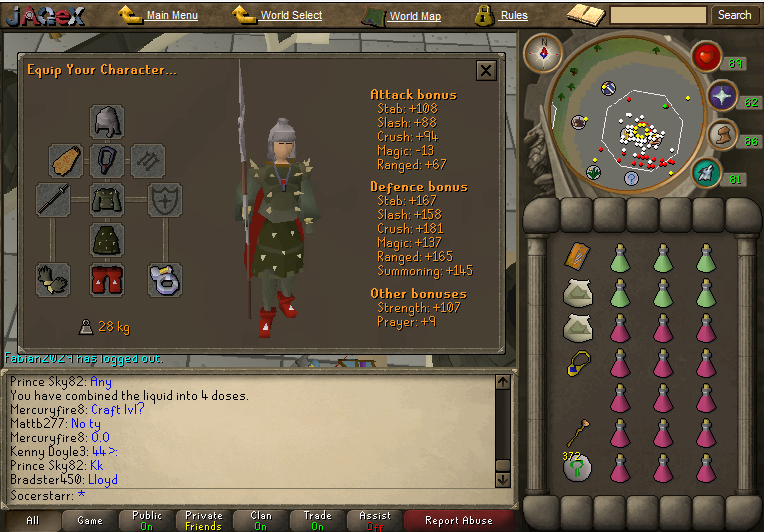
The outfits* with inventories**:
Slayer Dart:
Slayer Dart Barrows Invent
Ancient:
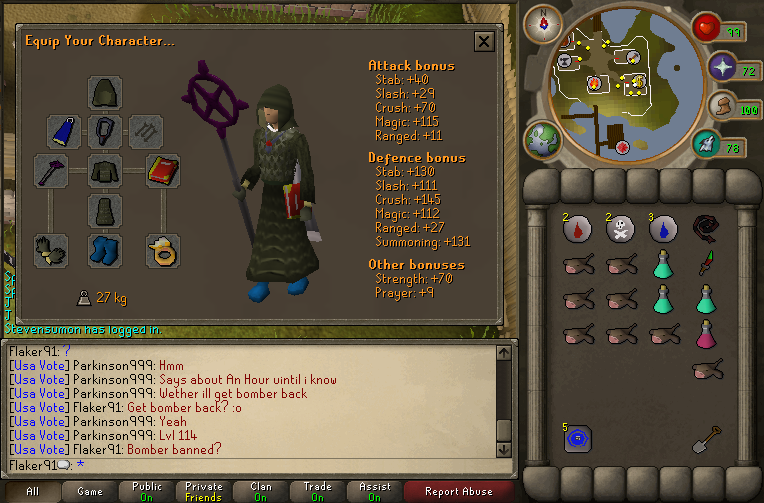
Ancient Barrows Invent
This is for blitzing, you can also use burst, but you will need the following runes:
Ancient Blitz runes Barrows Invent
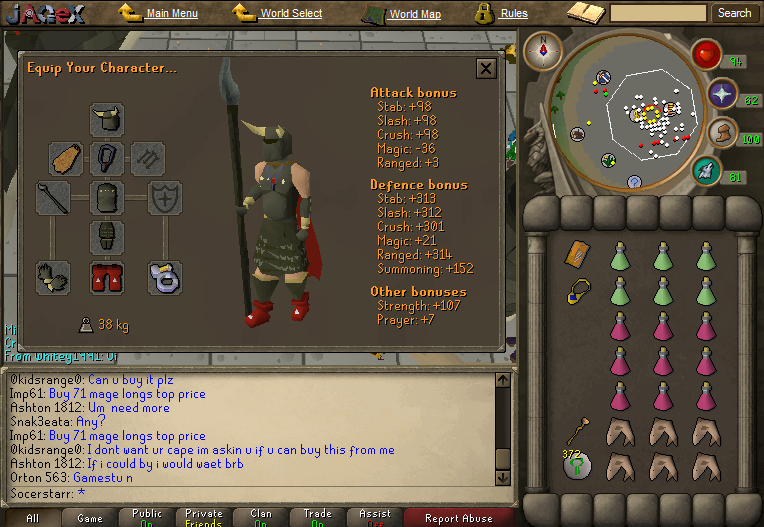
Black Salamander:

Black Salamander Barrows Invent
If you want to last for several rounds, you can use this inventory:
Longer Lasting Black Salamander Barrows Invent
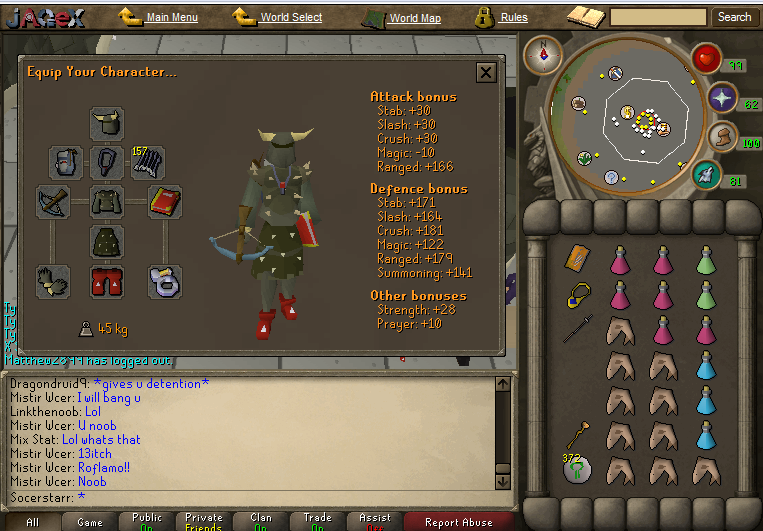
Ranged:
Ranged Barrows Invent
Godsword:
Godsword Barrows Invent
Whip:
Whip Barrows Invent
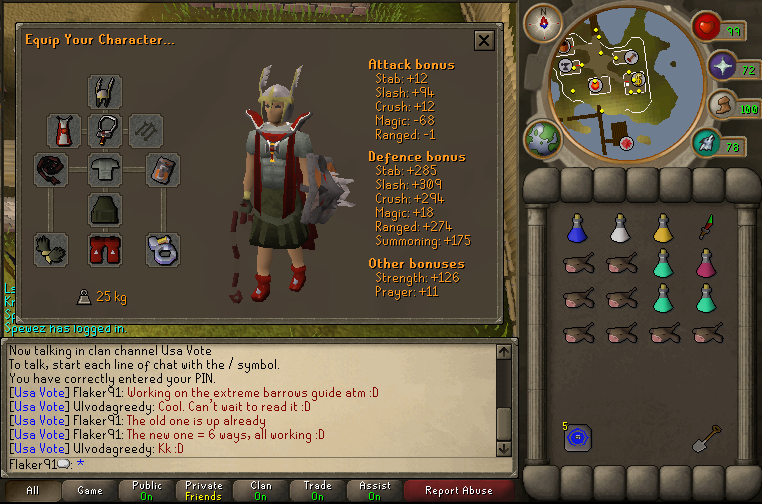
Teleport is needed! Home-teleport is easy, but I prefer the Teleport to house-tablet.
Prayer Potions, you will need them. 50+ prayer is a benefit. I usually use 4 doses, that is with 72 prayer. I use prayer on Dharok, Karil and Ahrim, then I restore my stats with super restore, and eventually another p pot dose if needed.
Several weapons are needed. DDS mainly to spec out Karil, as he is quite hard to mage through.
Runes. If you want to teleport, you can use a tele-tab since it saves 2 spaces compared to the runes. If you are going to use Magic, you will need (atleast) 100 spells. I suggest taking 200 to be completely safe, but 100 will most likely get you there too.
Food! You CANNOT go without. The monsters in the tunnels will/can do serious damage.
SPADE! If you forget your spade, go back to Canifis and get your spade. You can also bring some cash and buy a spade there, if you have inventory space left.
*You can change the shown gear for other items which you can afford. If you are melee-ing (GS/Whip), you can take Fire Cape, but I do not have one.
** You can take better food, but monkfish would do the trick.
Always go to Canifis first.
This is the last spot where you have the opportunity to bank. You can choose:
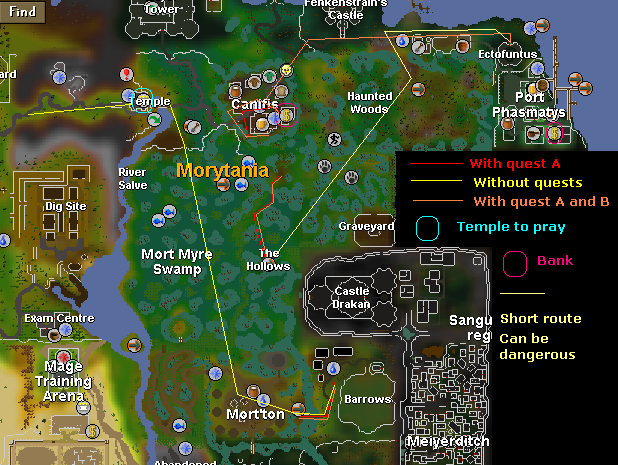
How to Get to Barrows
Quest A is only In Search of the Mirique
Quest A and B is In Search of the Mirique and Ghost Ahoy.
For the “Short Route” you only need Ghost Ahoy.
I DID NOT! Test this route out, I will soon
When you are at Barrows after a short trip (average of about 2 to 3 minutes), you need to go to the right “brother”. The best route is:
Name – Prayer
Dharok – Melee
Karil – Ranged
Ahrim – Mage
Guthan – Melee*
Torag – Melee*
Veracs – Melee*
*Optional
At one of the brothers, you will find a message:
“You have found a hidden sarcophague. Are you sure you want to go in?”
Answer with: Yes, I am fearless.
You will come in an dungeon-type of room, which looks like:
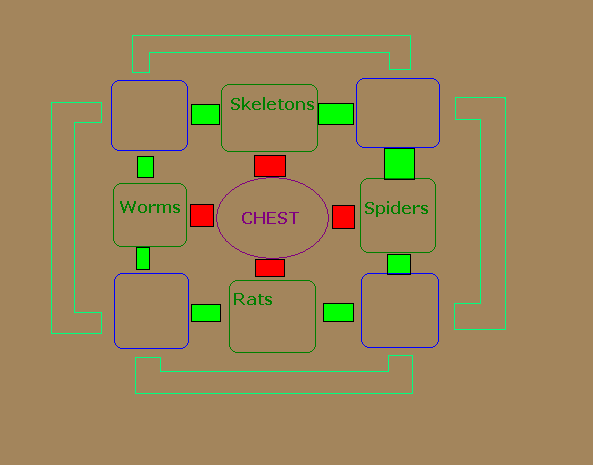
The Barrows Dungeon
The red bars are the ones with a puzzle, only one of them will open. If you fail the puzzle, you will have to find the open door again.
The green bars are constantly open.
The light-blue parts are the “walk-arounds” this will bring you from safe space to safe space.
THE LITTLE CREATURES CAN HURT YOU BAD!
THE GUY FROM THE TUNNEL CAN POP UP EVERYWHERE DOWN THERE! BE PREPARED!
If you are lucky enough, you will just find him at his chest, guarding the reward. Kill him and get the reward. After you got the reward, teleport away from the chest to a safe spot. From there you can start the guide again.
When doing multiple rounds per trip, go back to the ladder, climb out and start following the guide again.
Contents
1.0 – Introduction
2.0 – How to get there
3.0 – Method One
4.0 – Method Two
5.0 – Method Three
6.0 – FAQ
1.0 – Introduction
Loads of people in clans have been asking questions about waterfiends, these creatures are great for crimson charms, which are some of the best summoning charms available. Well to start off – they are level 115 with 128hp and are found in two different place in Runescape, one of them is in the Chaos tunnels where its all multi combat, and its not too easy because of the aggresiveness of the fiends also in that area. The other place is in The Ancient Cavern near the Waterfall, you will need to complete the mini-quest “Barbarian Training” to some degree before you can enter the Whirlpool which leads you down into the Cavern.
YOU CANNOT TAKE SUMMONING FAMILIARS DOWN INTO THE WHIRLPOOL, INSTEAD YOU HAVE TO SUMMON THEM ONCE YOU ARE DOWN THERE.
Waterfiends are one monster in Runescape that does not use a melee attack. Insted they use BOTH mage and range attacks, but their range attack seems to be more accurate and having the same max hit as the mage attack, which is 11. They are generally weak to CRUSH attacks making weapons such as the godswords a great addition for slaying these creatures. There are many methods to use at waterfiends, most prefer to use the Bunyip method because they don’t need to rely on food and/or guthans. But other methods such as ranging and meleeing with guthans are also effective.
2.0 – How To Get There!
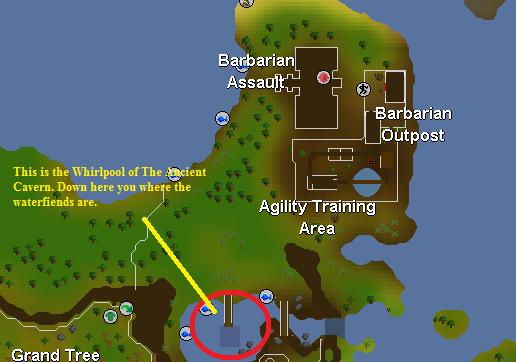
The Waterfiends are very easy to get to, with the games necklass teleport to the “Barbarian Assult” minigame which is around 50 – 60 Squares from the whirlpool leading to the cavern.
Here is the location of the Whirlpool, notice the Barbarian outpost is just north of it:
When you have teleported to Barbarian outpost using the Games Necklace, then run directly south untill you get here:
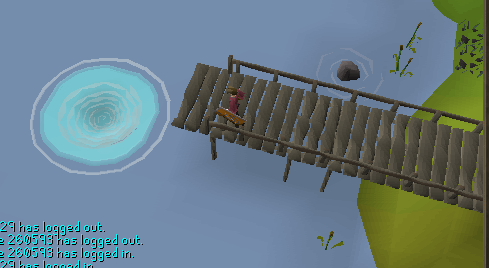
From here Jump into the Whirlpool (the animation is pretty good for this! :P) you will end up here:
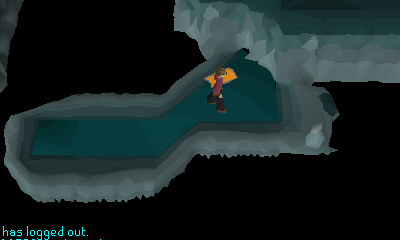
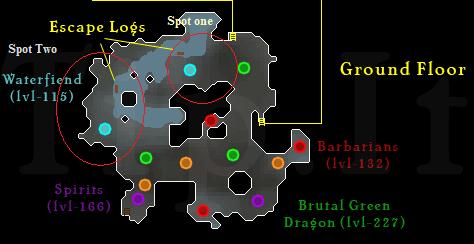
From here you go down the steps on the far east of the platform you are on, you now are face with two choices, if you are ranging you should use the the first spot which normally will have somebody using it, for meleeing you shold use the second spot as there are more waterfiends and less people.
When you are finished you CAN use home teleport because they should be non-aggressive by then, if not then you could use the logs in the river which takes you near the waterfall which is a safe place you can use the hometeleport.
3.0 – Method One
Method one is normally the most popular, it involes using a bunyip as the healing source, a bunyip requires 68 summoning to use and will heal you 2hp every 15 seconds this is good enough to provide the hp that you lose to the waterfiends.
An example inventory is shown below, the invent used can be adapted to get the best possible loot to suit the individual player.
If you have high enough summoning, you can use 2 bunyips a trip – you need 75+ summoning to do this, if you dont you could always take out a combat potion for a summoning potion so you could summon two.
When you tele to the barbarian outpost go into the assult building and bank the games necklace so you have 2 free spaces, then go into the whirlpool and run to spot 2 where you can drop your anti fire shield and summon one bunyip, this enables you to have 3 free spaces once you have got to your spot, this means you can loot all crimson charms and a few extras such as alchables (explained in FAQ’s what the ‘notable’ drops are.)
Protect from range so you only take damage from the mage attacks from the waterfiends, using the mage defence armour means that you don’t get hit much so the bunyip will heal more hp than you will lose.
Other weapons you could use instead of the zammy spear are: godswords (sara works every well here because its special), sara sword (pretty much the same speed as the spear) Veracs Flail (only use this as a last resort, this averages 40 crimson charms per bunyip compared to 60 – 70 charms with the zammy spear.)
Stay untill your bunyips have run out, this makes it less boring and easily enjoyable, a bunyip lasts for 44 minutes. Generally you will average 120 charms a trip which comes out to 30 – 50K summoning exp.
The cost of this is strangly low. If you use prayer potions instead of super restores (suggested because super restores are more expensive) you should break even each trip, clue scrolls come in handy because they make it so the trip could end in profit as they are level 3.
IF YOU ARE 68+ SUMMONING I SUGGEST YOU USE THIS METHOD BECAUSE IT IS SERIOUSLY THE BEST IN TERMS OF CHARMS/HOUR
4.0 – Method Two
The second method is less effective method, it relys heavily on guthans and uses less prayer potions as you dont need to pray when you above half hp. Once you get lower then half you then pray RANGE untill you are about 90% of your HP. For this method you use spot one, mainly because if you become desperate for HP there is a barbarian there which uses melee only so you can pray melee and heal freely on him.
Here is the suggested invent for method two:
The inventory includes food incase you become desperate for hp and there is no skeleton to heal on, although there are less prayer pots. When you become more experienced with this method you could get around 160 charms per trip, but its slow work because your relying on guthans. lots of people hate this method because of that factor and the red bared moments. So generally if you dont trust your guthans then don’t bother using this method.
5.0 – Method Three
Method three involves ranging, people think that you can’t range these little beasties because they use range and mage attacks, well infact you can. To range them you are going to need to wait untill they become unagressive, this is around 9 – 12 minutes of killing them. The invent for ranging is a mixture of the melee invent mainly because of the waiting for non-aggresiveness.
Here is the suggested invent for method three:
There is only one spot you can only use for this method, this is because you trap them behind a peice of land and range them over the piece of sticking out river.
Here is the ranging spot:
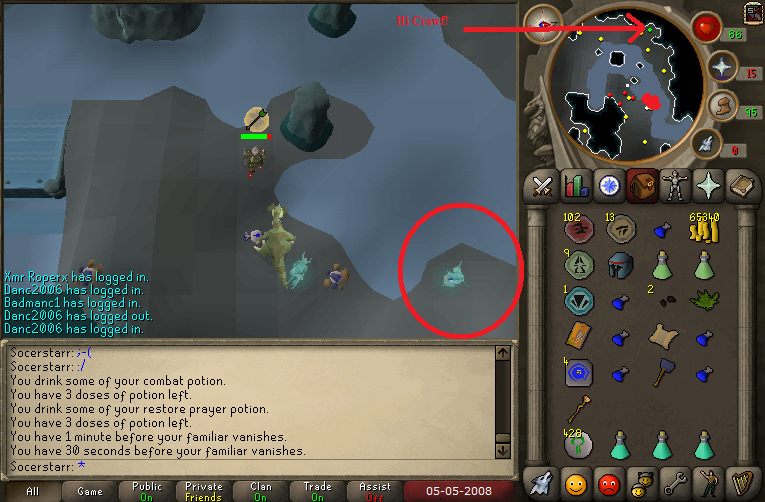
PLEASE TAKE NOTE THAT THE PICTURE ABOVE DOES NOT SHOW RANGING GEAR, IT IS JUST TO SHOW YOU THE SPOT.
In the red circle is where the Waterfiend must be lured to, this means you must attack it when its in the correct place, which is the red splodge on the radar. If the waterfiend is not in the correct place it will attack you with mage and range, this is why you have the extra prayer potions and a melee weapon, so when you mess up you will be able to kill it fast (yes you will mess up at least once a trip :P)
Please take note that this is slowest method that there is, but it is also the cheapest.
6.0 – Frequently Asked Questions
Q: Which charms are droped the most?
A: Crimson charms are the most common charms at the waterfiends.
Q:How many charms per hour?
A: This depends on the weapon which you use, with zammy spear you get 70 – 80 per 44 mins (bunyip time) with godsword you get 60 – 70 per 44 mins (bunyip time)
Q: What Slayer level is needed to kill them?
A: You dont need a slayer level to kill these monsters, they are not slayer specific.
Q: Why did you decide to make this guide?
A: Because loads of people in clans ask questions about waterfiends all the time, this guide sums up the methods and saves a lot of time
Q: Whats that helm in the melee without guthans picture?
A: The Helm is the Dwarven helmet – it gives +6 crush bonus.