Discord allows you to post messages from other websites and apps using Webhooks which is really useful, in the past I’ve used it from IFTTT and also linked into google calendar to share messages between them. What do you do if you want to get a webhook to ping roles or users at the same time it posts a message?
Well you need to use a special syntax to mention channels/users/roles etc in a webhook. For channels and users you should be able to use <@CHANNELID> and <@USERID>. To grab the IDs you need to go to settings->advanced then turn on developer mode. Once you have done that just right click a user or channel and hit “Copy ID”. Just paste it with the above so it looks something like <@684309756589074816>.
For roles its a similar approach to the above but you need to use <@&ROLEID> to get it working. You can also use it for other things like emojis if you need to for any reason! It took me a while to work it out so thought I would post here and I hope this helps someone.
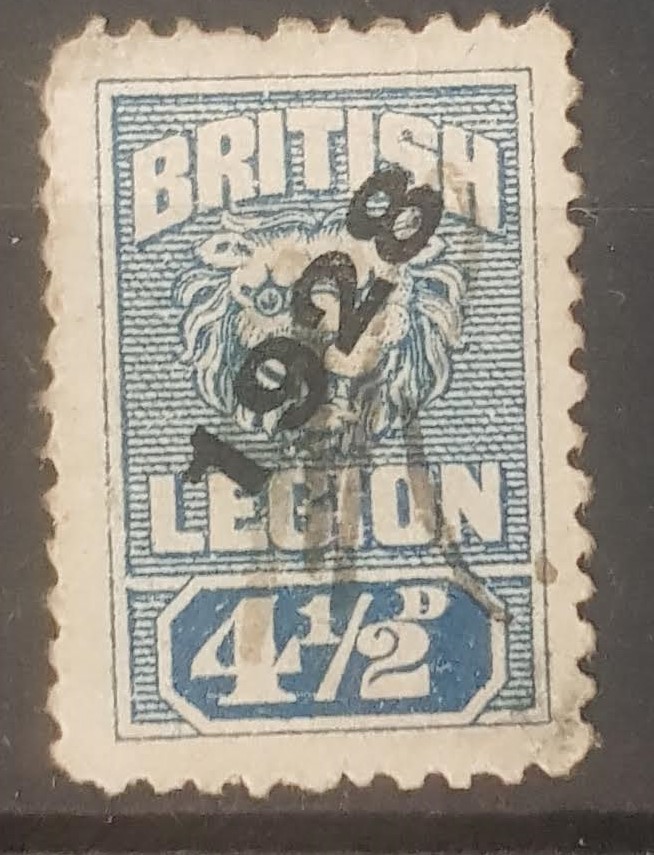
I have a stamp that I can’t find much infomation on using search engines and thought I would post it up here incase someone has any information on it. I can see its a British legion 4 1/2p stamp but no clue on whether there was a set of them or anything – Does anyone know about these?
Royal British Legion Blue Stamp 1928
The Royal British legion is a military charity in the Uk who give welfare and support to veterans. Its overprinted 1928 though i’m not sure why, could be to do with the great pilgrimage? Please do post in the comments if you know anything about this one or whether there is a set of them, I’d be very grateful.
Classic book and very memorable, I particularly like some of the words and sentences used, some of which you don’t hear today. Here are the ones that stood out to me with a rough guide on what they mean:
By and by = Over time Muggins = a fool Mud-cat = a catfish. Rapscallions Flapdoodle = Mess around Spondulicks = Money Considerable = A lot Sivilize me = Civilise me Sap-head = An idiot Yellocution = Elocution We’d allow it? I don’t take no stock in that
Command and Conquer was a game I played religiously as a child in the 90s, the good news is that in May 2020 they remastered it and online play is back with a bang. The downside is that I am older now and had long forgotten all of the strategy and tools I used to use to win. Well after a couple of months playing and re-learning my methods I can share a few good tips to get you going online.
There is no one method that will beat every opponent in every scenario on every map but I’ll walk you through a good strategy thats seen me win more than I lose and should give you a good idea where you have been going wrong and what to do to correct it. Lots of other guides will tell you to do things like get an APC and fill it with tanyas/engineers then sneak it into the enemies base and that can work but that has one major problem, if they kill the APC or kill the units before you have done enough damage then you lose as they will walk over your base in a few seconds.
Most Red Alert online games basically boil down to who can build the most tanks in the midgame and use them in the most efficient way. When you attack another player with your tanks you want to outnumber them and out maneuver them to be able to take down their tank army then you will be able to roll over the base unchallenged.
Early Game
Build your command centre then build a power plant then build a barracks.
Barracks, scouts and man rushes:
Scouting is very important as revealing large parts of the map early on gives you an advantage. For scouting build minigunners and sent one to each corner of the map and some inbetween too. Sometimes a man rush can work early on so you could build 20 minigunners (in addition to the scouts) then send them to another base as quick as possible in the hope of taking down an early building or two. Watch out for other people manrushing you – If they do this make sure you spot it early and build lots of minigunners to defend against it or a well placed pillbox. A good idea is to dot a few minigunners around your base as one stationary minigunner can take out multiple enemy minigunners running past. When scouting, placing minigunners or man rushing an enemy its extremely important you are building at the same time, do not let it distract you from building your base and getting to the next stage.
Ore refinaries, war factories:
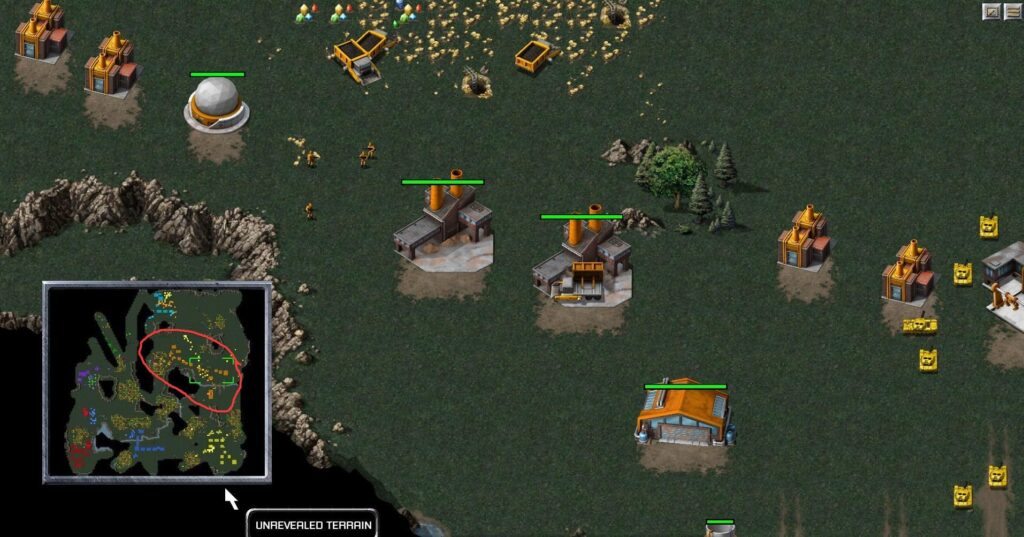
After you’ve built your barracks you need to focus on economy so build an ore refinary as close to an ore field as possible. This is one of the key things people don’t do well sometimes, they think they should have their base huddled in a corner with loads of tessla coils/pillboxes/turrets protecting it. Wrong. Only build tessla coils/pillboxes/turrets if you need to handle a situation like with the man rush example above. In terms of placing your buildings the best method is to snake them out accross the map to reach further ore fields. It may make you slightly more vulnerable if someone attacks but the benefits outweigh the risks big time as you will have access to much more ore therefore can grown your economy quicker and better economy ultimately means more tanks!
C&C Red Alert – Tips To Place Buildings and Snaking Accross the Map
Talking of tanks you need to place a war factory next though first thing out of the war factory should normally be a second harvester unless you are planning on sending a load of early tanks to your opponent or defending against a load of early tanks from your opponent. Early tank attacks can be successful though you will greatly sacrifice your economy by doing so. Its best to build a couple of extra harvesters before mass producing the tanks as you will very quickly burn through your cash once you start scaling up production (covered in next section).
Middle Game
Extra ore refineries and extra war factories
Ok you got the first bit sorted, scouts have flown to all corners revealing roughly where your opponent is, moneys coming in and tanks are rolling out. Building another ore refinery is good as you get a harvester with it and somewhere new to dock, it also makes it easier to farm some of the new ore fields you have been building towards (see snaking above). We need to speed up production now and build a radar at some point too. The way you speed up production in this game is by building more of the same type of buildings. So next thing to do is build a second war factory, this will double the speed your tanks are created. Obviously this is good as will mean massing huge army quicker but also it will eat more funds so make sure you have the ore refineries and harvesters to support it. A good rule of thub is one war factory to one ore refinery plus extra harvester. I don’t normally do this but you can even build a second command centre which means you can create buildings at twice the speed too!
Radar
Radar is important but its very difficult to guage exactly when to build it. Radar will mean you have a heads-up when opponents are moving towards you and also makes it easier for you to move your units accross the map. By this point your opponent may start to prod your defenses and you may have prodded your opponent a bit and movement is key to getting to the end game. Sometimes rather than battling your tanks in the middle of a map they may drive straight past into your base to try to take down a building or two and you then need to decide do I defend my base or do I counter attack? Whatever you do make sure the whole time you are building new buildings and mass producing the tanks. Often if someone tries to brute force into your base past your army they will get a building but while they are doing that you can destroy the majority of their tanks which in turn will leave their base vulnerable.
End Game
The end game is when you and your opponents have set up a nice base, your production lines are flowing and now its time to seal the deal. Most of the time I play the destroy structures mode which means when you have destroyed all of your opponents structures then the game is yours. You can also play where all units and structures have to be destroyed but this can become tedious trying to find that minigunner hidden in a tree.
This phase mostly boils down to who has built the best economy, you will have had some battles by now losing some units and even some buildings, its who can build up again after that and get the advantage. You need to think about being proactive, not waiting until your opponent makes a move. If you see a load of tanks coming towards your base do you use all of your resources defending? Or do you send all of your resources to their base? The answer very much depends on which option is most likely to result in a win but defending alone is not going to win, you need to be able to launch an attack after defending. If you are playing with team mates and you see an opponent make a move like that it means their base is vulnerable so could have one defending the attack while the other sneaks in behind and attacks their base.
Don’t give up, sometimes it may look like the opponent is winning, they have destroyed your command center and you have lost a lot of your army but they often pay a heavy price driving a load of tanks through your base and would have lost a good portion of their army too. I’ve seen games won with only one building left on the map so do everything you can with the bits you have left!
A Good Example Build Order
Command center
Powerplant
Barracks -> scouts -> base perimeter protection -> man rushes (optional)
Ore Refinery
War factory -> Extra harvester -> 8 tanks -> Extra harvester -> TANKS TANKS TANKS
First of all a disclaimer, if you don’t know what you are doing with electricity or are not sure then its always best to get an electrician to do the work or check the work for you before you turn it on as it can kill or injure you.
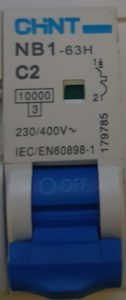
Now I am a qualified electronic engineer so know how to deal with things at component level but sometimes I have to dabble with electrical items too and am not so competent. For this task I had to install a small single pole type C Miniature Circuit Breaker (MCB) as one of my projects and had a few problems at first understanding which way around to wire it as the manufacturers documentation didn’t say and the device had no indication on it except for a small symbol here:
Chint 2A Type C MCB Operation Symbol Line and Load
What does the electrical MCB symbol mean?
Now some of you electrician types are probably saying “ah thats easy, you are a fool if you don’t know what that means and shouldn’t even be touching electricity”. Well you may be right but the good news is that I worked it out and thought it worth sharing as the internet wasn’t too helpful on this. So the top bit is showing a little lever with an X – This is a switch, the big on/off blue thing you can see in the photo above. Great thats one part but what do the two bits below mean and then onto the important question, how do I wire it? Well the next item down shows a square/rectangle symbol, this is the symbol for a thermal device. So its detecting if there is too much curent and when there is it will get too hot and will do something. The final piece of the puzzle is the curve half-circle like symbol underneith, this is actually the symbol for the circuit breaker itself. So the image tells us a nice little story, when the switch is on, it will be letting current through to the thermal sensor and if too much current goes through it will produce heat which will cause that curve to fire away like a rocket which will break the circuit and flip the switch off.
How do I wire it? Which way around does it go? Is line 1 and load 2 or is it the other way around?
Well the MCB will trip if the current exceeds its limit whichever way around you wire it but saying that they do have a correct way around to wire in. There are a few holes on your MCB that will expel heat etc if there is a short circuit, if its wired the wrong way around these will not work when the circuit trips. On this particular circuit breaker which is a Chint 2A Type C MCB you need to have the line or supply going to 1 with the load on 2 I.e. the line going into the top and the load out the bottom. Why can’t they write that on the datasheet?
Here are some of the terms I typed into search to try to find an answer on this:
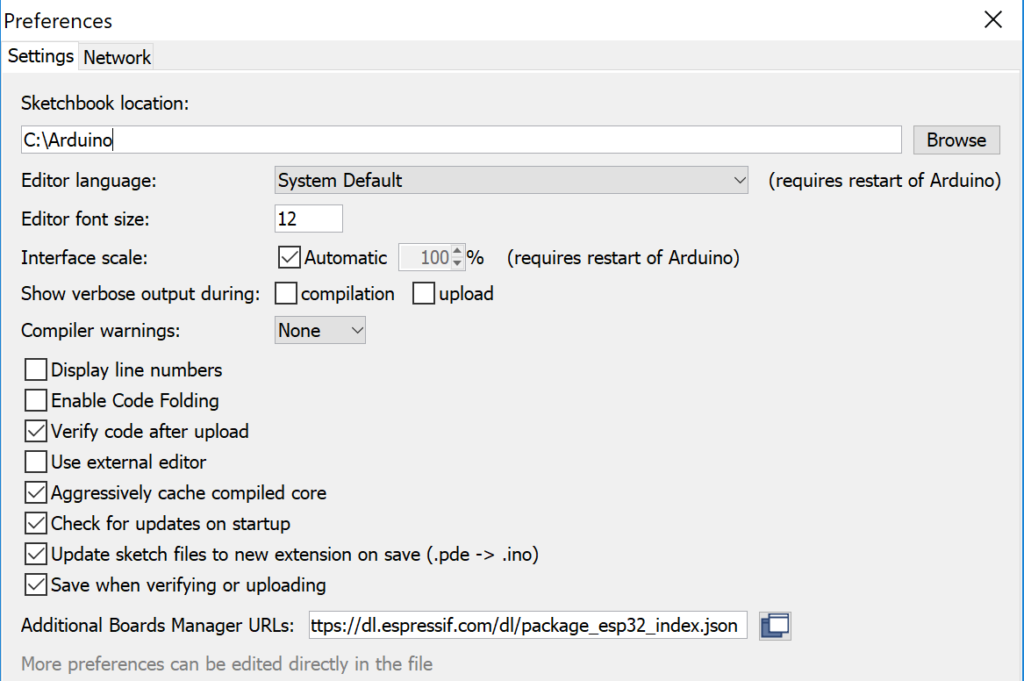
Got youself a new ESP-32 development board and wondering how you talk to it? The good news is that someone has done a lot of the hard work required to set up ESP-32 support in the Arduino IDE. The first thing we need to do is add the board manager files so that settings and boards relating to ESP-32 show up in the Arduino IDE. Go to File -> Preferences then enter https://dl.espressif.com/dl/package_esp32_index.json into the “Additional Board Manager URLs” field:
Adding ESP-32 additional boards manager to Arduino IDE
Note: if you already have the ESP8266 boards URL, you can separate the URLs with a comma in the above.
Open boards manager. Go to Tools > Board > Boards Manager…
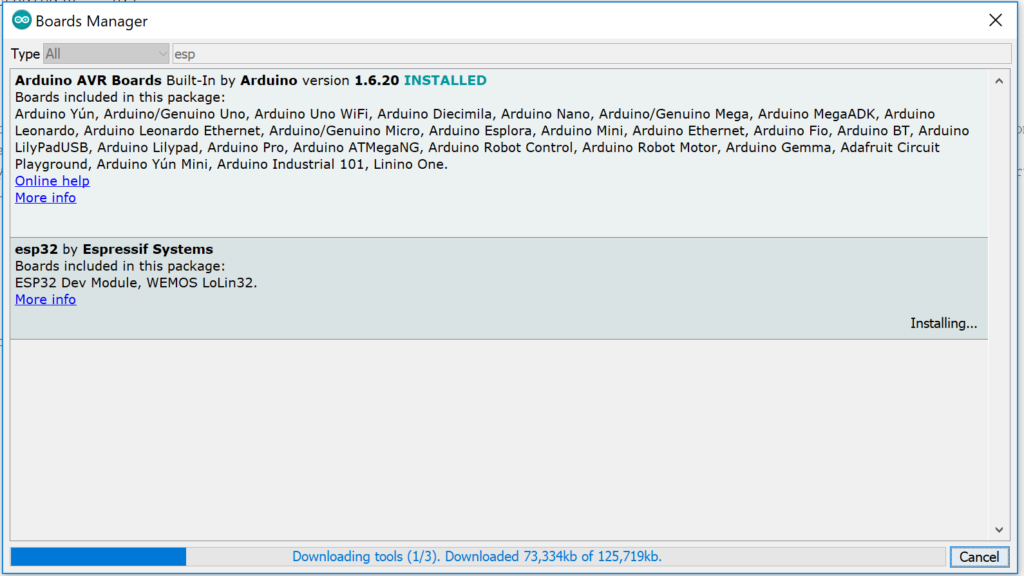
Search for ESP32 and press install button for the “ESP32 by Espressif Systems“ and hit install:
Installing ESP-32 Board In The Boards Manager
Select your Board in Tools > Board menu (in my case it’s the DOIT ESP32 DEVKIT V1)
Plug in the ESP-32 with USB cable to your computer.
Select the Port (if you don’t see the COM Port in your Arduino IDE) (tools->port).
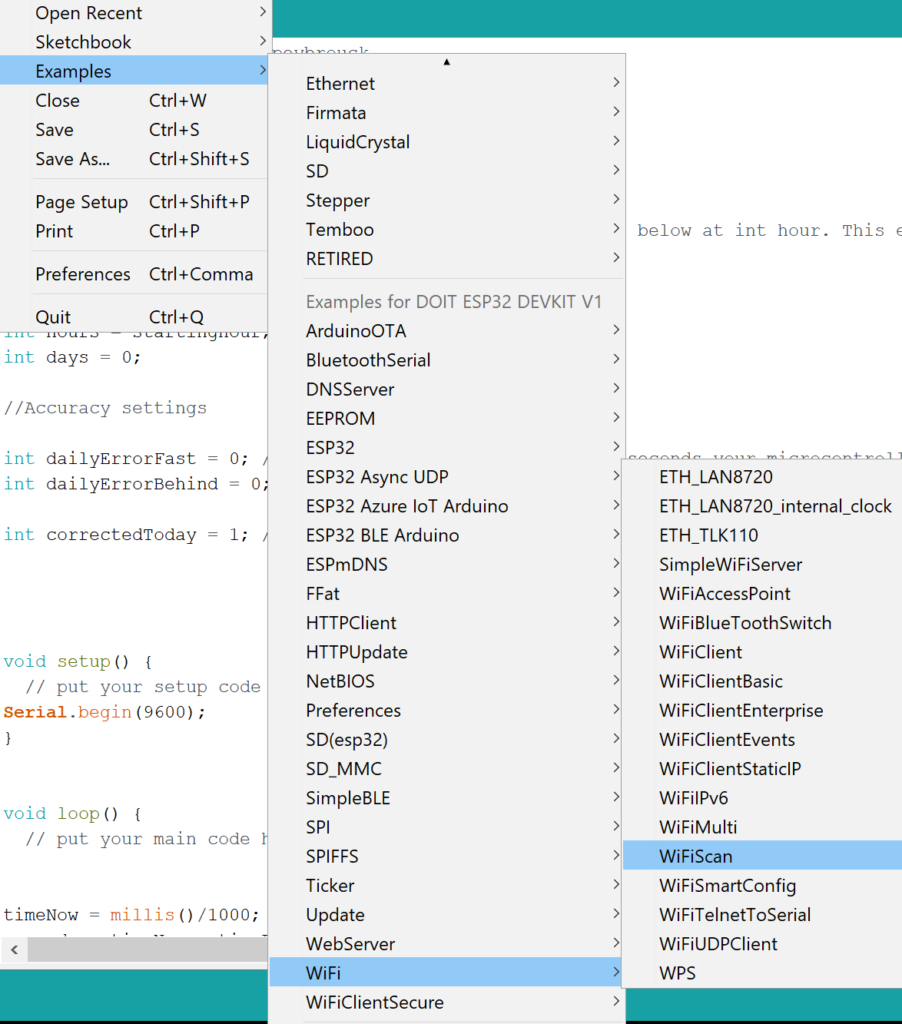
Open the following example under File > Examples > WiFi (ESP32) > WiFi Scan
Testing Your ESP-32 By Opening the WIFI Scan Example Project
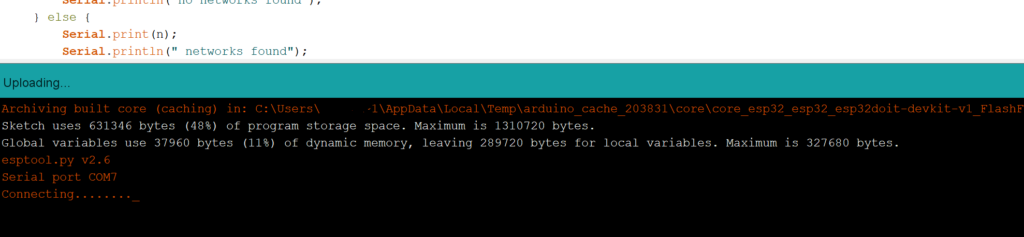
Press the Upload button in the Arduino IDE. Wait a few seconds while the code compiles and uploads to your board. When it says connecting…… press the boot button on the board and release. If that didn’t work hold the boot button before you press upload and release when it says connecting. I’ve even had some dev boards that need the enable button pressed instead, doing one of these will work, you just have to find which one.
ESP-32 In The IDE Waiting For Boot Button Press
If everything went as expected, you should see a “Done uploading.” message.
ESP-32 Done Uploading In The Arduino IDE
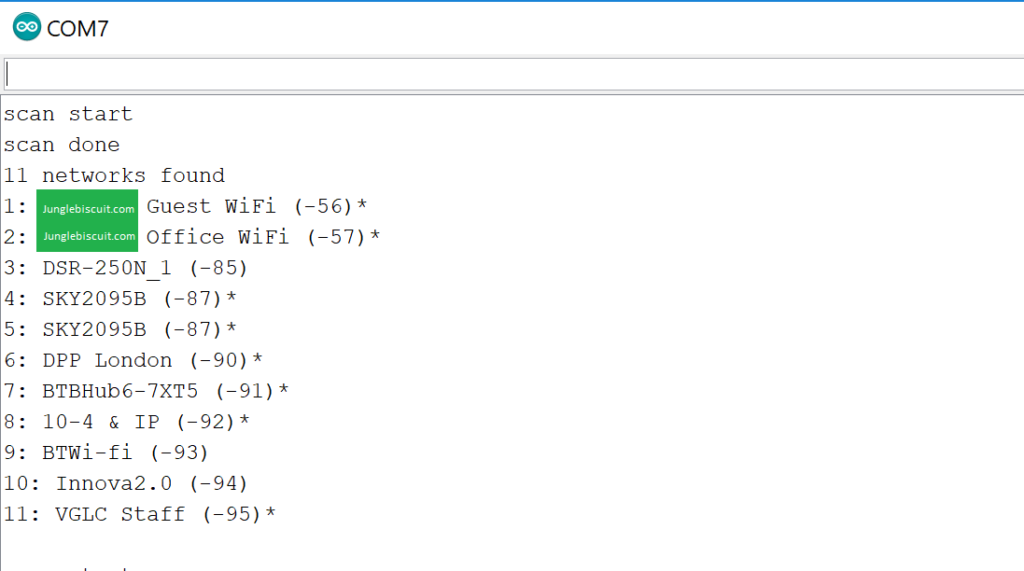
Finally just open the Arduino IDE Serial Monitor at a baud rate of 115200 and hey presto you should see it scaning for WIFI networks. You may need to press enable/reset button first:
Testing The ESP-32 Using WIFI Scan On The Serial Monitor
We use cookies to ensure that we give you the best experience on our website. If you continue to use this site we will assume that you are happy with it.Ok