This is a guide on how to do all of the skirmish/scenarios by level and the type of unit you need:
1 – Carver(10) 2 – Jellykiller(3), Blastmaster(2) 3 – Pyrebeast(7), Flame Stoker(1) 4 – Disciple(12), Tricrow(9) 5 – Spirited Fire(11) 6 – Stone Watcher(26) 7 – Disciple(18), Sneagle(7) 8 – Leech(24), Swamp Arrows(7) 9 – Voodoo(18), Equine Guard(8) 10 – Worm(30), Swamp Arrow(1) 11 – Blight Stinger(21) 12 – Automaton(30) 13 – Shah(1), Sand Devil(18) 14 – Spirited Fire(22) 15 – Bloodsucker(90) 16 – Spirit Serpent(1), Mutant Trogs(29) 17 – Goblin Guard(40), Gargoyle(10), Djinn(1) Note: Relies a bit on Djinn Spellcasting RNG, specifically getting good buff coverage via the Fortune buff – may take a few tries. 18 – Deadeye(20), Forest Spirit(49) 19 – Goblin Guard(21), Automaton(10), Djinn(1) Note: The most difficult mission currently IMO. Relies on Djinn Spellcasting RNG, – it has to be proc’d early and needs to have good coverage. It also relies on enemy Golden Buck Midas procs being low. May take many tries. Let me know if anyone’s found a consistent way of beating this. 20 – Spirited Fire(31) 21 – Archer(62), Wildspeaker(2) 22 – Spirited Fire(39) 23 – Flame Stoker(34), Canine(18), Shah(1) 24 – Spirited Fire(56) 25 – Wise(2), Trogs(45) Note: Relies a bit on Wise Spellcasting RNG, specifically getting good value from Evolve(Wise Spell) on Trogs. Might take a few tries. 26 – Hierophant(1), Carver(28), Lizarcher(17), Lizgennaire(13) 27 – Marksman(44), Swordsman(28) 28 – Harpooneer(15), Mutant Trogs(41) 29 – Bearguard(29), Seastars(58), Stingers(5), Seamare(1) Note: Seastars need to get access to the enemy hillkeepers and deadeyes – good positioning generally should make this strategy consistent. 30 – Aspect of Shadow(4), Wildkind(20), Flamestoker(188), Voodoo(46) Note: Actually pretty easy, as long as you have plenty of Flamestokers you can get away with any composition
Symptoms: Your character is occasionally grunting, your vision blurs, you have no blood gain and persistent health loss.
Cause: Getting a cut or treating a cut without disinfected bandages.
Cure: Use alcoholic or iodine tincture on the wound to disinfect it but that only works in the early stages of infection. In any case take Tetracycline as that should help it clear up.
Cholera
Symptoms: Your vision blurs, you are being sick and getting dehydrated.
Cause: Drinking unclean water.
Cure: This one takes a few days to cure, use Tetracycline. When you need to eat or drink take small bites or sips to avoid being sick again straight away.
Cold
Symptoms: The only symptoms are sneezing. If you have more than sneezing then its probably flu (influenza)
Cause: The common cold can be caught from other survivors or you can get it by being exposed to the elements i.e. not wearing warm clothes.
Cure: Use Tetracycline. It can go naturally but takes ages so tetracycline is the best method if you can find some.
Flu (influenza)
Symptoms: The main symptoms are coughing but you can sneeze and have a fever too.
Cause: The flu can be caught from other survivors or you can get it by being exposed to the elements i.e. not wearing warm clothes.
Cure: Use Tetracycline. It can go naturally but takes ages so tetracycline is the best method if you can find some.
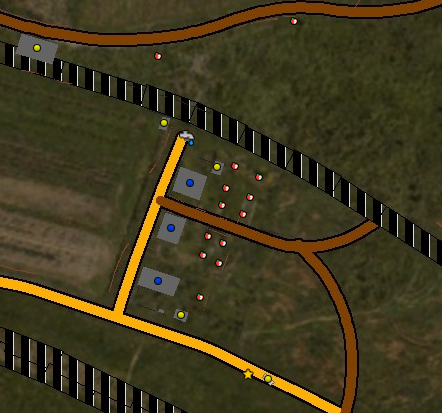
One of the main tips when starting as a noob on the beach is to find a water pump in a town or village and drink until you can’t drink anymore. Eventually, this symbol will show indicating if you continue then you will be sick, that is the time to stop and move on with your adventure:
Dayz Full Stomach Symbol
When you eat or drink, it first goes into your stomach. The stomach can hold 2000 millilitres of content. When the volume reaches 1500 the stomach symbol appears, and when you hit the 2000 limit, you’ll vomit to empty the stomach. If you stop eating before that though, it takes about 5 minutes to digest the food and turn it into energy and hydration. While the contents are being digested and drop below 1500, the stomach icon will go away. Filling up on water at the start of your journey will mean you can easily get away from the coast or do some serious looting without having to worry about your water level for a while.
If you find a water bottle in Dayz or a canteen of water I would not drink it straight away as there is a chance you could get a nasty disease, make sure you pour out any water that comes with it and refill at a pump. Receptacles can be filled and water can be drunk from ponds, lakes, dams and extracted from water pumps.
There is no need to disinfect bottles or canteens, disinfecting bottles does nothing. You can use chlorine tablets to get rid of the chance of contracting cholera from bottles of water that you have found containing water that is potentially infected. There is a chance of getting it from water pump too so using a chlorine tablet or taking a multivitamin pill before drinking is a great way to protect yourself. If you have been gutting anything and are not wearing gloves then make sure you wash your hands before drinking too as this can also lead to getting sick.
Another nice tip is to use some larger vessels like jerrycans or cooking pots to drink from, you can use 1 chlorine tablet on it but get to drink a whole lot more water. Drinking rainwater from barrels is 100% safe as well unless you pour contaminated water into it then it ruins the entire barrel and you can’t use chlorine tablets on it.
Normally when I’m a fresh spawn I’ve been close to death many times and one thing has saved my life – Scrumping! There are fruit trees everywhere in DAYZ though I will focus on three in particular the apple, pear and plum trees. You can find fruit on the floor next to the trees in various states either raw, dried or rotten.
Where are these fruity trees?
Fruit trees are everywhere and you can use one of the DAYZ interactive loot maps to find them, after a while you will start to recognise the trees and not need the map anymore. Generally I have found that most of the trees in a town and in gardens of houses are fruit trees so that is a good place to look. In some places there are orchards with loads of fruit trees in, generally with these it depends how big they are to how successful your fruit finding will be. Weirdly the bigger the orchard the less fruit you will find as I think they have the same amount spawning per area no matter how many trees there are.
What fruit can I eat?
As I said above the fruit spawns as either raw, dried or rotten. You can eat raw or dried fruit straight away without any danger of becoming sick. Though the dried fruit doesn’t look very appetising its actually very good for your food levels. Take the standard raw apple for example, when you eat it you get 100kcal food energy and 75ml of water. Eating a dried apple will give no water but 200kcal food energy which is double the raw apple. Cooking the apple does increase the food energy slightly but generally isn’t worth the effort.
Eating burned or rotten food will make you sick.
How often does Fruit Respawn?
Constantly! Pick a piece of fruit up, run around a little and come back to that same tree a moment later and it may have some more for you to pick up. There are some areas where you have a close patch of 10 or so trees where you can literally do a loop running around each one checking for fruit then it will keep respawning. Make sure you pick up all fruit, even rotten ones as doing so will allow more fruit to spawn there. Somewhere like this with a couple of houses and 10 or so trees is perfect for the scrumping loop:
The DAYZ Scrumping Loop
Happy scrumping and please do leave a message below if you have anything to add to help our fellow scrumpers survive this zombie apocalypse.
I don’t like to get stuck doing one particular thing in game and for that reason I’m a big fan of multipurpose ships. Multipurpose ships allow different ways of fitting to suit whatever role the player is aiming for whereas others are reasonably restricted by their abilities to a certain role be it combat, exploring, passengers, mining or carrying cargo.
You all start with a Sidewinder MkI which itself is a multipurpose ship and that is very much so you can try different roles, learn the game and decide what you like doing. I used the sidewinder to make some money and the next ship I went for is the Cobra MkIII which costs 349,718 CR but you will need a Mil or two to fit it well. I found its a great small ship that is manoverable and has many fitting points. As a result you can haul stuff with it, kill stuff with it and even turn it into a miner if you wanted to!
When you are ready to upgrade and you have enough credits to buy one and fit one I’d say the next best all-rounder is the Asp Explorer. It has a good amount of hard points, decent cargo space, amazing jump range and is medium sized. Though to buy the ship its 6,661,153 CR it will cost around 30M if you want to A-rate fit it.
Going up another level (though still classed as medium ships) your choice should be between the Python and the Krait MkII. If you are more into combat then take the Krait, if you are more into space trucking/mining then take the Python. The Krait will cost you 45,814,205 CR and Python will cost you 56,978,180 CR but, as above, make sure you have a lot more than that to cover fitting and upgrading. Modules cost a lot more for these bigger ships!
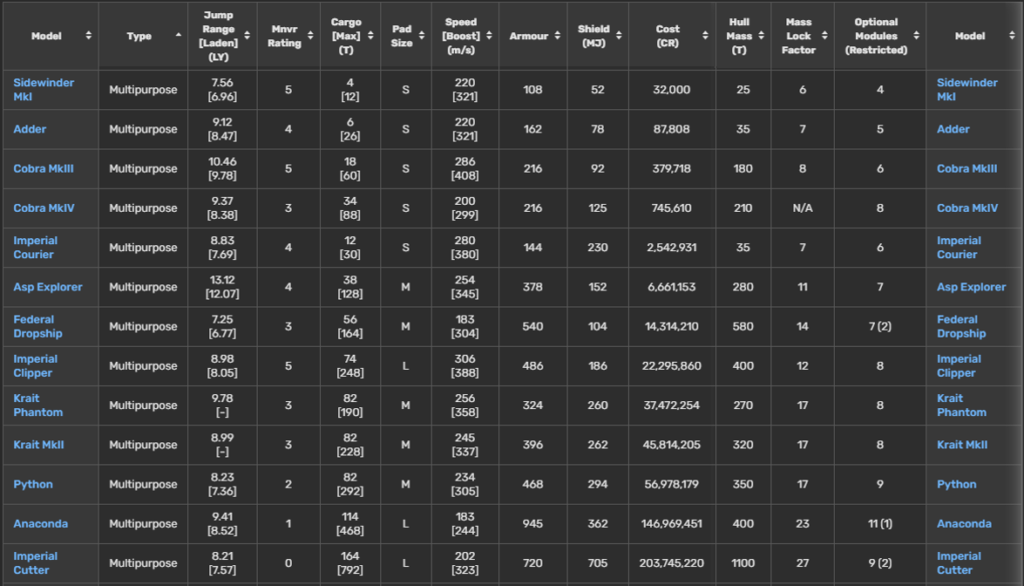
Hopefully that gives you a good path if you are like me and favour the multipurpose ship. Keep in mind that everyone is different and there are pros and cons to all ships so its important to do a bit of research before jumping in and buying one. Finally here is a table from the Wiki showing all of the multipurpose ships currently available and a link to the Wiki page showing comparisons of all ships:
Command and Conquer was a game I played religiously as a child in the 90s, the good news is that in May 2020 they remastered it and online play is back with a bang. The downside is that I am older now and had long forgotten all of the strategy and tools I used to use to win. Well after a couple of months playing and re-learning my methods I can share a few good tips to get you going online.
There is no one method that will beat every opponent in every scenario on every map but I’ll walk you through a good strategy thats seen me win more than I lose and should give you a good idea where you have been going wrong and what to do to correct it. Lots of other guides will tell you to do things like get an APC and fill it with tanyas/engineers then sneak it into the enemies base and that can work but that has one major problem, if they kill the APC or kill the units before you have done enough damage then you lose as they will walk over your base in a few seconds.
Most Red Alert online games basically boil down to who can build the most tanks in the midgame and use them in the most efficient way. When you attack another player with your tanks you want to outnumber them and out maneuver them to be able to take down their tank army then you will be able to roll over the base unchallenged.
Early Game
Build your command centre then build a power plant then build a barracks.
Barracks, scouts and man rushes:
Scouting is very important as revealing large parts of the map early on gives you an advantage. For scouting build minigunners and sent one to each corner of the map and some inbetween too. Sometimes a man rush can work early on so you could build 20 minigunners (in addition to the scouts) then send them to another base as quick as possible in the hope of taking down an early building or two. Watch out for other people manrushing you – If they do this make sure you spot it early and build lots of minigunners to defend against it or a well placed pillbox. A good idea is to dot a few minigunners around your base as one stationary minigunner can take out multiple enemy minigunners running past. When scouting, placing minigunners or man rushing an enemy its extremely important you are building at the same time, do not let it distract you from building your base and getting to the next stage.
Ore refinaries, war factories:
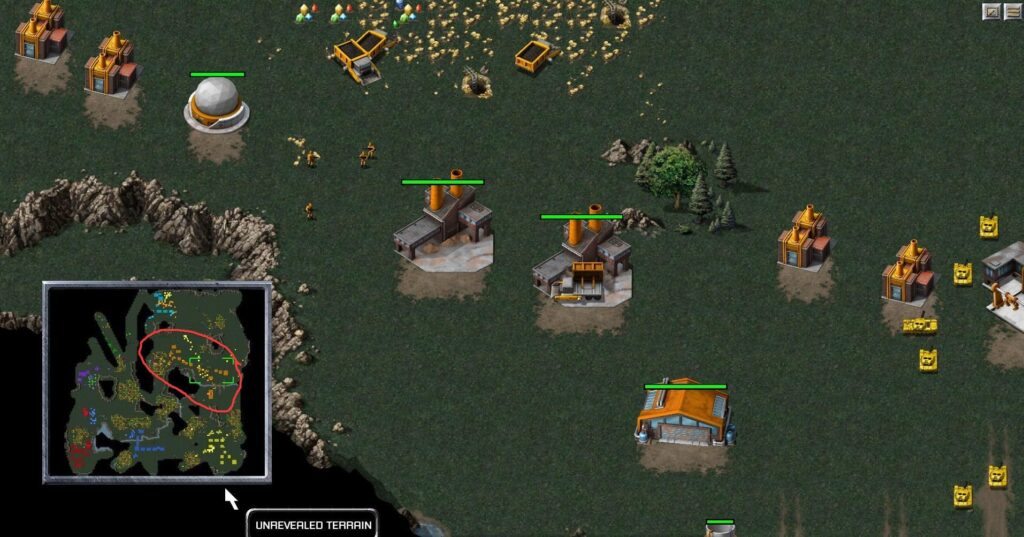
After you’ve built your barracks you need to focus on economy so build an ore refinary as close to an ore field as possible. This is one of the key things people don’t do well sometimes, they think they should have their base huddled in a corner with loads of tessla coils/pillboxes/turrets protecting it. Wrong. Only build tessla coils/pillboxes/turrets if you need to handle a situation like with the man rush example above. In terms of placing your buildings the best method is to snake them out accross the map to reach further ore fields. It may make you slightly more vulnerable if someone attacks but the benefits outweigh the risks big time as you will have access to much more ore therefore can grown your economy quicker and better economy ultimately means more tanks!
C&C Red Alert – Tips To Place Buildings and Snaking Accross the Map
Talking of tanks you need to place a war factory next though first thing out of the war factory should normally be a second harvester unless you are planning on sending a load of early tanks to your opponent or defending against a load of early tanks from your opponent. Early tank attacks can be successful though you will greatly sacrifice your economy by doing so. Its best to build a couple of extra harvesters before mass producing the tanks as you will very quickly burn through your cash once you start scaling up production (covered in next section).
Middle Game
Extra ore refineries and extra war factories
Ok you got the first bit sorted, scouts have flown to all corners revealing roughly where your opponent is, moneys coming in and tanks are rolling out. Building another ore refinery is good as you get a harvester with it and somewhere new to dock, it also makes it easier to farm some of the new ore fields you have been building towards (see snaking above). We need to speed up production now and build a radar at some point too. The way you speed up production in this game is by building more of the same type of buildings. So next thing to do is build a second war factory, this will double the speed your tanks are created. Obviously this is good as will mean massing huge army quicker but also it will eat more funds so make sure you have the ore refineries and harvesters to support it. A good rule of thub is one war factory to one ore refinery plus extra harvester. I don’t normally do this but you can even build a second command centre which means you can create buildings at twice the speed too!
Radar
Radar is important but its very difficult to guage exactly when to build it. Radar will mean you have a heads-up when opponents are moving towards you and also makes it easier for you to move your units accross the map. By this point your opponent may start to prod your defenses and you may have prodded your opponent a bit and movement is key to getting to the end game. Sometimes rather than battling your tanks in the middle of a map they may drive straight past into your base to try to take down a building or two and you then need to decide do I defend my base or do I counter attack? Whatever you do make sure the whole time you are building new buildings and mass producing the tanks. Often if someone tries to brute force into your base past your army they will get a building but while they are doing that you can destroy the majority of their tanks which in turn will leave their base vulnerable.
End Game
The end game is when you and your opponents have set up a nice base, your production lines are flowing and now its time to seal the deal. Most of the time I play the destroy structures mode which means when you have destroyed all of your opponents structures then the game is yours. You can also play where all units and structures have to be destroyed but this can become tedious trying to find that minigunner hidden in a tree.
This phase mostly boils down to who has built the best economy, you will have had some battles by now losing some units and even some buildings, its who can build up again after that and get the advantage. You need to think about being proactive, not waiting until your opponent makes a move. If you see a load of tanks coming towards your base do you use all of your resources defending? Or do you send all of your resources to their base? The answer very much depends on which option is most likely to result in a win but defending alone is not going to win, you need to be able to launch an attack after defending. If you are playing with team mates and you see an opponent make a move like that it means their base is vulnerable so could have one defending the attack while the other sneaks in behind and attacks their base.
Don’t give up, sometimes it may look like the opponent is winning, they have destroyed your command center and you have lost a lot of your army but they often pay a heavy price driving a load of tanks through your base and would have lost a good portion of their army too. I’ve seen games won with only one building left on the map so do everything you can with the bits you have left!
A Good Example Build Order
Command center
Powerplant
Barracks -> scouts -> base perimeter protection -> man rushes (optional)
Ore Refinery
War factory -> Extra harvester -> 8 tanks -> Extra harvester -> TANKS TANKS TANKS