Understanding the MCB and which way to wire it

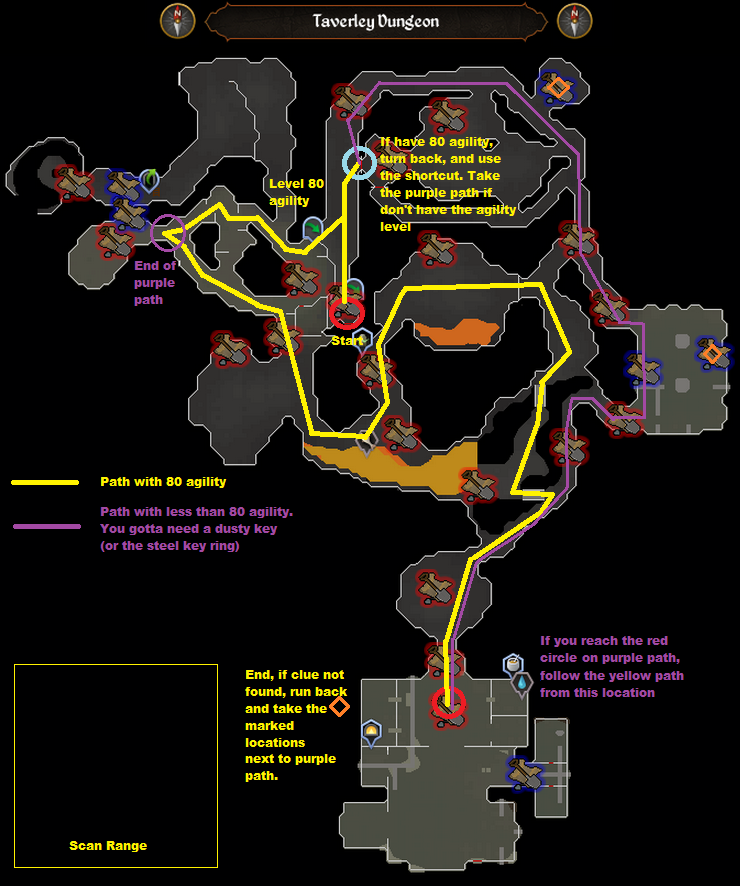
First of all a disclaimer, if you don’t know what you are doing with electricity or are not sure then its always best to get an electrician to do the work or check the work for you before you turn it on as it can kill or injure you.

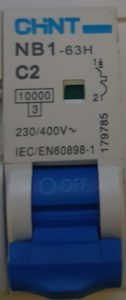
Now I am a qualified electronic engineer so know how to deal with things at component level but sometimes I have to dabble with electrical items too and am not so competent. For this task I had to install a small single pole type C Miniature Circuit Breaker (MCB) as one of my projects and had a few problems at first understanding which way around to wire it as the manufacturers documentation didn’t say and the device had no indication on it except for a small symbol here:

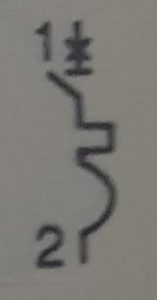
What does the electrical MCB symbol mean?

Now some of you electrician types are probably saying “ah thats easy, you are a fool if you don’t know what that means and shouldn’t even be touching electricity”. Well you may be right but the good news is that I worked it out and thought it worth sharing as the internet wasn’t too helpful on this. So the top bit is showing a little lever with an X – This is a switch, the big on/off blue thing you can see in the photo above. Great thats one part but what do the two bits below mean and then onto the important question, how do I wire it? Well the next item down shows a square/rectangle symbol, this is the symbol for a thermal device. So its detecting if there is too much curent and when there is it will get too hot and will do something. The final piece of the puzzle is the curve half-circle like symbol underneith, this is actually the symbol for the circuit breaker itself. So the image tells us a nice little story, when the switch is on, it will be letting current through to the thermal sensor and if too much current goes through it will produce heat which will cause that curve to fire away like a rocket which will break the circuit and flip the switch off.

How do I wire it? Which way around does it go? Is line 1 and load 2 or is it the other way around?

Well the MCB will trip if the current exceeds its limit whichever way around you wire it but saying that they do have a correct way around to wire in. There are a few holes on your MCB that will expel heat etc if there is a short circuit, if its wired the wrong way around these will not work when the circuit trips. On this particular circuit breaker which is a Chint 2A Type C MCB you need to have the line or supply going to 1 with the load on 2 I.e. the line going into the top and the load out the bottom. Why can’t they write that on the datasheet?

Here are some of the terms I typed into search to try to find an answer on this:

  • single pole mcb wiring
  • single pole mcb wiring chint
  • single pole mcb wiring chint which side
  • mcb load side wiring diagram
  • mcb load side wiring diagram chint
  • wire up chint mcb
  • mcb schematic
  • mcb schematic chint
  • mcb schematic chint load top or bottom
  • single phase mcb connection diagram
  • mcb load symbol
  • mcb load symbol supply
  • mcb operation symbol
  • mcb operation symbol supply load
  • mcb how to identify supply and load
  • mcb wiring top or bottom
  • type c mcb connection
  • mcb load and line symbol
  • trip unit breaker symbol
  • electrical symbol for load circuit breaker
  • electrical symbol for line circuit breaker
  • electrical symbol mcb wiring

How to Setup an Esp-32 in the Arduino IDE

Got youself a new ESP-32 development board and wondering how you talk to it? The good news is that someone has done a lot of the hard work required to set up ESP-32 support in the Arduino IDE. The first thing we need to do is add the board manager files so that settings and boards relating to ESP-32 show up in the Arduino IDE. Go to File -> Preferences then enter  https://dl.espressif.com/dl/package_esp32_index.json into the “Additional Board Manager URLs” field:

Adding ESP-32 additional boards manager to Arduino IDE

Note: if you already have the ESP8266 boards URL, you can separate the URLs with a comma in the above.

Open boards manager. Go to Tools > Board > Boards Manager…

Search for ESP32 and press install button for the “ESP32 by Espressif Systems“ and hit install:

Installing ESP-32 Board In The Boards Manager

Select your Board in Tools > Board menu (in my case it’s the DOIT ESP32 DEVKIT V1)

Plug in the ESP-32 with USB cable to your computer.

Select the Port (if you don’t see the COM Port in your Arduino IDE) (tools->port).

Open the following example under File > Examples > WiFi (ESP32) > WiFi Scan

Testing Your ESP-32 By Opening the WIFI Scan Example Project

Press the Upload button in the Arduino IDE. Wait a few seconds while the code compiles and uploads to your board. When it says connecting…… press the boot button on the board and release.  If that didn’t work hold the boot button before you press upload and release when it says connecting. I’ve even had some dev boards that need the enable button pressed instead, doing one of these will work, you just have to find which one.

ESP-32 In The IDE Waiting For Boot Button Press

If everything went as expected, you should see a “Done uploading.” message.

ESP-32 Done Uploading In The Arduino IDE

Finally just open the Arduino IDE Serial Monitor at a baud rate of 115200 and hey presto you should see it scaning for WIFI networks. You may need to press enable/reset button first:

Testing The ESP-32 Using WIFI Scan On The Serial Monitor

Runescape – The most efficient route for elite scan clues

I seem to do clue scrolls in waves, specially now they stack nicely and go in the clue carrier. Every time I got back to doing a batch I’m never sure which route to take when running the elite scan location clue scrolls. The images below should help! One of the missing maps is is Menaphos – For this one start at the lode then run to imperial district and right click the tomb entrance, go to one of the other districts then repeat for all three. Most of the time the clue will show but if not then you only have a few places out of range you need to run to.

Runescape - Varrock - Elite Clue Scan Route
Runescape – Varrock – Elite Clue Scan Route
Runescape - Zanaris - Elite Clue Scan Route
Runescape – Zanaris – Elite Clue Scan Route
Runescape - Tirannwn Elf Lands - Elite Clue Scan Route
Runescape – Tirannwn Elf Lands – Elite Clue Scan Route
Runescape - The desert, east of the Elid and north of Nardah - Elite Clue Scan Route
Runescape – The desert, east of the Elid and north of Nardah – Elite Clue Scan Route
Runescape - Taverley Dungeon - Elite Clue Scan Route
Runescape – Taverley Dungeon – Elite Clue Scan Route
Runescape - Piscatoris Hunter Area - Elite Clue Scan Route
Runescape – Piscatoris Hunter Area – Elite Clue Scan Route
Runescape - Mos Le'Harmless - Elite Clue Scan Route
Runescape – Mos Le’Harmless – Elite Clue Scan Route
Runescape - Kharazi Jungle - Elite Clue Scan Route
Runescape – Kharazi Jungle – Elite Clue Scan Route
Runescape - Keldagrim - Elite Clue Scan Route
Runescape – Keldagrim – Elite Clue Scan Route
Runescape - Haunted Woods - Elite Clue Scan Route
Runescape – Haunted Woods – Elite Clue Scan Route
Runescape - Fremennik Isles - Elite Clue Scan Route
Runescape – Fremennik Isles – Elite Clue Scan Route
Runescape - Brimhaven Dungeon - Elite Clue Scan Route
Runescape – Brimhaven Dungeon – Elite Clue Scan Route
Runescape - Ardougne - Elite Clue Scan Route
Runescape – Ardougne – Elite Clue Scan Route

The chaos tunnels below has now been removed as a scan path (thank the lord!). here is the old map:

Runescape - The Chaos Tunnels - Elite Clue Scan Route
Runescape – The Chaos Tunnels – Elite Clue Scan Route