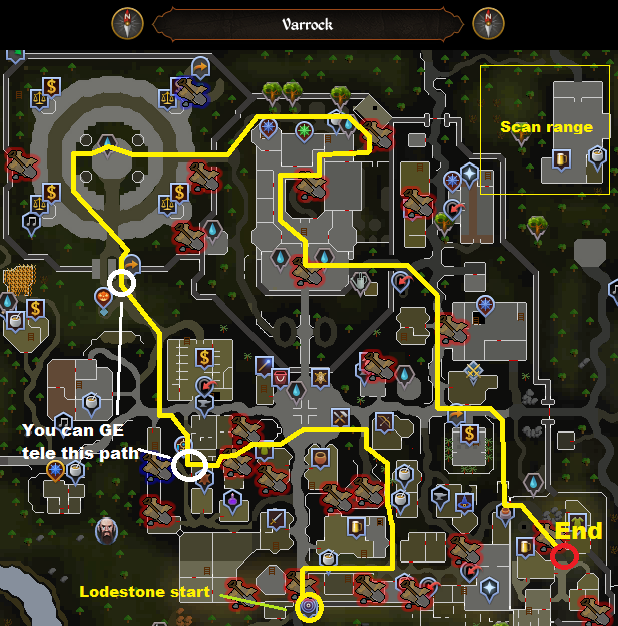
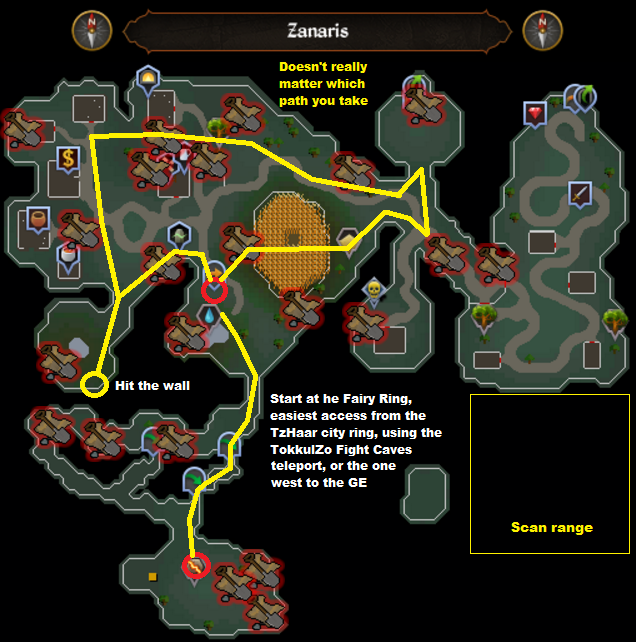
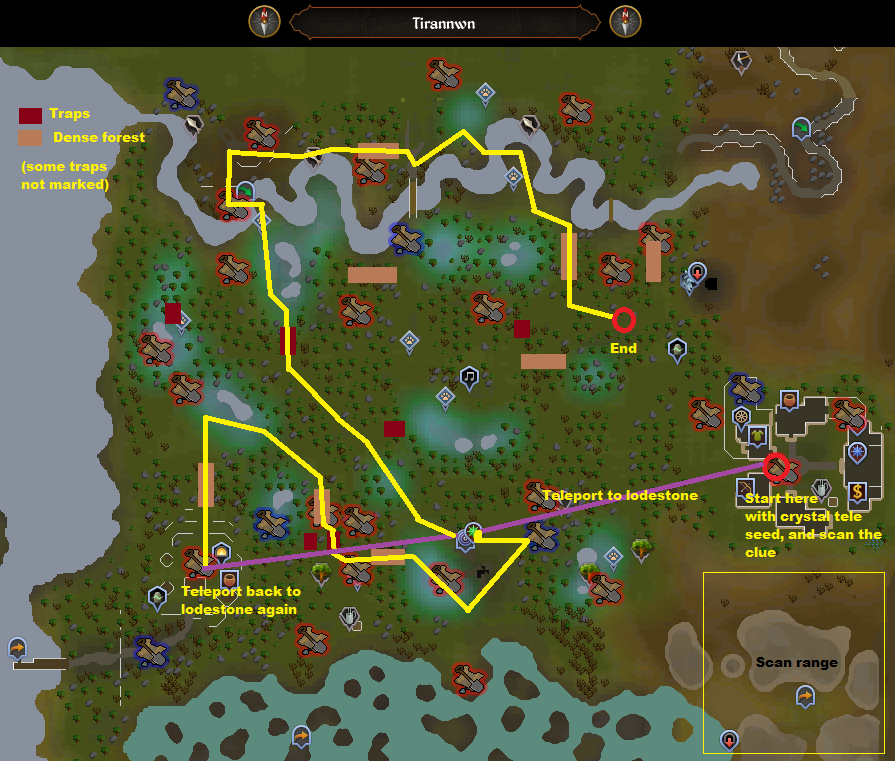
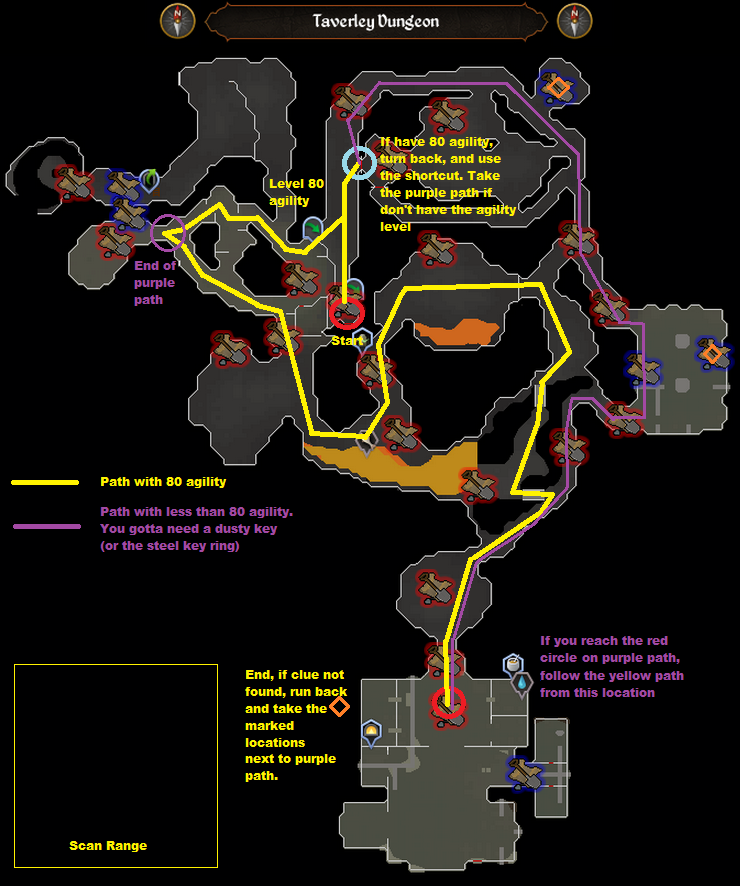
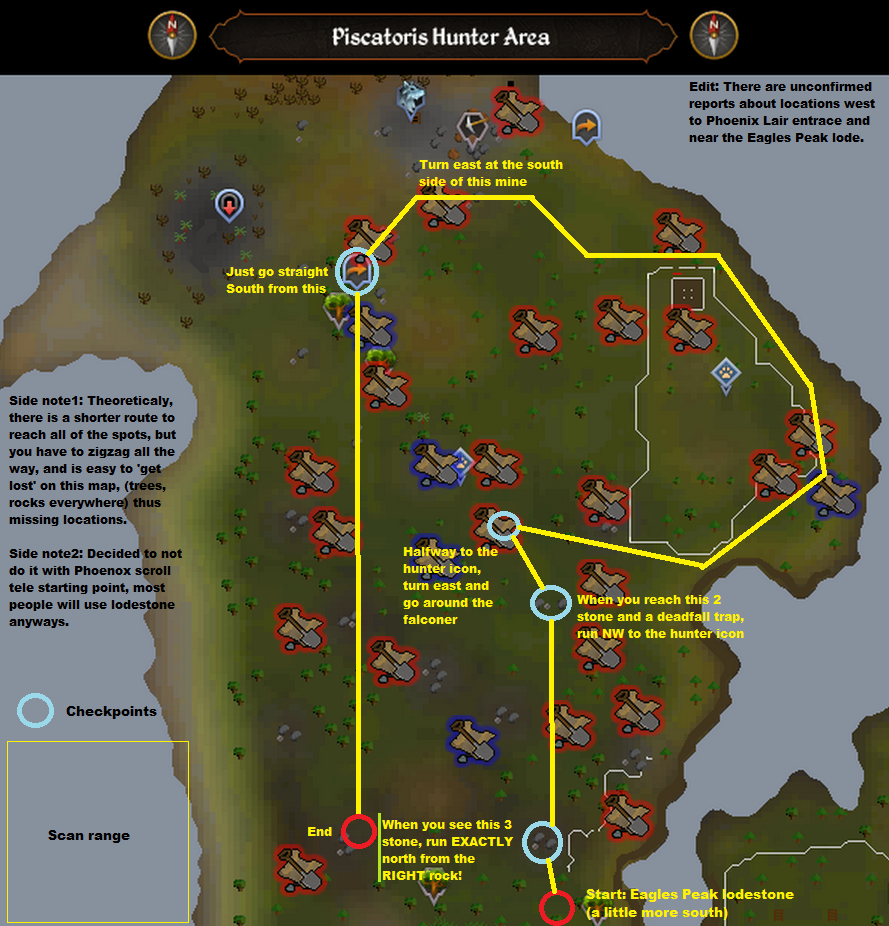
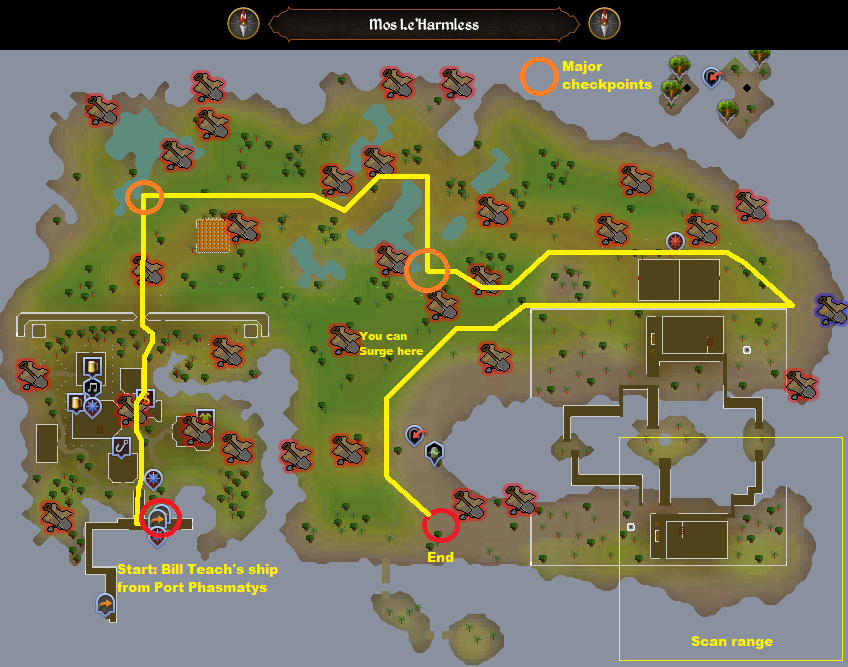
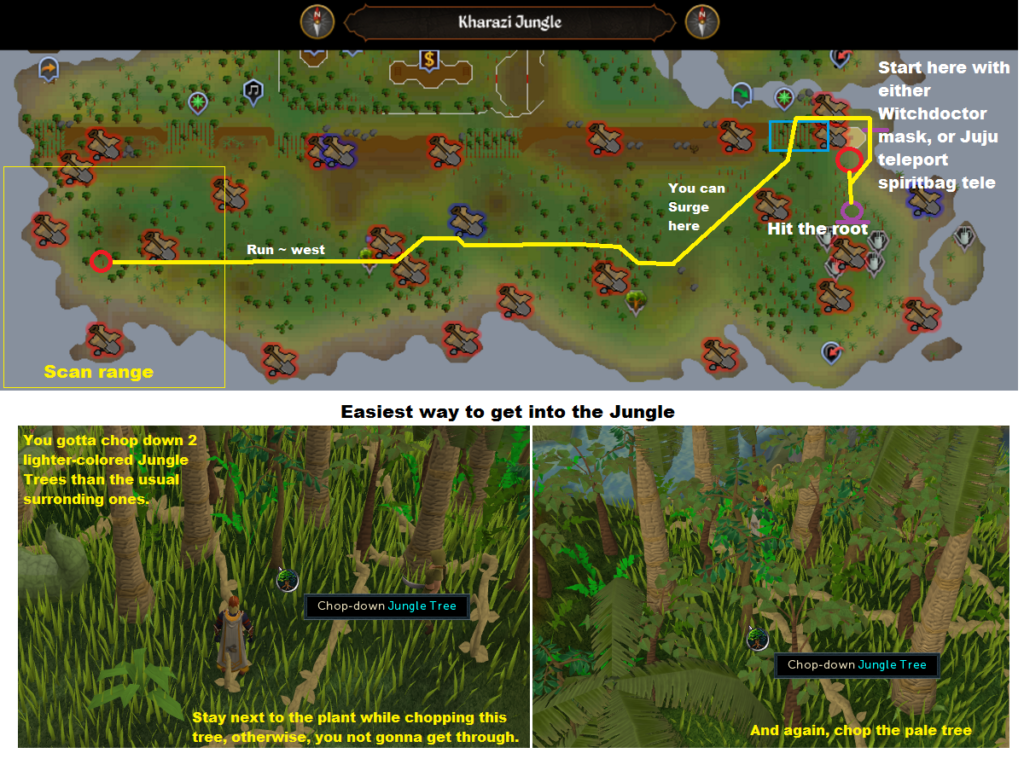
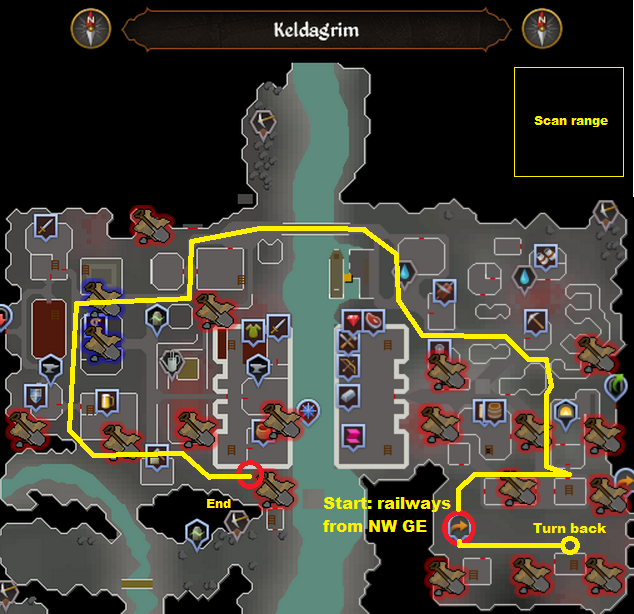
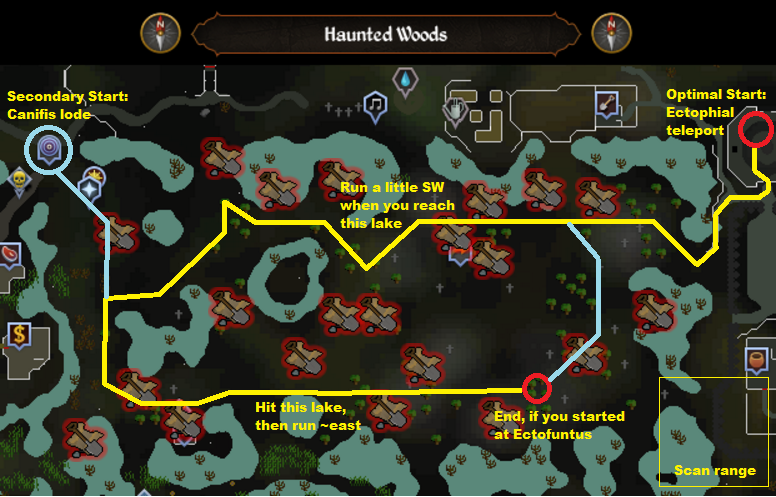
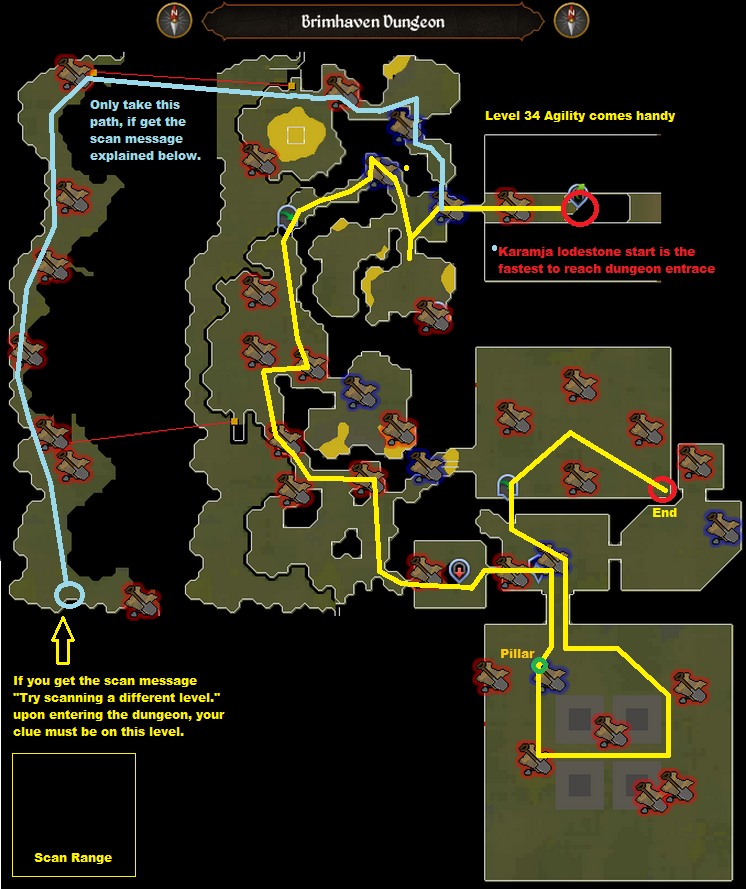
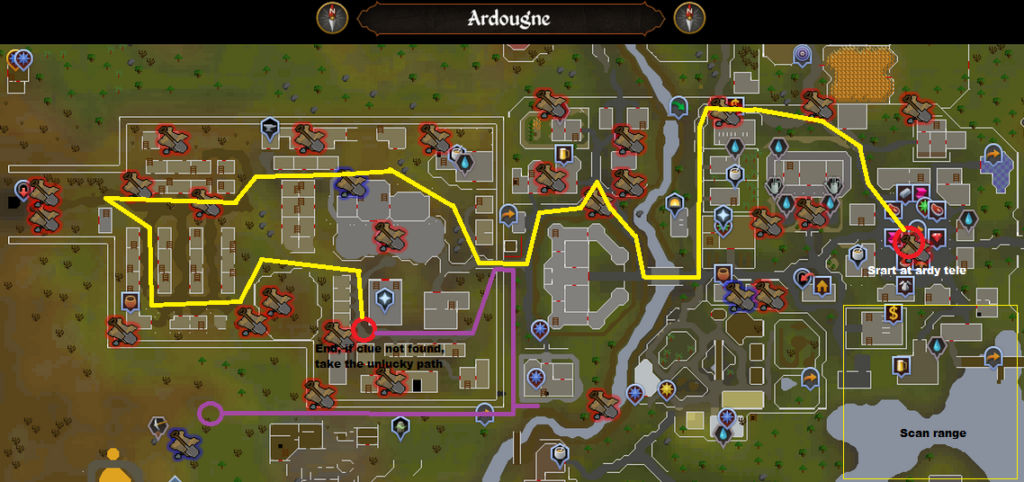
I seem to do clue scrolls in waves, specially now they stack nicely and go in the clue carrier. Every time I got back to doing a batch I’m never sure which route to take when running the elite scan location clue scrolls. The images below should help! One of the missing maps is is Menaphos – For this one start at the lode then run to imperial district and right click the tomb entrance, go to one of the other districts then repeat for all three. Most of the time the clue will show but if not then you only have a few places out of range you need to run to.
Invention is tricky to understand with all the different components and its difficult to know what combines with what to get something that may help you get a bit more damage in combat or a few useful perks. There are lots of spreadsheets out there and posts but they seem to be written in code most of them so I’ll try to go through from a beginners point of view to help you understand how to start perking your armour and weapons and a suggest few nice ones to add to help start out.
First Step – Augmenting
The first thing you need to do to your weapon or armour is augment it. You can make an augmentor or buy it on the grand exchange. To make it you need divine energy, base parts, flexible parts, tensile parts, enhancing parts and powerful components. These all take time to get so if you don’t have time or have money then just buy one on the grand exchange. Once you have one just use it on your weapon or armour piece you want to augment and it will turn into an augmented version ready for the next step.
Second Step – Gizmos
So gizmos are things you need to make and on them you can generate perks which then attach to the augmented armour or weapon to provide a bonus. To start with you need to make gizmo shells (you can’t buy them). There is a weapon gizmo shell and an armour gizmo shell, you can also get a tool gizmo shell which I won’t be covering in this post. You make the weapon gizmo shell with blade parts, crafted parts and strong components at the invention bench. You make the armour gizmo shell with deflecting parts, crafted parts and protective parts at the invention bench. Once you have the shells then you can click on them “add materials” to get to the next step.
Update: If you have invention level 85 then you can use ancient gizmos. These need to be unlocked via a blueprint you can make or buy on ge but give access to more material slots and allow the use of ancient materials.
Third Step – Adding Materials
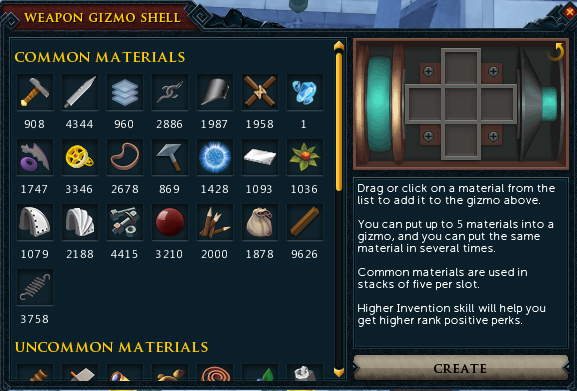
So clicking “add materials” on a gizmo shell will bring up a new window:
Runescape Adding Materials To a Gizmo Shell
As you can see from the image above, you click or drag the materials onto the five slots to see what possible perks you can get and then can create it if happy. When you click create you will not necessarily get the top one and may have to re-roll it a few times until you get what you want, you can also fail it. If you have enough materials to try again it will let you re-roll on another gizmo shell but it will use a new one, not the previous one. “But how the hell do I know what materials to add for what perks?” I hear you cry. Well that depends what you want to get out! In the next section I give some tips for those who want to add stuff but don’t want to research the full ins and outs of whats available.
Non-elitist Ok Perks To Get Started
On an augmented two handed weapon you can add two weapon gizmos, otherwise you can add one gizmo to main hand and one to offhand. Generally I would aim for precise and aftershock perks on weapons if you are after adding extra damage. The pros go for Precise 4 + Equilibrium 2 in one slot and aftershock 3 in the other but you don’t have to get those exact numbers, even aftershock 1 is better than nothing.
On armour you can have two gizmos on legs and two on tops. The main ones to aim for are crackling, enhanced devotion, impatient and biting. The pros will go for things like biting 3 which requires nox components and is too expensive for my tastes but you can get biting 2 for nowhere near the cost and is very helpful.
Weapons – Precise Perk
So to make the first one you want precise really, you can use precise 1-5 on its own instead if you can keep re-rolling until you get what you want. To get precise 5 add 5 armadyl components to the gizmo shell. You can’t get that many have a look at the other suggested combos on the wiki page which includes getting equilibrium with it:
Now aftershock perk can seem expensive as you need to use Ilujankan components which come from Anima Core Zaros items which are 18mil at the time of writing but only get you 1 component for disassembling but don’t panic, there is a way to get more. You buy an Anima Core Legs of Zaros and Anima Core Body of Zaros then augment them both (you don’t need gizmos on them). Then level them up to level 9 in combat and disassemble which will give you more Ilujankan components and enable you to make this expensive perk. More details and combos on the wiki page:
Crackling 3 is great and can be reasonably cheap to get by using explosive components gathered by disassembling hand cannons. Even if you only have crackling 1-2 its better than nothing. You can get it with secondary perks too as shown on the wiki:
This one is gained by using Faceted components which can be gathered by disassembling crystal items. A cheaper way to do it is by disassembling crystal flasks or light orbs. You can get enhanced devotion 2-3 quite easily:
https://runescape.wiki/w/Enhanced_Devoted
Armour – Impatient
Now this one can cost some money as it needs Zaros components and Zamorak components specially if you are after 3, I would go for 1-2 to start with as its a lot cheaper:
Now as I said above biting 3 is not worth it for most people but biting 2 can be got quite easily and cheaply using direct components. You can also try to get it with a secondary perk like venonblood/reflexes/mobile. The compnents you need for this are suggested on the wiki:
Now if you have learnt anything from this I hope it is that perking is worth it and doesn’t have to be expensive. Start with adding a few small cheap perks to get the hang of it and you can easily replace them over time when you get more cash or components.
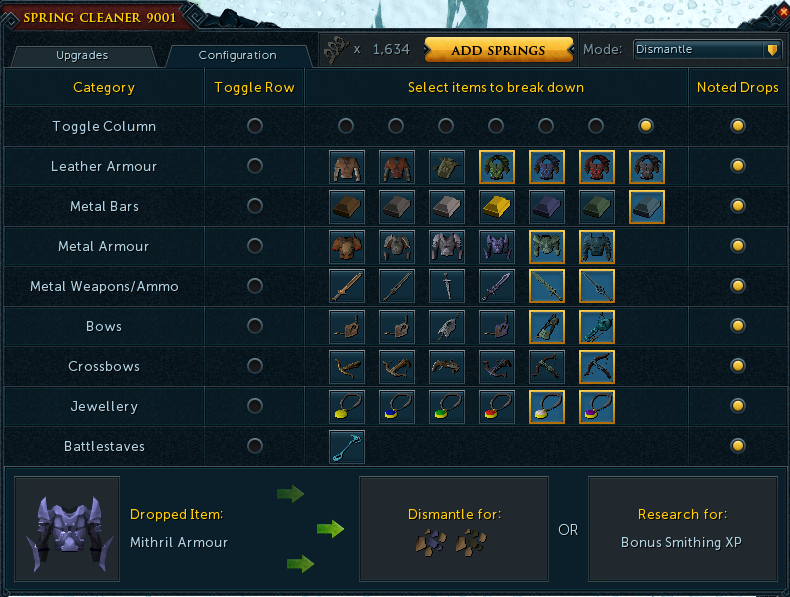
The Spring cleaner is an item I use a lot and make a lot of cash from, it can be confusing to set up and understand how to use it so here are some words and pictures to help you!
Where to get it?
You can get it from invention at level 43 or I think they still dish it out on treasure hunter now and then. If you have it sitting in bank then you should definitely start using it 🙂
Should I upgrade it?
Answer is yes you want the max upgraded version to Spring cleaner 9001 as it dismantles noted drops too then and you can get it instantly by buying springs on GE but its expensive (10K springs needed!) so don’t worry if not – Start using it anyway and it will upgrade as you go.
AHHHH WHAT DO I DO WITH IT, THERE ARE TOO MANY SETTINGS?
Don’t panic – All you need to do is set it up first time and then just take it with you on slayer tasks or even to boss kills and it will start dismantling stuff and sending the ore etc to your bank (so saves picking stuff up too!).
There are two modes, I only use dismantle mode. The rest is personal choice on what you want to dismantle and what you don’t. To start off copy my settings below and off you go:
Runescape Spring Cleaner Configuration Settings
Make Money
So you will see messages appearing and have stuff appearing in your bank which is generally worth more than the normal drop! I got this today with a bit of combined luck of dwarves ring so it does work:
Press “L” to toggle lock/unlock interface in order to drag, resize and re-arrange your UI. Gameplay – make yourself familiar here. A lot of useful settings here. Worth mentioning are area looting & the different skilling options. Interface Settings – toggle slim headers, XP pop-ups, show reset timers and make X progress to mention a few. Controls – customise keyboard and mouse sensitivity, keybinds and toggle camera type. Graphics Settings – graphic settings. Audio Settings – audio settings. Combat Settings – select combat mode and which stats to recieve XP in for the combat styles.
General recommendations
Slim headers – what do we need large headers for? Gameplay settings – take a few and make yourself familiar here. Many useful QoL settings. Lock interface when not editing.
How to create a customized UI
1. Start out by resetting your current UI by going to the main menu (ESC) then go to “Quick Load Layout” and select “Retro”.
2. Resize the game window so it is exactly as you would like it. Personally I have my game window occupying 70% of my screen. Ignore this if you play on fullscreen.
3. Main menu then “Edit Mode” then “3D World Editing”. Resize your “Game View” to something like this. (we will get back to this later).
4. Now open everything you want accessible at all times while playing RuneScape. It will look messy at first don’t worry – we will make this look good.
5. Play around with the placement and sizes of your interfaces boxes. This may take some time and you may have to change the “Game View” several times.
6. Main menu then “Edit Mode” then “Gameplay HUDs Editing”. Change the placement and sizes of the different HUDs.
7. Congratulations with your new interface!
Tips & Tricks
If your gameplay is stuttering go to “Controls” then check that your camera type is set to RS3.
Tasks can be for rescources gathered on the Arc/Uncharted Islands
All rewards include 150 chimes (except collecting tasks)
Sometimes contracts award 1-2 taijitu
Task | Amount | Reward
Chop Bamboo (35-95) 12,600–34,200xp
100 bamboo per tree:SUPPLIES:
Cook Oil (12-40) 11,220–37,400xp
Craft Bowls (12-40) 11,220–37,400xp
Harvest Energy (35-95) 10,150–34,200xp
300 energy per spawn
Fish Wobbegong (35-95) 12,600–34,200xp
100 wobbigongs per spawn
Fletch Bundles of Bamboo (12-40) 11,220–37,400xp
Catch Tortles (35-95) 12,600–34,200xp
207 shell chippings per spawn
Mine Salt (35-95) 12,600–34,200xp
110-130 salt per spawn
Slay acolytes of Seiryu (35–100) 25,900–74,000xp
as well as 2-8 Slayer points
Producing Chimes
Make Shark Soup with
1 x Shiny Tortle Shell Bowl
Crafted with 4 shiny shell chippings
1 x Bundle of Bamboo
Crafted with 2 golden bamboo or 5 regular bamboo
1 x Sliced Mushrooms
# of mushrooms used varies
1 x Wobbegong Oil
Made with 2 wobbegongs
1 x Alaea Salt
From mining Alaea Crabs on Uncharted Islands
Transmuting
Ancestral Energy can be converted to another resource.
Unlocks
Sold by Boni, who can be found on Waiko next to the bank.
For Taijitu do Long Voyages (costs 20 SUPPLIES)
Hanto Armour Set
Chest/Legs/Helm/Gloves/Boots
Cost: 90 Taijitu & 60,000 chimes
Hanto Weapons
Winds of Waiko/Thalassia’s Revenge/Rage of Hyu-Ji
Cost: 50 Taijitu & 25,000 chimes (each)
Broken Home – BIS Ring (ASR)
Plagues End – Access to Priffdinas (Supreme Ovls, quick way to change spellbooks, etc)
The Mighty fall – God Wars tele for Ranged duo Nex
Ritual of the Mahjarrat – Dragonbane Ammo + Akrisae at Barrows + Glacors
While Guthix Sleeps – Glacor boost & TDS
As a First Resort – Decant Flasks
River of Blood – Sunspear, Berzerker Blood Essence, Drakans Medallion, Blisterwood
Summers End – Access to Corporal Beast
Lunar Diplomacy + Dream Mentor – Lunar Spellbook (+ Livid farm to fully complete it)
The World Wakes – 4 New Abilities, 3 of them being very helpful
The Digsite Quest – 3 New Abilities (Tendrils) Extremely helpful for DPS
Ghost Ahoy – Ectophial (Teleport to Araxxor)
Tales of GWD 2 – Teleport tablets to GWD 2 (Telos/Gwd 2 camping)
One of a Kind – Dragonrider Necklace (Good alternative for Hydrix necklaces)
Kindred Spirits – Linza
The Elder Kiln – Fight Kiln Access
Temple of Sennisten – Curses (Soulsplit/Turmoil)
Kings Ransom- T70 Prayers (Augury/Rigour/Piety)
Desert Treasure – Ancient Magicks(edited)
Quests for Slayer
Smoking Kills – Crucial for training slayer
Fate of the Gods – Muspahs & Nihils
The Light Within – Crystal Shapeshifters
Ritual of the Mahjarrat (+While Guthix Sleeps) – TDs & Glacors
The World Wakes – Automatons
Children of Mah – Nightmares
Branches of Darkmeyer – Vyrewatch
One of a Kind – Celestial Dragons
Do No Evil – Sophanem Slayer Dungeon Access(edited)