Runescape – Ivy and Farming Combined Guide

Requirements:
– 9 Farming (higher is advised though)
– 68 Woodcutting (for Ivy)

Suggested levels:
– Higher Farming
– 51 Magic (For Ardougne Teleport)

Item Requirements:
– Rune/Dragon Hatchet or Inferno Adze
– Herb seeds (Toadflax if you want big profit, Highest possible herb seeds if you want experience)
– Flower seeds (Optional)
– Allotment seeds (Optional)
– Payments for the other seeds (If you want to be sure your Allotment patches will stay alive)

Here is a link to Zybez’ Farming information [link in the text]
– Super Compost (optional)
– about 250 gp cash, to buy Plant Cure.
– Regular farming equipment (Spade, Rake, Seed Dibber)

Suggested/Usefull Items:
– Magic Secateurs (for more herbs per patch)
– Ardougne Cloak 3+elite (for teleporting to the Ardougne patch) If you don’t have one, just use runes to teleport to Ardougne.
– Falador Shield 2 (for more herbs when farming Falador patch)
– Explorers Ring 3 (for teleporting to the Falador patch, this one is needed for effective farming)
– Ectophial (for teleporting to the Morytania Patch)

Useful information:
– You can use your farmed items (herbs, allotments and flowers) on the Leprechaun to receive them in notes. This makes mass-farming very easy.
– Weeds can NOT be noted, so make sure you drop/bank these.
– It’s useful to have a decent amount of Supercompost stored in the Leprechaun.
– You can note your payments, making it easy to take the payments for several trips.

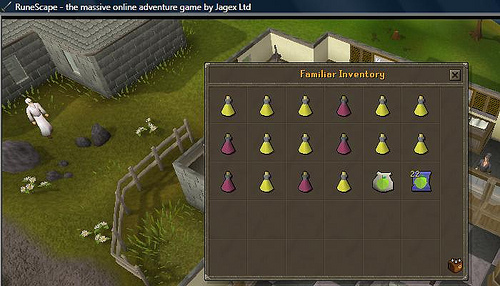
Your inventory and gear should look somewhat like this:

Image


Inventory and gear required

Explanation to the picture:

Gear:
Ardougne Cloak 3+elite, this is very hard to get, but I took runes too, so you can see a regular set-up.

Magic Secateurs
Falador Shield 3, I have 3, but 2 is sufficient.
Explorers ring 3, this is the highest possible, but it’s very easy to get.

Inventory:
8 Supercompost, this is enough for the herbs and the flowers for one trip.
24 herb seeds, this is for 6 trips using 4 patches. There is a 5th patch, which is usefull, but certainly not necessary.
24 flower seeds (marigold seeds used to show what to take), same as the herb seeds.
144 allotment seeds (potato used to show), 3 seeds per patch, 2 patches per set, 4 set per trip, 6 trips for a round. 2*3*4*6 = 144 seeds.
48 buckets of compost (payment for the potatoes), 2 buckets of compost per patch, 2 patches per set, 4 sets per trip, 6 trips for a round. 2*2*4*6 = 96 buckets of compost (or 48 units of payment)
Ectophial to teleport to the Morytania patch.
18 Law Runes for 6 Camelot teleports and 6 Ardougne Teleports.
30 Air Runes for 6 Camelot teleports.
12 Water Runes for 6 Ardougne teleports.
Farming Equipment

As you can see, I forgot the coins. If you come to the same conclusion while cutting ivy, run to Draynor, and grab some cash

How to start:

1) Teleport with the Ectophial to the Ectofuntus near Port Phasmatys.
2) Walk north, then west, past the farm to get to the first set of farming patches. Remove all the weeds per patch and start planting the seeds per patch.
Use Supercompost on your herb patch before planting your herb seed. There is a chance your herb-plant can die. With Supercompost, this chance is reduced.
Depending on your Flower seed, you might want to use Supercompost. This is advised when using Limpwurt seeds.
Plant your Allotment seeds per patch, without the Supercompost. Use the “Pay-(Location) for both the patches.

3) Teleport to Ardougne with either your runes, or the Ardougne Cloak. When teleporting with the runes, walk to the northern city gate, proceed further north, climb over the first stile, over the second stile, and open the fence at the cows. Walk north and you’ll find patch-set 2.
Repeat the actions said in step 2.

4) Teleport to Camelot. Walk east and a bit south and you’ll find patch-set 3. This is the Catherby patch-set. Repeat step 2 again.
5) This is your final step for starting. Teleport to the Falador Farming patch-set with the “Cabbage-port”-option on your Explorers Ring 3. Repeat step 2.

After you’ve planted your seeds and paid the farmer, walk north.
You’ll end up at Falador’s South wall. There are 7 spots where ivy will grow, start cutting them.
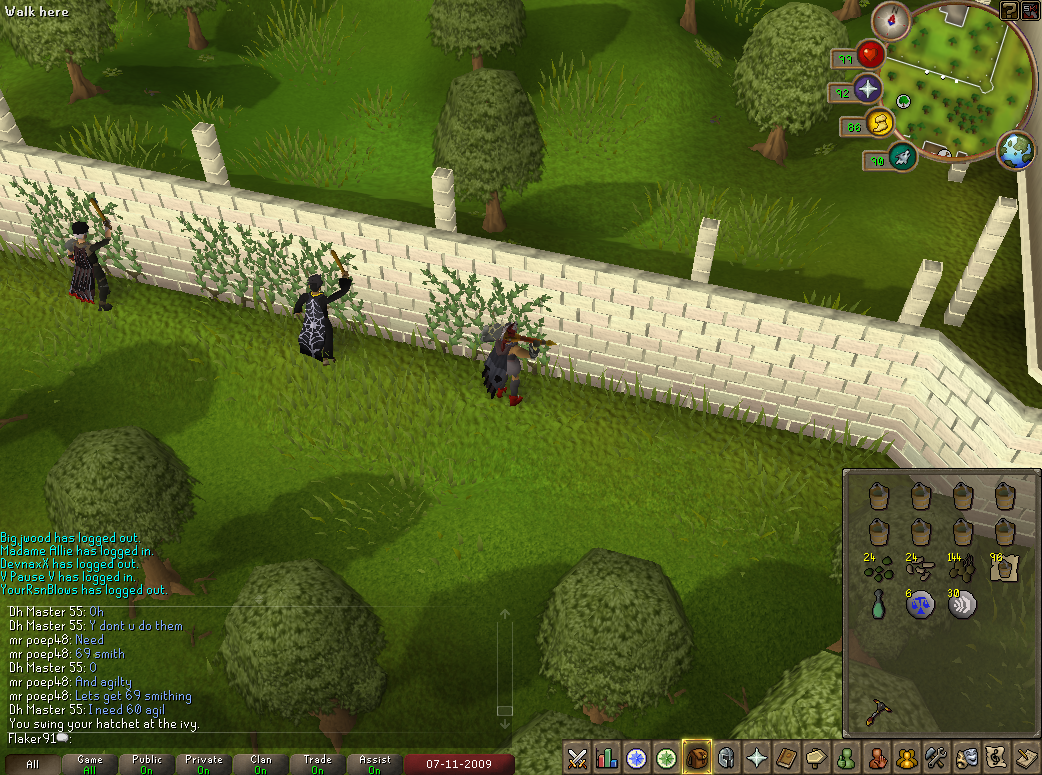
Image


Ivy Cutting

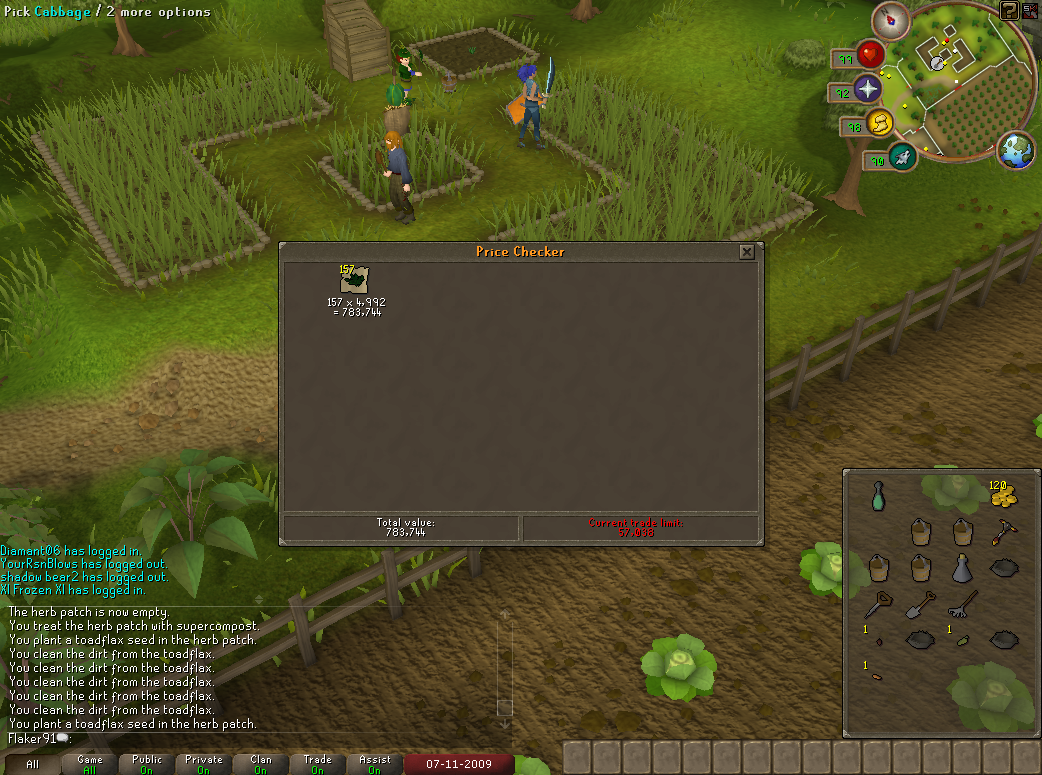
As you can see below, if you turn your camera the correct way, you can see your herb patch.

Image


Herb patch

This patch is your “timing-patch”. If you notice the herbs are getting diseased, use a Plant Cure on the patch. Keep cutting the ivy until you notice the herbs are fully grown. You’ll notice this if it shows the option “Pick Herbs”.

Now it’s time to do your new farming run.

6) Teleport to Ectofuntus again.
7) Your patches will all be done. Start harvesting your allotment. When you’re done with the patch, use the farmed items on the Leprechaun to receive notes. You can do this for every item you’ll gain from farming.
Harvest the other patches at the area, plant new seeds (as said in step 2), pay the farmer and click Exchange on the Leprechaun. Click on the empty buckets in your inventory tab. The Leprechaun will store them.

8) Teleport to Ardougne, repeat step 3. When you arrive, harvest, plant, note, and pay the farmer as said in step 7.
9) Teleport to Camelot and walk to the Catherby patch-set. When you arrive, repeat step 7.
10) You are now close to a bank. You can take the empty buckets out of the Leprechaun’s storage. Go to the bank, which is located south of the patches. Bank the empty buckets, nests obtained from the ivy and whatever you want to bank. I suggest keeping the noted items in your investory. This is a great motivation and an easy way to check how much profit you’ve made.

11) Teleport to the Falador patch-set and repeat step 7.

Walk back to the ivy and start chopping again.
Again, when you notice your herb is diseased, cure it.

Every ~75 minutes, you’ll be able to farm the herbs.

In the 75 minutes you’ll be chopping ivy, you’ll most likely gain between 90k and 140k woodcutting experience.

In the end, your farming will go up in no-time, especially when you’re new to the members area. You’ll also gain a lot of woodcutting experience.

After about 300k woodcutting experience and a nice bit of food and sleep, I ended up with:

Image


Easy cash!

That’s some easy cash too, using just herbs.

Good luck getting some nice cash

Back To Top

Eve Online Screenshots

Eve Online Mining Screenshot
Eve Online Ship Fitting Screenshot
Eve Online NPC Murdering Screenshot
Eve Online Trinity Video Screenshot
Eve Online Caldari Ship Docked Screenshot
Eve Online Spacewang Docked Screenshot
Eve Online Damnation Docked Screenshot
Eve Online Punisher Docked Screenshot
Eve Online Spacewang Fitting Screenshot
Eve Online Asteroid Belt Screenshot
Eve Online Gang Killing Spree Screenshot
Eve Online Space Explosion Screenshot
Eve Online Player Owned Station (POS) Screenshot
Eve Online Warp Gate Screenshot
Eve Online Ship Dock
Eve Online Taranis
Eve Online Taranis
Eve Online Titan Dreadnought
An Eve Online Player Owned Station (POS) With Over 300 Ships
An Eve Online Docking Que
Eve Online Ship Screenshot
Eve Online Ship Explosion Screenshot
Eve Online Ship Fleet Screenshot

Back To Top

GTA 4 Multiplayer Guide

Introduction

To access multiplayer in-game:

1) Press Up on the directional pad to access your mobile phone

2) Toggle to Multiplayer and press ( for PS3 or for Xbox 360) to accept

3) Choose from Player Match, Ranked, or Party Mode

4) Select from one of 14 multiplayer games and press to enter the multiplayer lobby

Multiplayer Ranks

Rank 0 – $0

Rank 1 – $1,000

Rank 2 – $10,000

Rank 3 – $50,000

Rank 4 – $100,000

Rank 5 – $250,000


Rank 6 – $500,000


Rank 7 – $750,000


Rank 8 – $1 Million


Rank 9 – $2.5 Million


Rank 10 – $5 Million

Multiplayer Games

Race

GTA Race


Hangmans NOOSE

Car Jack City

Deathmatch

Team Deathmatch

Bomb da Base

Bomb da Base II

Mafia Work

Team Mafia Work

Turf War

Cops N Crooks

Deal Breaker

Free Mode

Car Jack City

Multiplayer Unlockable Clothing

Rank 0

HEAD – White, Skinny White, Black, White Moustache
TORSO – Red w/black body warmer Grey w/Blue, Black w/ Green
LEGS – Beige, Black, Jeans, Brown
GLASSES – Purple Sport, Orange Sport
HATS – Green B/Ball, Black B/Ball, White B/Ball, Brown Beanie, Olive beanie, Black Beanie

Rank 1

HEAD – White Tattoo, White Chubby
TORSO – Black Shiny, Red Shiny, Black shiny w/ white jumper
LEGS – Navy Jeans, Pale Jeans
GLASSES – Brown Rimmed geek
HATS – Purple Do-Rag, Russian

Rank 2

HEAD – Black w/ Stubble, White w/ Beard
TORSO – Blue w/ Brown Jacket, Brown/Sky Blue Jacket
LEGS – Camoflague Army w/Boots
GLASSES – Thin Framed Blue Tinted Glasses
HATS – Urban Camo Do-Rag

Rank 3

HEAD – same as head #1 w/ tattoo
TORSO -brown vest w/ red jacket, green jacket
LEGS –
GLASSES – Circle hippie like glasses
HATS -Red-White-Blue Bandana, Airport earmuffs

Rank 4

HEAD – Bike Helmet
TORSO –
LEGS –
GLASSES –
HATS –

Rank 5

HEAD –
TORSO –
LEGS –
GLASSES –
HATS – Army Helmet

Rank 6

HEAD –
TORSO –
LEGS –
GLASSES –
HATS –

Rank 7

HEAD – Helmet w/Goggles
TORSO –
LEGS –
GLASSES –
HATS –

Rank 8

HEAD – White bike helmet w/Blue Stars
TORSO –
LEGS –
GLASSES –
HATS –

Rank 9

HEAD –
TORSO –
LEGS –
GLASSES –
HATS –

Rank 10

HEAD –
TORSO –
LEGS –
GLASSES –
HATS –

Runescape – Armadyl God Wars Solo Guide

I like to solo armadyl it is my favorite thing to do on the game. I have been soloing armadyl at least once a day for approximately 3 month and I have made roughly 300mill in drops

2x hilts

5x helms

1x skirt

and 20million in dwarf weed herbs and seeds

Although it appears indimidating to risk a substantial amount of armor to solo fight a high lvl monster, armadyl is perhaps the easiest to solo with the proper setup and the best to solo for time. Although bandos kc takes 5 minutes you are only in the room 5 minutes. Armadyl kc takes 20 minutes and I have stayed in the room for 10 kills and 45 minutes as my record I have done atleast 1,000 solo kills and have experimented with numerous techniques to minimize damage and inventory setups and I would like to share with my friends in the clan what I consider to be the best money on the game (I made the same amount of money one would earn runecrafting from 70-99)

First off I would recommend atleast 85 defense/range before attempting solos because the amount of kills per trip probably wouldnt compensate for the amount of total supplies lost. Armadyl soloing is expensive. Even with addy bars a trip will cost roughly 200-300k a trip but mathematically one should receive atleast a helmet drop for every 5mill in supplies spent. (Trust me on this one I constantly broke even from helmet drops to pay for supplies). Now lets get down to business with inventory/gear.

Inventory is absolutely crucial to maximizing return on investment (supplies).

runescapearmadylgodwarssologuide1

Armadyl God Wars Solo Familiar Inventory

As you can see I do a 2/1 ratio in my tort with 1 extra brew so 11/5 with pouch and scrolls. I do 2/1 because when im able to heal with some fruit I dont restore after brewing for prayer.

Gear is also very important and I understand that risking a sizeable portion of your bank can be a turn off so here is my personal setup I use that I found out is the best setup for low risk. You will notice I have 2 armadyl pieces with a risk of 8.3. I choose to wear a few armadyl pieces because I am still risking 7m if I wear karils and bird helm so the extra 1m risk for armadyl is justifiable. It doesnt matter if you trade in arma helm for v helm or wear karils and v helm the risk still equals the same.

runescapearmadylgodwarssologuide2
Armadyl God Wars Solo Inventory/Gear

Basically any mix of armadyl and karils is a good setup. Even full karils with spirit shield and v helm is a good setup.

THE FIGHT

Fighting armadyl imo is not that hard. You constantly protect range so that attack does not hit while your mage bonus armor protects against the mage somewhat well. Kilisa is the only minion that you have no prayer or armor to work around. I quick pray protect item steel defense protect range and eagle eye. I like to keep a certain distance away from kree because there is one technique that will help not take so much damage while healing. I like to call this the evade and heal tactic. As you know krees wings will blow you in certain directions so when i need to heal I will run in the direction of the wind (it helps propel you far away from him so he wont melee when you are healing). I click one sip run away from him and sip again. At this point in time i will range him one time to trick the system so he will not melee me and take 1 more brew sip. I range him one more time as I restore and that is my effective technique on healing without taking melee damage.

I do not pray at the altar until I break out my bat. Reason is before you break out the healing familar you brew/restore enough to keep prayer up so I save my altar praying until when I need it and that is my first kill with bat.

The Bat-For those that are familar and experienced with the bat you should already have an understanding of the timing. It is very important to keep some distance between kree and yourself when you are picking up papayas. You can time it to pick up a papaya range him pick up pap range him multiple times without the bird coming in for a melee attack. This is a great technique for healing and not using brews for a period of time and can extend your trip by a few kills.

The minions-As soon as kree dies I unclick my quick prayer and immediately turn on just protect range and hawkeye to save prayer. I also do this so I can 1 click my quick pray back on when kree spawns. I Always take out the mage first unless the melee minion has half hitpoints or something. Mage/melee/range is the proper order to kill minions in. The time you are killing minions is the best opportunity to fill any empty inventory spots with fruit.

Well that is all I guess have fun soloing if you choose to 🙂

Call Of Duty 5 – World at War – Trophies and Tips

Call Of Duty 5 – World at War – Trophies and Tips

Here are the names of the Call Of Duty 5 – World at War trophies, and some tips on how you can achieve them. The tips were written based on my ps3 experience but lots of the tips are also relevant to the xbox and pc versions of the game.


55 Total Trophies: Platinum Trophy 1 Platinum Gold Trophy 2 Gold Silver Trophy 15 Silver Bronze Trophy 36 Bronze Hidden Trophy 1 Hidden

Bronze Trophy
Get Your Hands Dirty

Complete ‘Semper Fi’ on Veteran difficulty. (Solo only)

No tips required

Bronze Trophy
Bloody Peleliu

Complete ‘Little Resistance’ on Veteran difficulty. (Solo only)

No tips required

Bronze Trophy
The Sword Is Broken

Complete ‘Hard Landing’ on Veteran difficulty. (Solo only)

At the end of the mission you have to defend the airfield – Do NOT get on the Triple25 or you will die very quickly. Stay back and kill the soldiers until the mission is complete.

Bronze Trophy
Architect

Complete ‘Vendetta’ on Veteran difficulty. (Solo only)

Pretty easy mission, except for two parts:

Sniper part – Once your told which floor the sniper is on (probably 3rd floor), go downstairs of the bar to the window and make it so that you can only see the most right window of the 3rd floor. When he looks out to shoot you, shoot him and move left fast to dodge his shot. Keep an eye out for decoys (you will see a light and a helmet bobbing up and down, dont shoot.) It took me 3 shots to beat him, take your time, don’t rush.

Crawling part – If you have a machine gun from earlier in the mission this part may be easier for you, it can be done with sniper rifle alone. As soon as the soldier spots you, run forward and start crawling. As you get under the fallen bookcase two soldiers will appear in the two windows – try to shoot them both, one shot each. Hit or miss get up and run through the door to the left and follow the wall into the corner, two more windows with two more soldiers, one shot each, run up the stairs hit or miss. You may die a few times attempting this on vetran but will get there in the end.

Bronze Trophy
The Hammer Strikes


Complete ‘Their Land, Their Blood’ on Veteran difficulty. (Solo only)

The hardest part of this mission is exploding the four tanks at the end. There are plenty of missile launchers available throughout the mission and loads of undercover locations to shoot them from. When you open the barn and the final tank appears (shows an enemy tank on the compass before) quickly run to the corner of the barn. Shoot it as soon as it appears, go back on the side of the barn to reload, and repeat.

Bronze Trophy
Scorched Earth

Complete ‘Burn ’em Out’ on Veteran difficulty. (Solo only)

This is one of the hardest missions to beat on Veteran. Make sure you raid the small bunkers to restock your supplies. The hardest part is clearing the tunnels towards the end. Go inside the first bunker on the left, get the Type 99 and a full stock of smoke and frag grenades. Throw two smoke grenades down the tunnel. Wait a couple seconds, go in and throw smoke grenades to the end of the cave. Wait for the smoke to fill the tunnel, walk up and throw some frags in the same place, shooting any runners. When they are all dead, run back to the small tunnel where you got your supplies, restock, and clear out the last mortar pit with smoke and grenades.

Bronze Trophy
Fearless

Complete ‘Relentless’ on Veteran difficulty. (Solo only)

No tips required.

Bronze Trophy
Hell on Wheels

Complete ‘Blood and Iron’ on Veteran difficulty. (Solo only)

No tips required.

Bronze Trophy
No Return

Complete ‘Ring of Steel’ on Veteran difficulty. (Solo only)

No tips required.

Bronze Trophy
When it Rains, It Pours

Complete ‘Eviction’ on Veteran difficulty. (Solo only)

The subway is the hardest part of this mission, use the various object to hide behind, try to engage the enemy when the lights go off only and work your way up carefully.

Bronze Trophy
One Bad Gato

Complete ‘Blackcats’ on Veteran difficulty. (Solo only)

No tips required.

Bronze Trophy
Blowtorch and Corkscrew

Complete ‘Blowtorch and Corkscrew’ on Veteran difficulty. (Solo only)

No tips required

Bronze Trophy
The Sun Sets

Complete ‘Breaking Point’ on Veteran difficulty. (Solo only)

The hill at the beginning is the only troublesome part – Take your time, hiding inside the empty spider holes. There is also a nice clearway at the left side of the hill to help move the other soldiers up.

Bronze Trophy
For the Motherland

Complete ‘Heart of the Reich’ on Veteran difficulty. (Solo only)

Hard part of this mission is destroying the Flak cannons. Go for the right Flak 88 first, plant the charge, hide, then go for the left one. It takes a long time to get through but checkpoint should appear once the second one is destroyed. A tank will move up and explode, use this for cover. Kill as many German soldiers as you can then dash into the house to the right. Hold until your troops move up then the rest of the level is a walk in the park in comparison.

Bronze Trophy
Bearing the Burden

Complete ‘Downfall’ on Veteran difficulty. (Solo only)

This mission is very easy overall. The first part is really hard and might discourage you. Don’t let it, once complete, the rest is very simple.

Bronze Trophy
Saved Private Ryan

Save the soldier before he burns to death.

On the mission ‘Semper Fi’, after the first part a man on fire will come out of the house and attack Pvt. Ryan, shoot the man on fire to unlock this trophy.

Bronze Trophy
Weapon of Mass Destruction

Radio in a naval bombardment that kills at least 4 Japanese soldiers.

In the mission ‘Little Resistance’, once you have gotten into the turret building, there should be a pit of Japanese Soldiers (this is the part when the tanks start to appear), airstrike them.

Bronze Trophy
Lights Out!

In ‘Black Cats’, blast out all of the spot lights in the Japanese cargo convoy. (Solo only)

In the mission ‘Black Cats’, shoot the 6 lights on the merchant ships ( 2 on each ship, one at each end ). They go out with a couple bullets.

Bronze Trophy
Rough Economy

Kill 3 enemies with a single round.

In the mission ‘Vendetta’, after you take out the first 5 soldiers (and the dog), more should come walking in. Three of them should line up – snipe them.

Bronze Trophy
Guardian Angel

In the final battle for Okinawa, save Sergeant Roebuck.

In the mission ‘Breaking Point’, when you are entering the final part, you will see three Japanese soldiers with their hands up. Your team will run up to them. Keep your eye on the one to the right, Sgt. Roebuck will go to him and they will grab their weapons. One person will die, Polonsky or Sgt. Roebuck. Save the Sergeant to unlock this trophy by shooting the Japanese soldier in time.

Bronze Trophy
Close Shave

Survive a banzai attack. (Solo only)

You will unlock this one by pressing R3 when a soldier is about to stab you with a bayonet.

Bronze Trophy
Snake in the Grass

Take out a Japanese soldier lying in wait in the grass.

In the mission ‘Hard Landing’, when you get to the part where there are some tall trees and nothing else, there will be Japanese troops lying in the grass. Shoot the ground until you kill one to get this trophy.

Bronze Trophy
No Safe Place

Burn an enemy out of a tree with the flamethrower in ‘Hard Landing’.

Can be unlocked at the same part as the tip for ‘Snake in the grass’.

Bronze Trophy
Purple Heart

When staring into the face of adversity, show courage and persevere.

Die more than 10 times on a mission.

Bronze Trophy
Ruthless

Kill 15 enemies while mounted on a tank in ‘Ring of Steel’.

Mount the second tank at the end of the mission and shoot all enemies you see until it ends or you get the trophy.

Bronze Trophy
Mortar-dom

Kill 8 Japanese with thrown mortars in ‘Breaking Point.

A fun trophy – Grab mortars in ‘Breaking Point’ and throw them at the mortar pits to get this. Try not to hit your own troops or the mission will end.

Bronze Trophy
Shot in the Dark

Kill 10 enemies while the lights are out in the subway in ‘Eviction’.

In the mission ‘Eviction’, when entering the subway you will notice that the lights will go on and off. When they are off, shoot the enemy soldiers. Use the time when the lights are on to find the enemy soldier locations.

Bronze Trophy
Blue Ribbon

Complete a 4-player Competitive Co-Op match in 1st place. (Online co-op only)

Play a couple of online Co-Op Competitive rounds and you should get this. Try to use the knife and get headshots. Try to revive people and not die much, you will get bonus XP at the end of the round. Make sure no one leaves during the round as you need to have 4 people to get this trophy.

Bronze Trophy
Get Your Left Foot Wet

Complete a match in Campaign Co-Op mode. (Online co-op only)

Go on recruit difficulty if you want to get it done fast.

Bronze Trophy
Get Your Right Foot Wet

Complete a match in Competitive Co-Op mode. (Online co-op only)

Go on recruit mode if you want to get it done fast.

Silver Trophy
Carlson’s Raiders

Complete ‘Semper Fi’ on any difficulty. (Solo only)

No tips required

Silver Trophy
Stormed Peleliu

Establish a beachhead at Peleliu Island on any difficulty. (Solo only)

Complete the mission ‘Relentless’.

Silver Trophy
The Last Stand

Survive the conflict in Okinawa on any difficulty. (Solo only)

Complete the mission ‘Breaking Point’.

Silver Trophy
Stabbed in the Heart

Complete all missions on the Eastern Front on any difficulty. (Solo only)

Complete all of the Russian missions, they contain the last mission of the game. Complete the game to unlock this trophy.

Silver Trophy
The Professional

Shoot all of Amsel’s henchmen, including their attack dog, without reloading. (Solo only)

In the mission ‘Vendetta’ you need to get some collateral damages. The two people beside the car can be killed with one bullet along with the people by the steps of the building. Use two bullets to kill the guys on the left. Then a guy should come and inspect the dead body. You can snipe the soldier and his dog easily when he turns his head behind the soldier, or you can snipe the soldier and knife the dog when he runs at you. Both will work to unlock this trophy.

Silver Trophy
Gunslinger

Assassinate General Amsel with a pistol shot. (Solo only)

This is a difficult trophy to achieve. Earlier on in the level where you snipe the guy in the window, in that same room there is a pistol on the table, take it. There are some different ways to get this trophy. Once you see a car come in from the left, snipe the driver and Amsel will start to run to the right. Take out the pistol and shoot at him the best you can. There is an exploding barrel near the car that could help if you can hit it at the right time.

Silver Trophy
Grave Robber

Collect all Death Cards in the game. (Solo only)

See Junglebiscuit Call of Duty : World at War Death Card Guide:

Call of Duty World At War Death Card Guide

Silver Trophy
Throw a Six and a Half

On Hardened or Veteran difficulty, complete a level without dying. (Solo only)

The easiest way to obtain this trophy is to play the mission ‘Black Cats’ on hardened.

Silver Trophy
Firestarter

Complete a level using only the flamethrower. Melee, grenades & explosives are OK.

Complete the mission ‘Burn em out’ on recruit difficulty setting. Only use your flamethrower, smokes, frags and meele attacks.

Silver Trophy
Kamikaze

Complete a level on Regular difficulty or higher using only melee or grenades. (Solo only)

Play ‘Semper Fi’ on Regular difficulty setting. Fairly easy – Save your grenades for the part where you get ambushed.

Silver Trophy
Iron Fist

Destroy all towers and bunkers in ‘Blood and Iron’.

There are 17 towers and 5 bunkers.

Silver Trophy
Sum of All Zeros

Down 45 Japanese Zeros in ‘Black Cats’. (Solo only)

Probably the hardest trophy to achieve. Go on recruit difficulty setting on ‘Black Cats’, play the mission until you get to the part where the zeros come. Save and quit, then reload your checkpoint. Shoot in front of the zeros and before you land make sure you have destroyed 20. If you haven’t, quit and restart. Once you get 20, land and get to 30-35 on the side turrets. When you get to the front turret finish up the job.

Gold Trophy
Hardened War Hero

Complete the game on Hardened or Veteran difficulty. (Solo only)

Read the trophy tips on the veteran missions at the start of this article.

Gold Trophy
War Hero

Complete the game on any difficulty. (Solo only)

No tips required

Platinum Trophy
Platinum

Congratulations!


Map Pack 2 Trophy Additions:

Bronze Trophy
Hammer Time

Repair 200 window boards in a single game. (Map Pack 2 only)

Bronze Trophy
It’s a Trap!

Kill atleast one zombie with three different traps in a single round. (Map Pack 2 only)

Bronze Trophy
Weapons of Minor Destruction

Kill no more than one zombie with a nuke. (Map Pack 2 only)

Bronze Trophy
Perk-a-Holic

Have all four perks simultaniously active in a game of Nazi Zombies. (Map Pack 2 only)

Bronze Trophy
Fertilizer Man

Kill 200 Zombies in a single game. (Map Pack 2 only)

Silver Trophy
Deadhead

Get 150 zombie headshots in a single game. (Map Pack 2 only)

Silver Trophy
Big Baller

Earn 75,000 points in a single Nazi Zombies game. (Map Pack 2 only)

Bronze Trophy
Big Brawler

Get 10 consecutive zombie melee kills before Insta-Kill expires. (Map Pack 2 only)

Silver Trophy
Soul Survivor

Reach round 15 in Nazi Zombies without getting revived. (Map Pack 2 only)

Back To Top