A complete guide to automatically read events from Google Calendar and present them on Discord via IFTTT.

Bonus – Ping interested roles!

Discord has some functionality built in called a Webhook which allows you to get automated messages and data updates sent to a text channel. One of the main things I use Webhooks for is to read calendar events from Google Calendar, send the event to a text channel 15minutes before it starts and ping Discord roles that may be interested in that event. In this guide I attempt to show you step by step how to set that up and the good news is that it is completely free to use.

We will be using the three platforms shown below:
– Google Calendar
– IFTTT
– Discord

Google Calendar to IFTTT to Discord

The first thing to set up is the Google Calendar https://www.google.com/calendar/

Once there, sign into your google account or register if you are new. Then on the left, next to Other calendars, click the plus sign to add other calendars.

Google Calendar - Add Other Calendars
Google Calendar – Add Other Calendars

Then go to Create new calendar on the drop down menu.

Google Calendar - Create New Calendar
Google Calendar – Create New Calendar

Lets leave the calendar there for a minute and jump over to IFTTT, IFTTT is a site that helps you automate processes and it allows you to have a certain number of applets running for free. https://ifttt.com/explore

Register or log in to IFTTT then hit create at the top right and then we need to configure it to connect to the services. Where it says “If This” click “Add” and type google calendar into the search. You then need to pick “Any event starts”, this will look for events starting on your calendar. You should then be able to pick your Google Calendar Account, pick the calendar you have just created and select the time you want to trigger this, for online gaming stuff etc I normally go for 15mins or 30mins to give people warning that something is happening soon. If its a real life meet up you may want to trigger it a day or two before the event.

The next part we need to configure on IFTTT is the “Then That” but we need to set up the webhook in Discord first. On Discord, right click your server then go to Server Settings -> Integrations. Then on webhooks go to view webhooks and click “New Webhook”. This should create one, you can name it and pick which text channel it should post the event information on. Then all you need to do is copy the Webhook URL and we can go back to finalising our IFTTT settings.

On IFTTT “Then That” click “Add” and type “webhook” into the seach box. Pick webhook then click “make a search request”. In the URL box paste in the URL you copied from Discord. Set method to post, content type should be set to application/json and in body type what you want the message to be when the event starts, something like this:

{"content":"Our {{Title}} event is due to start in 15 minutes! {{Description}}"}

Doing that will pull the title and description from the Google Calendar entry automatically!
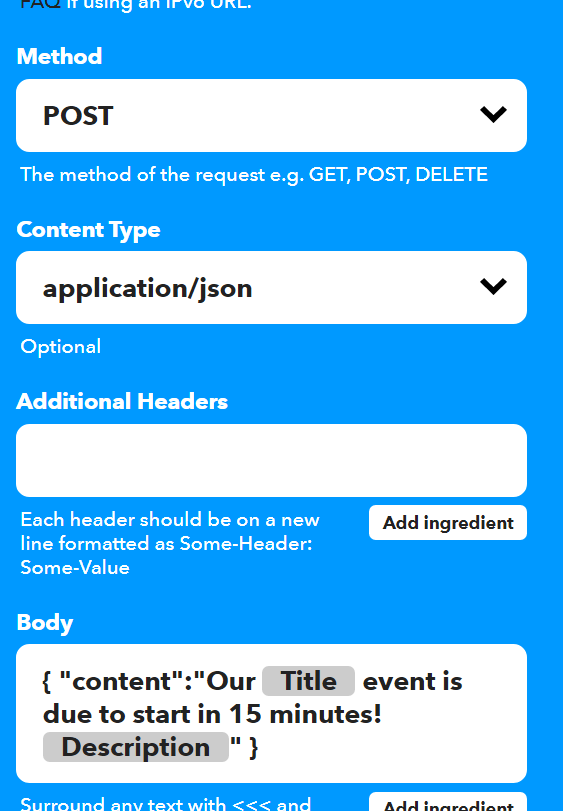
IFTTT Then That Setup

Once you have clicked create action that is the IFTTT setup complete. Click continue and finish on IFTTT, you can change the title of the applet if you want to. Now all you need to do is add some events to your Google Calendar and test that it works!

Bonus – With a little more setup you can make it automatically ping or tag Discord roles at the same time. In the above we added the {{Description}} part to IFTTT, this will relay whatever is in that description box on the google calendar event. We will use this to put the role information in. First thing you need to do is go to discord and check you have set it into developer mode. Go to settings -> Advnaced then toggle the developer mode setting to turn it on. Then you should be able to right click your server, go to settings -> roles and right click the role you want to ping and click copy ID.

Discord Copy Role ID

Now if you paste that it will give you a load of random numbers like 513344460535674883. This on its own will not work but if you put it in the proper syntax <@& 513344460535674883 > then it should. Simply paste that into the description box of the event and it will ping that roll before the event starts.

Discord Text Message produced from Google Calendar via IFTTT

Discord – How to get a webhook to ping roles, users, channels and other items

Discord allows you to post messages from other websites and apps using Webhooks which is really useful, in the past I’ve used it from IFTTT and also linked into google calendar to share messages between them. What do you do if you want to get a webhook to ping roles or users at the same time it posts a message?

Well you need to use a special syntax to mention channels/users/roles etc in a webhook. For channels and users you should be able to use <@CHANNELID> and <@USERID>. To grab the IDs you need to go to settings->advanced then turn on developer mode. Once you have done that just right click a user or channel and hit “Copy ID”. Just paste it with the above so it looks something like <@684309756589074816>.

For roles its a similar approach to the above but you need to use <@&ROLEID> to get it working. You can also use it for other things like emojis if you need to for any reason! It took me a while to work it out so thought I would post here and I hope this helps someone.

Understanding the MCB and which way to wire it

First of all a disclaimer, if you don’t know what you are doing with electricity or are not sure then its always best to get an electrician to do the work or check the work for you before you turn it on as it can kill or injure you.

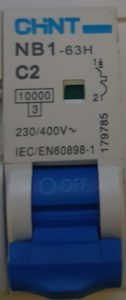
Now I am a qualified electronic engineer so know how to deal with things at component level but sometimes I have to dabble with electrical items too and am not so competent. For this task I had to install a small single pole type C Miniature Circuit Breaker (MCB) as one of my projects and had a few problems at first understanding which way around to wire it as the manufacturers documentation didn’t say and the device had no indication on it except for a small symbol here:

What does the electrical MCB symbol mean?

Now some of you electrician types are probably saying “ah thats easy, you are a fool if you don’t know what that means and shouldn’t even be touching electricity”. Well you may be right but the good news is that I worked it out and thought it worth sharing as the internet wasn’t too helpful on this. So the top bit is showing a little lever with an X – This is a switch, the big on/off blue thing you can see in the photo above. Great thats one part but what do the two bits below mean and then onto the important question, how do I wire it? Well the next item down shows a square/rectangle symbol, this is the symbol for a thermal device. So its detecting if there is too much curent and when there is it will get too hot and will do something. The final piece of the puzzle is the curve half-circle like symbol underneith, this is actually the symbol for the circuit breaker itself. So the image tells us a nice little story, when the switch is on, it will be letting current through to the thermal sensor and if too much current goes through it will produce heat which will cause that curve to fire away like a rocket which will break the circuit and flip the switch off.

How do I wire it? Which way around does it go? Is line 1 and load 2 or is it the other way around?

Well the MCB will trip if the current exceeds its limit whichever way around you wire it but saying that they do have a correct way around to wire in. There are a few holes on your MCB that will expel heat etc if there is a short circuit, if its wired the wrong way around these will not work when the circuit trips. On this particular circuit breaker which is a Chint 2A Type C MCB you need to have the line or supply going to 1 with the load on 2 I.e. the line going into the top and the load out the bottom. Why can’t they write that on the datasheet?

Here are some of the terms I typed into search to try to find an answer on this:

  • single pole mcb wiring
  • single pole mcb wiring chint
  • single pole mcb wiring chint which side
  • mcb load side wiring diagram
  • mcb load side wiring diagram chint
  • wire up chint mcb
  • mcb schematic
  • mcb schematic chint
  • mcb schematic chint load top or bottom
  • single phase mcb connection diagram
  • mcb load symbol
  • mcb load symbol supply
  • mcb operation symbol
  • mcb operation symbol supply load
  • mcb how to identify supply and load
  • mcb wiring top or bottom
  • type c mcb connection
  • mcb load and line symbol
  • trip unit breaker symbol
  • electrical symbol for load circuit breaker
  • electrical symbol for line circuit breaker
  • electrical symbol mcb wiring

How to Setup an Esp-32 in the Arduino IDE

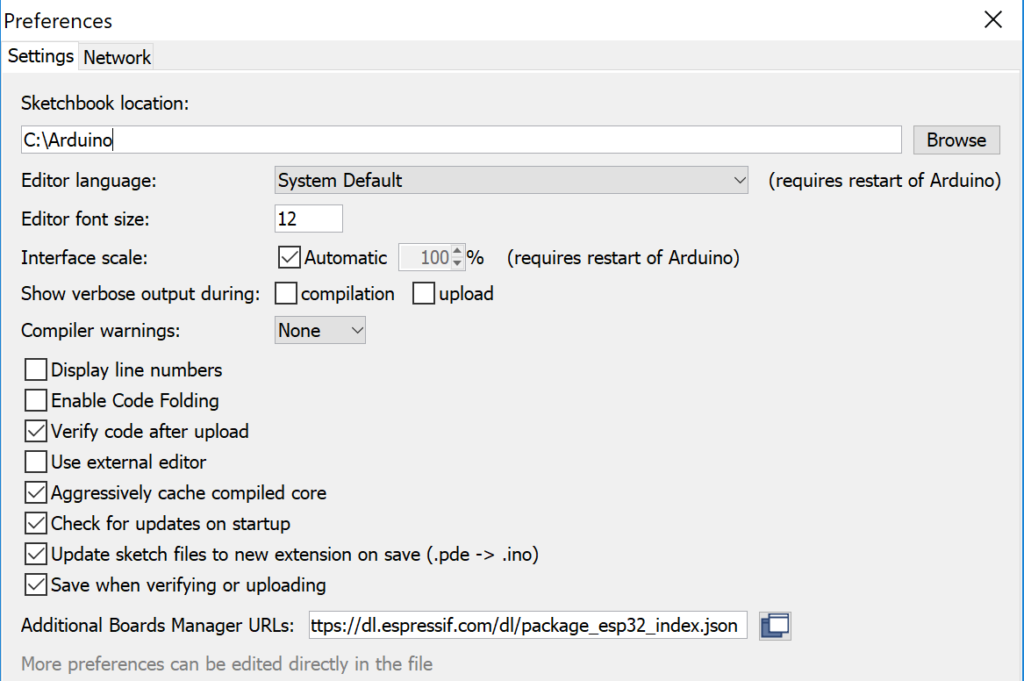
Got youself a new ESP-32 development board and wondering how you talk to it? The good news is that someone has done a lot of the hard work required to set up ESP-32 support in the Arduino IDE. The first thing we need to do is add the board manager files so that settings and boards relating to ESP-32 show up in the Arduino IDE. Go to File -> Preferences then enter  https://dl.espressif.com/dl/package_esp32_index.json into the “Additional Board Manager URLs” field:

Adding ESP-32 additional boards manager to Arduino IDE

Note: if you already have the ESP8266 boards URL, you can separate the URLs with a comma in the above.

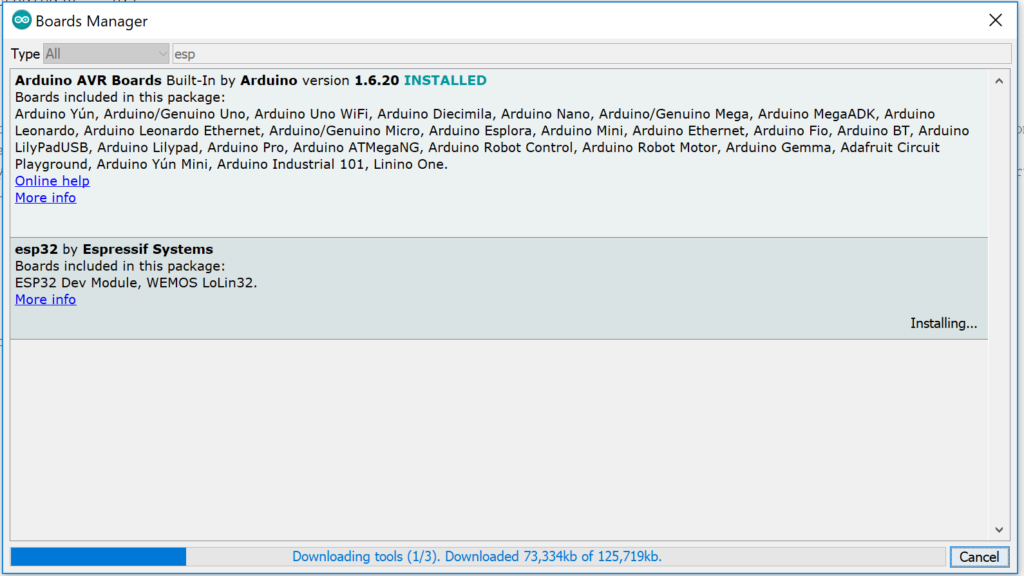
Open boards manager. Go to Tools > Board > Boards Manager…

Search for ESP32 and press install button for the “ESP32 by Espressif Systems“ and hit install:

Installing ESP-32 Board In The Boards Manager

Select your Board in Tools > Board menu (in my case it’s the DOIT ESP32 DEVKIT V1)

Plug in the ESP-32 with USB cable to your computer.

Select the Port (if you don’t see the COM Port in your Arduino IDE) (tools->port).

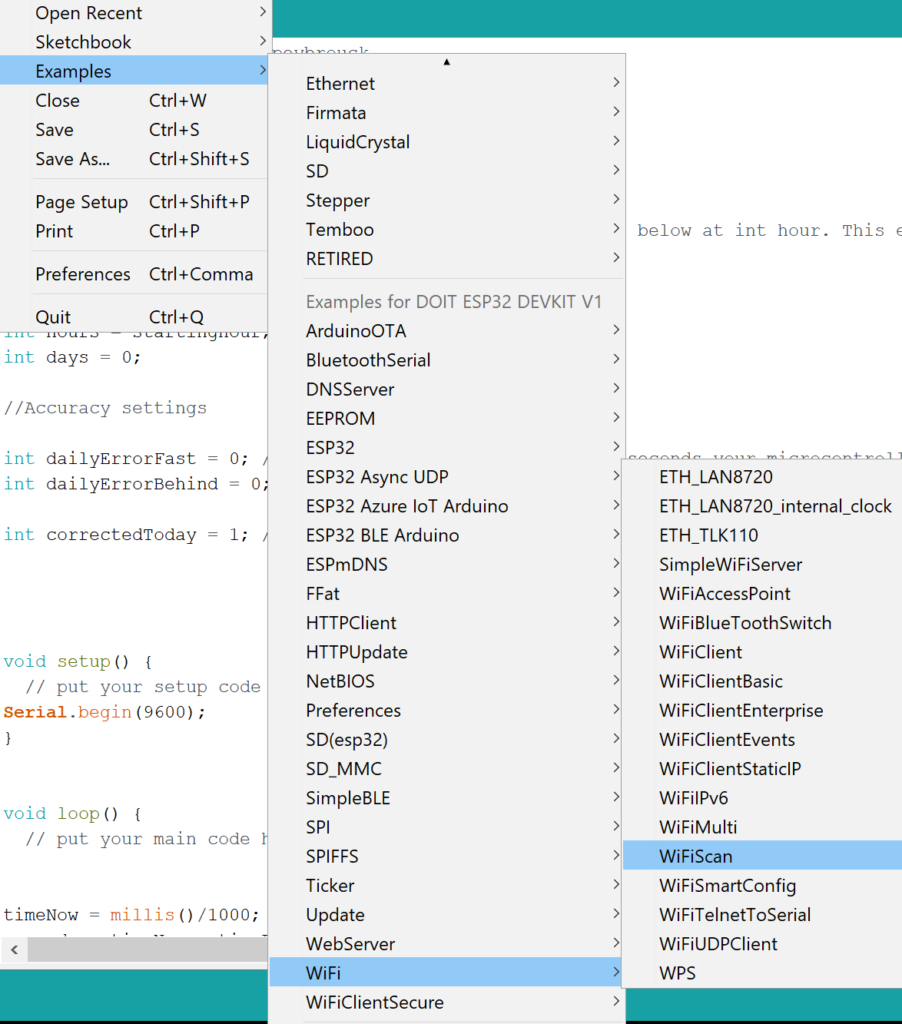
Open the following example under File > Examples > WiFi (ESP32) > WiFi Scan

Testing Your ESP-32 By Opening the WIFI Scan Example Project

Press the Upload button in the Arduino IDE. Wait a few seconds while the code compiles and uploads to your board. When it says connecting…… press the boot button on the board and release.  If that didn’t work hold the boot button before you press upload and release when it says connecting. I’ve even had some dev boards that need the enable button pressed instead, doing one of these will work, you just have to find which one.

ESP-32 In The IDE Waiting For Boot Button Press

If everything went as expected, you should see a “Done uploading.” message.

ESP-32 Done Uploading In The Arduino IDE

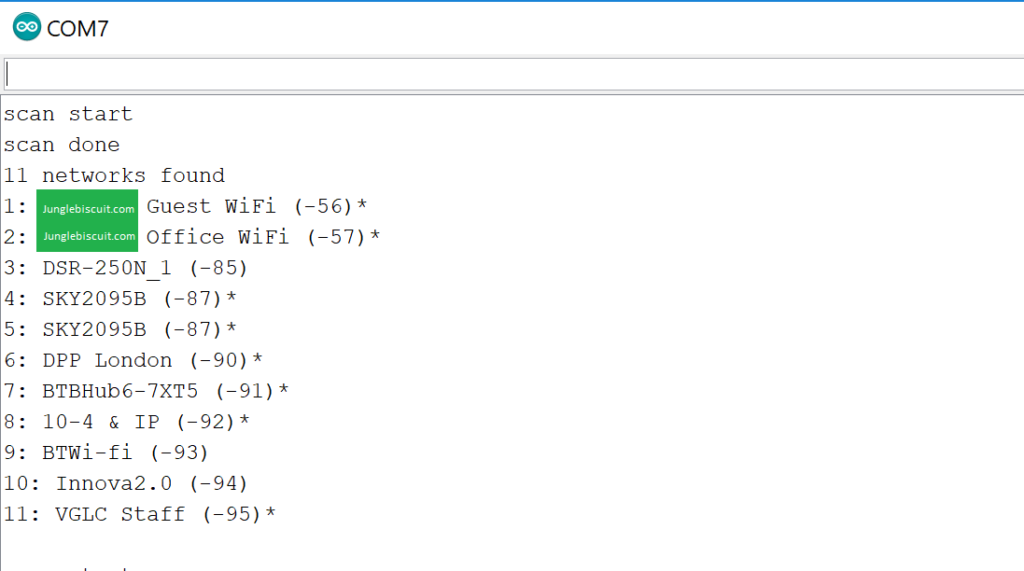
Finally just open the Arduino IDE Serial Monitor at a baud rate of 115200 and hey presto you should see it scaning for WIFI networks. You may need to press enable/reset button first:

Testing The ESP-32 Using WIFI Scan On The Serial Monitor

Step by Step Guide on How to flash the ESP-01

Step by Step Guide on How to flash the ESP-01

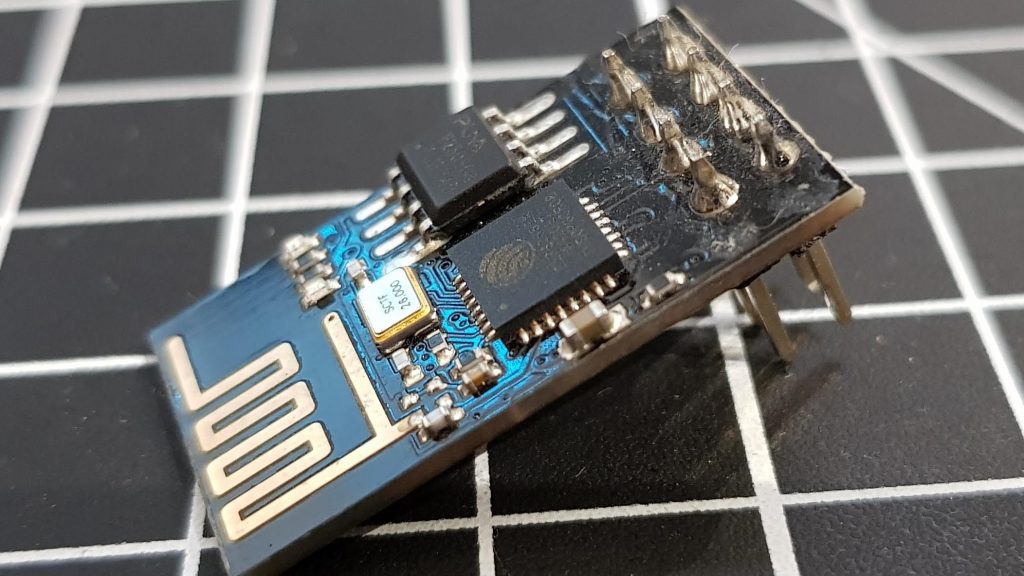
ESP-01
ESP-01

So, you have bought your ESP-01 and are not sure if its pre-flashed or you need to do something with it, you may just want to make sure you have the latest firmware anyway.  The best bet is to open your favourite programming software and try the module.  If it’s not working at all or behaving weirdly then the chances are that you need to flash a new version of the firmware onto it.  This is something that’s relatively easy but only when you know how and if you type it in a search engine there are lots of websites out there trying to get you to use weird versions of the ESP firmware so you need to be careful.  I’ll go through what hardware to use to flash it, where to get the firmware and where to get the tool to upload the firmware to the chip.

The good news is that the tools and firmware are all free on the Espressif website but even then it’s not completely clear what to get and even the documentation provided isn’t too clear on what to do for beginners so I will go through it all here.

What hardware do I need?

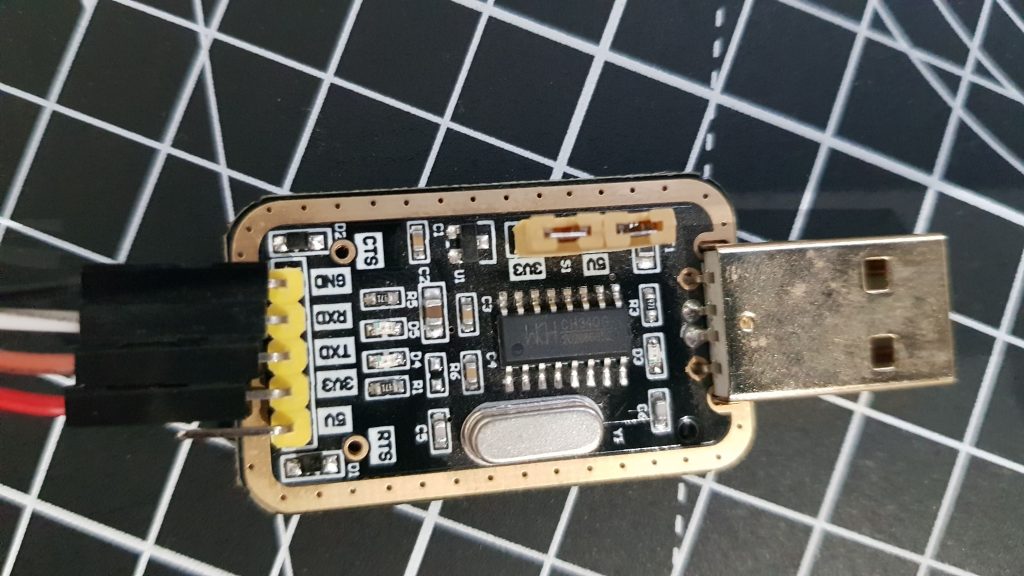
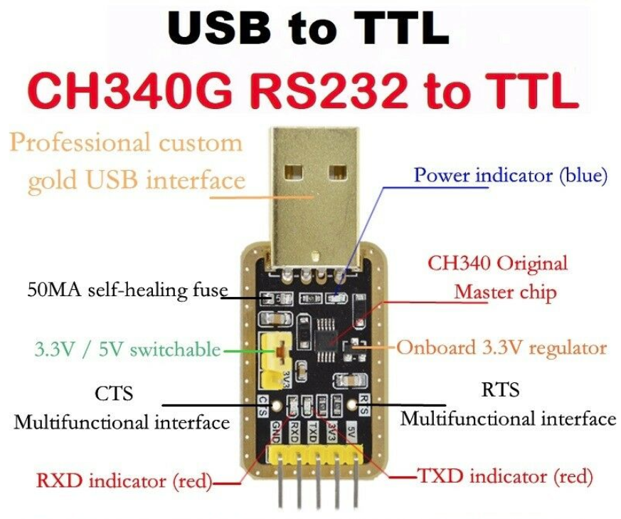
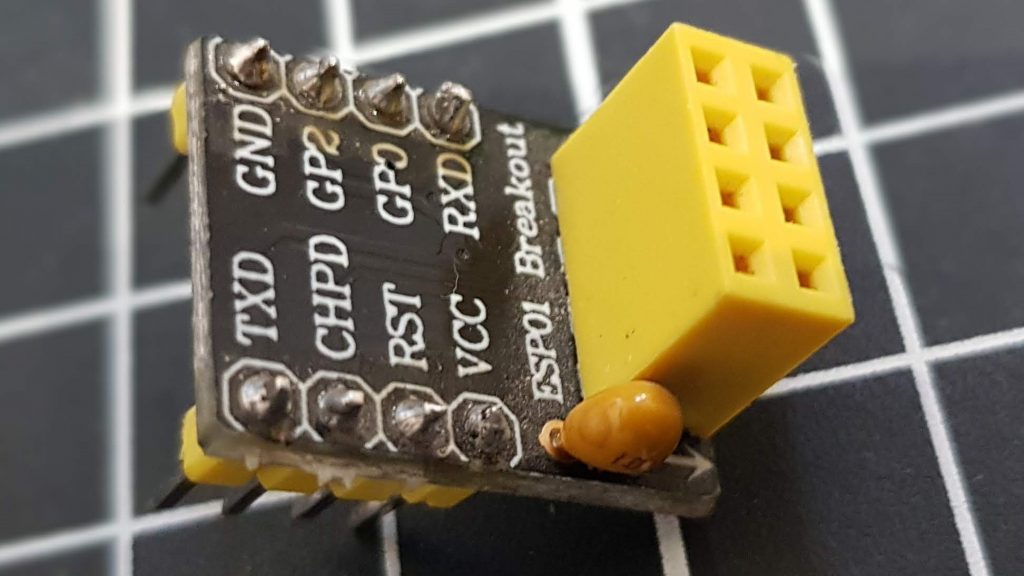
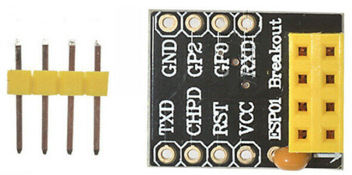
I put together a flashing circuit specially for this purpose and keep it set up on my breadboard so that it’s there when I need it.  The two main odd looking items you will need are a USB-to-TTL converter so that you can plug in your USB port on your PC to upload the firmware and the ESP-01 has a weird pinout so I find its best to use an ESP-01 breakout board/adapter.  Other than that, it’s just a couple of buttons and resistors.  Here is the USB to TTL (sometimes called FTDI) converter I use, it’s a couple of pounds on your favourite electronics or auction site and has a 3.3v option which is ideal for the ESP-01 though there are plenty of other options out there:

USB to TTL Converter

USB to TTL Converter

ESP-01 Breakout Adapter

ESP-01 Breakout Adapter

Here is the schematic:

ESP-01 Flashing Schematic

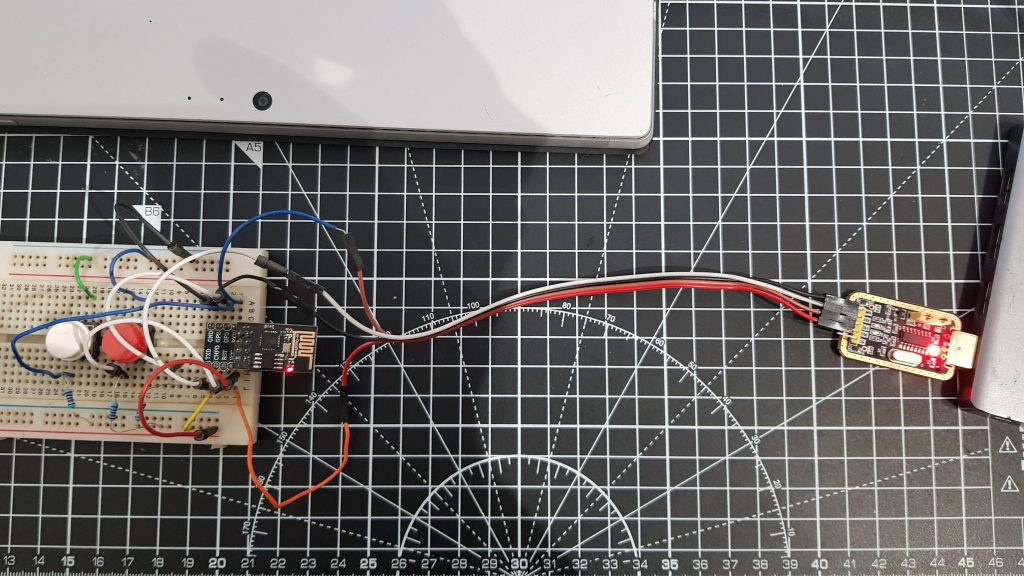
And finally, here is a picture of it all setup on the breadboard:

ESP-01 Flashing Circuit on Breadboard

DON’T PLUG IT IN WITHOUT READING THE INSTRUCTIONS BELOW FIRST

What tool do I need to download to flash the ESP?

To flash the ESP-01 you need the Espressif Flash Download Tool which you can download for free from their website in the support -> download -> tools section.  Link here:

https://www.espressif.com/en/support/download/other-tools

Downloading the Espressif Flash Download Tool From the Website

It’s not just for ESP-01, works for others too as you can see.  Download that to a folder of your choice and unzip that file.  Next you need to download the firmware files you are going to flash.

What firmware do I need and where do I get it?

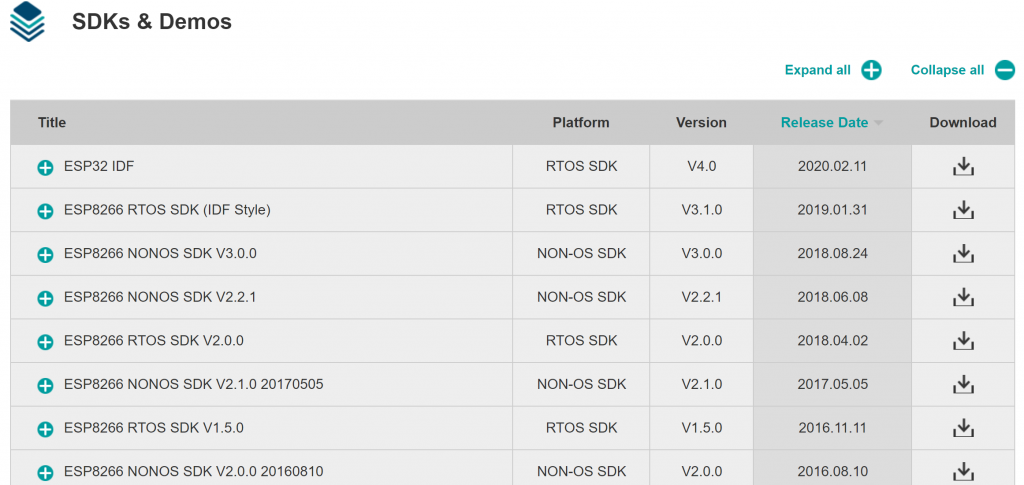
There are lots of different firmware versions out there and they all have different functionality, some fix bugs and some improve performance.  Obviously, some may induce bugs and decrease performance too, so I try to go for a stable version rather than the absolute latest issue.  The firmware files can be downloaded individually or as part of a software development kit, I normally go for the software development kit as it has all the files that work together.  You can download these again from the Espressif website in the support -> download -> SDK & Demos section.  Link here:

https://www.espressif.com/en/support/download/sdks-demos

Downloading the ESP-01 Firmware From the Espressif Website

All of the stable versions should be shown, you can see the latest at the time of writing is ESP8266 NONOS SDK V3.0.0.  Simply hit download and save it to a location on your computer, if it redirects to a github page then scroll down to the bottom and download the source code .zip file from there.  Unzip the file and now you have all the things you need to flash the chip.  All of the binary files you need to flash are in there, you may need to navigate around the files to locate all the ones you need but you should be able to find the following:

  • blank.bin
    • Location:  ESP8266_NONOS_SDK-3.0.0\bin\blank.bin
    • Flash Address:  0xFB000
  • esp_init_data_default.bin
    • Location:  ESP8266_NONOS_SDK-3.0.0\bin\esp_init_data_defaultv08.bin
    • Flash Address:  0xFC000
  • blank.bin
    • Location:  ESP8266_NONOS_SDK-3.0.0\bin\blank.bin
    • Flash Address:  0x7E000
  • blank.bin
    • Location:  ESP8266_NONOS_SDK-3.0.0\bin\blank.bin
    • Flash Address:  0xFE000
  • boot_v1.6.bin
    • Location:  ESP8266_NONOS_SDK-3.0.0\bin\boot_v1.6.bin
    • Flash Address:  0x00000
  • user1.1024.new.2.bin
    • Location:  ESP8266_NONOS_SDK-3.0.0\bin\at\512+512\user1.1024.new.2.bin
    • Flash Address:  0x01000

Flash the ESP-01!

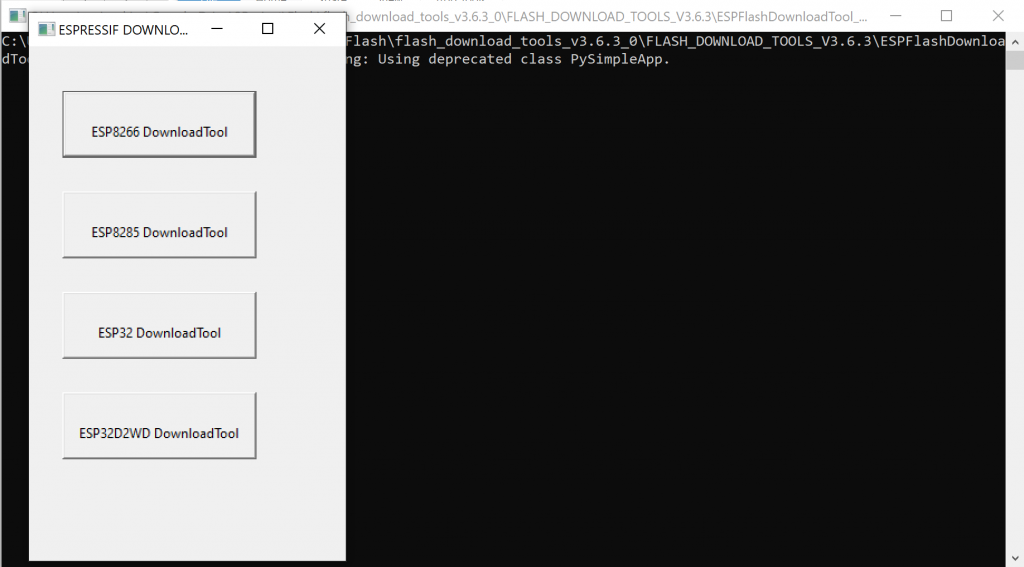
Now you have done all the groundwork to flash this thing its time to put it all together and do the job, exciting times!  Open up the Espressif Flash Download Tool, you should be able to open the file straight from the folder you downloaded without having to install anything and it will open something like this:

Opening up the Espressif ESP flash download tool

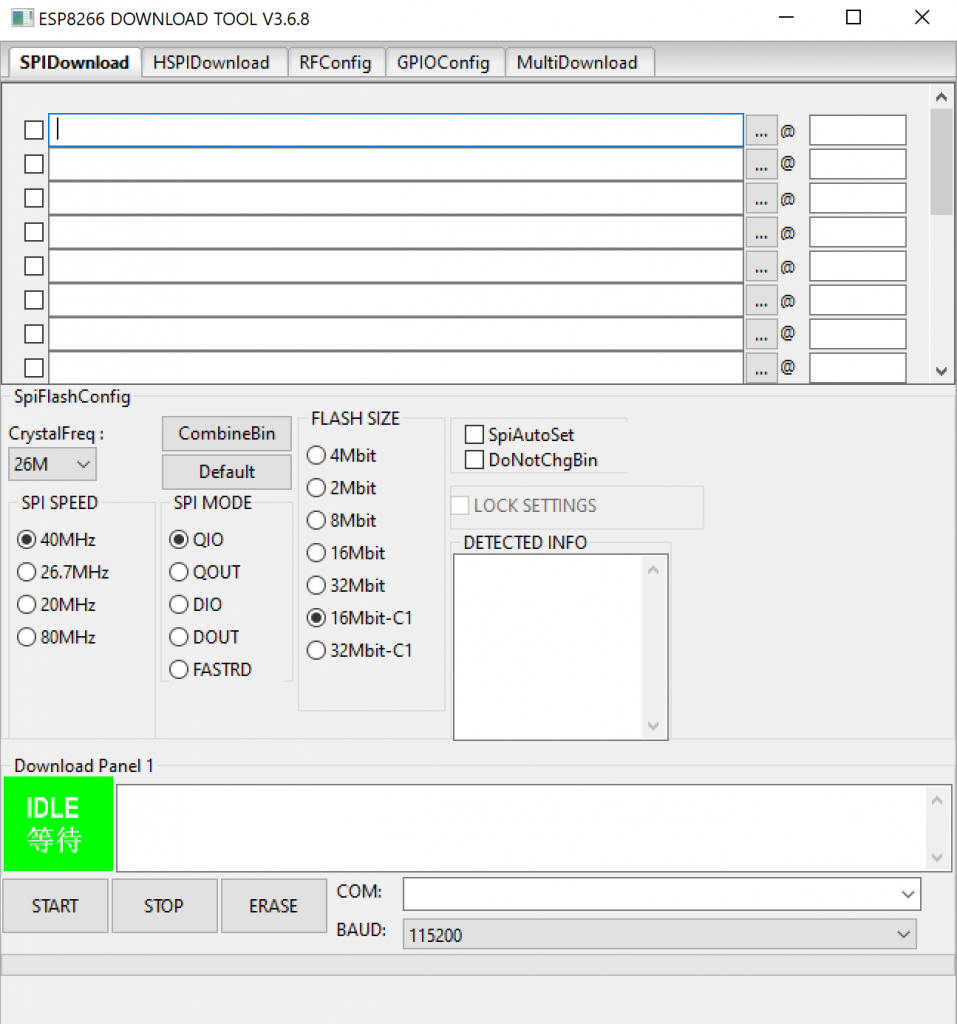
Click the top one for the ESP8266 Download Tool and it should open up this page:

ESP8266 Download Tool Window

Some of those may be blank and you may have different boxes ticked, don’t worry, I’ll run through what to tick.

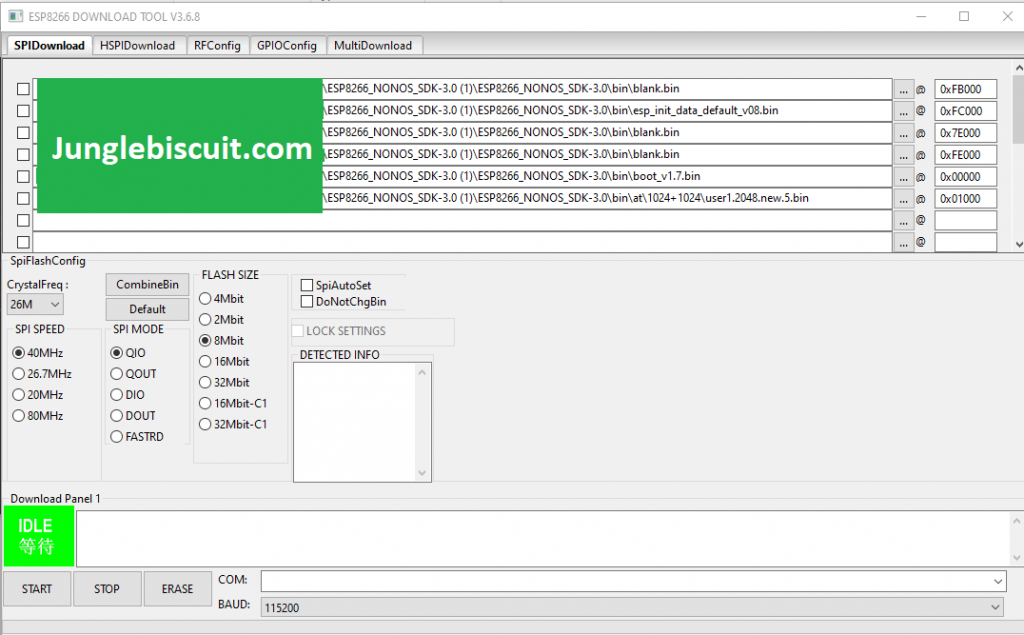
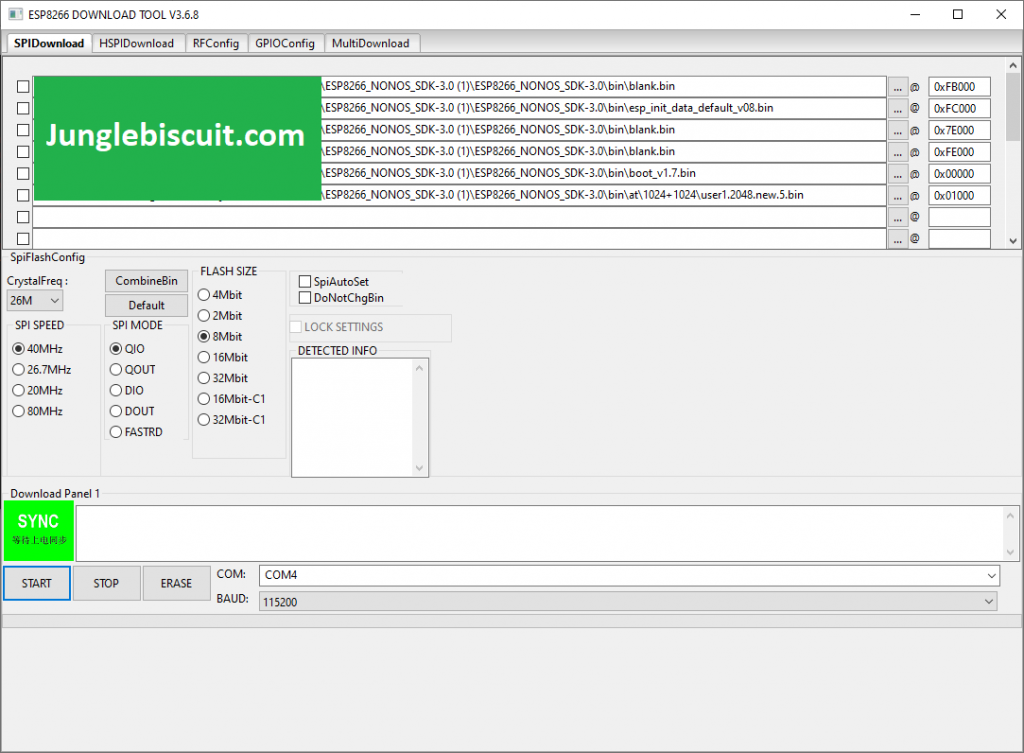
  • Assign the binary files to the flash address as above.
  • Pick CrystalFreq as 26M from the dropdown
  • Click the SPI SPEED button 40MHz
  • Click the SPI MODE button QIO.
  • Click the FLASH SIZE radio button for 8Mbit.

So now it should look like this:

ESP8266 Download Tool Window Adding Binary Files

Ok now you are ready to plug in, when you plug the USB in you need to do the following to put the ESP into programming mode:

  • Hold down the reset switch (SWI 1)
  • Hold down the flash switch (SW 2)
  • Release the reset switch (SWI 1)
  • Release the flash switch (SWI 2)

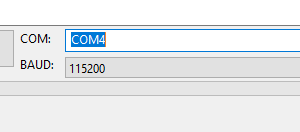
Make sure you select the COM port you are using from the drop down and set the baud rate to 115200:

ESP8266 Download Tool Select COM port and baud rate

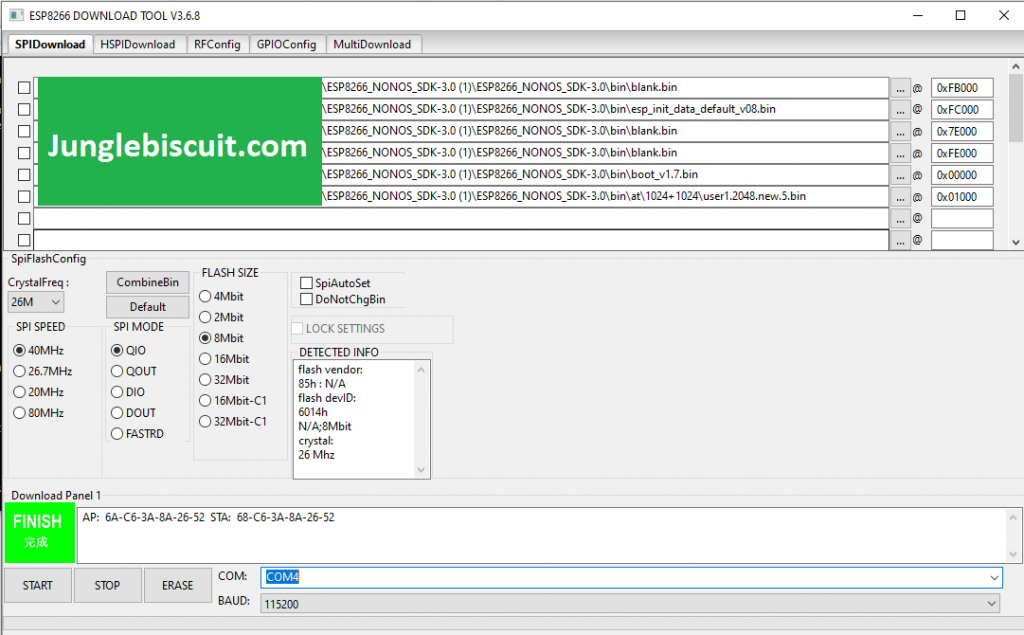
Now just press start and it will sync then download then finish the flash!

ESP8266 Download Tool Synchronizing

ESP8266 Download Tool Finished Flashing

How To Fix CPU Fan Errors On Computer Startup

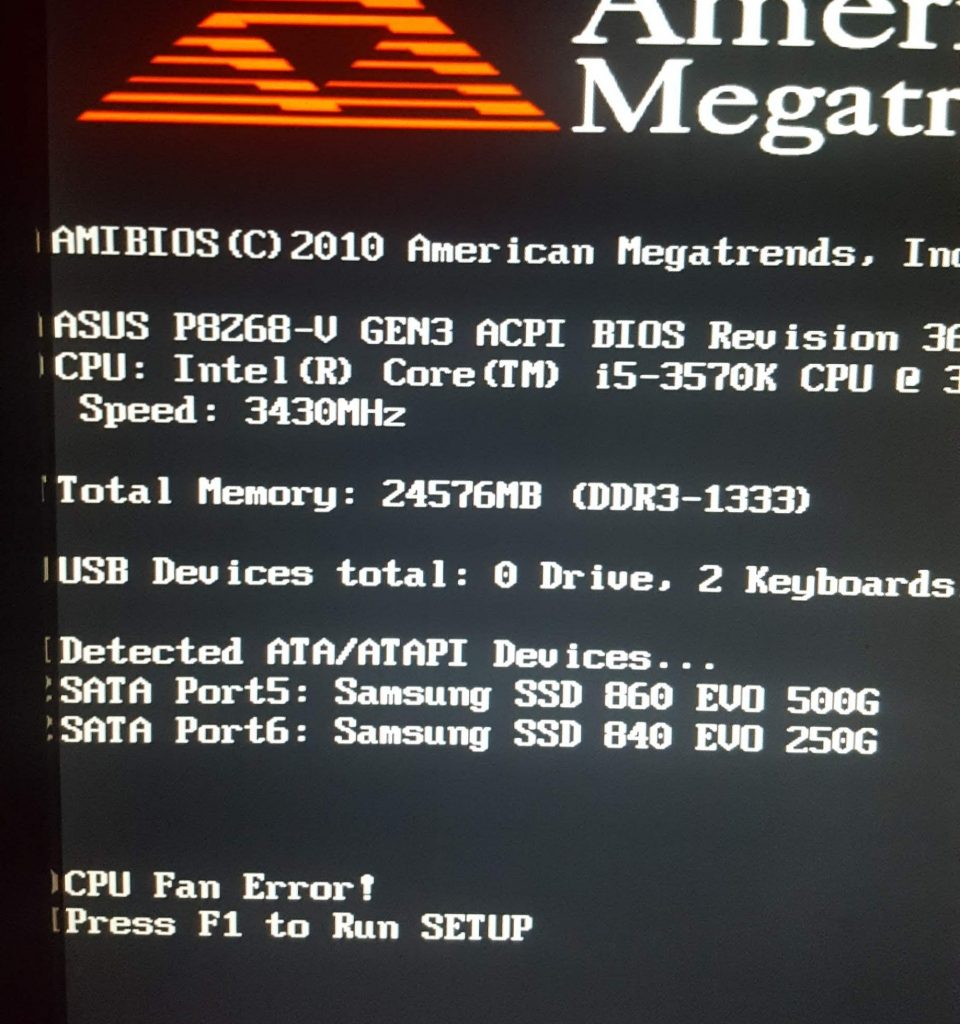
So, you have lots to do, you go to turn your PC on and before it even considers starting you are hit with an error:

“CPU Fan Error!”

CPU Fan Error On Bootup

The first thing to do is check the fan is ok and is plugged in correctly but if you have done that and it seems good then this can be an annoying problem to solve.  On my computer I would restart a few times and then all of a sudden for what seems like no reason it would work and go straight through as if everything is normal.

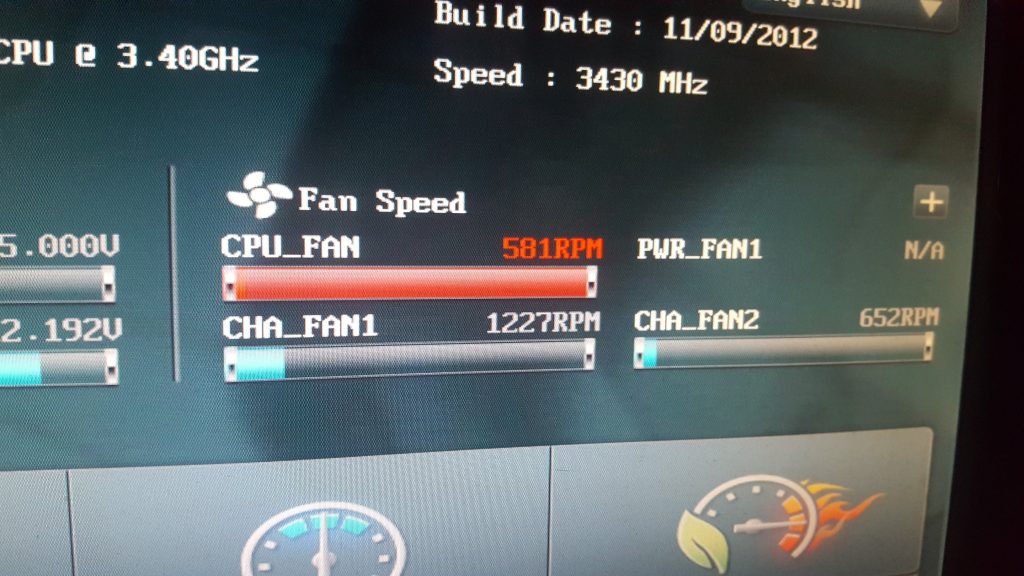
That error alarm is normally triggered when the RPM of the fan goes below a set speed.  Luckily that speed is configurable in the BIOS settings on most systems.  So when the computer starts up press DEL or F1 or whatever button it is to get to the BIOS.  Once there on my PC I could see the actual fan speed reported on the main page as below:

Checking The Fan Speed From BIOS

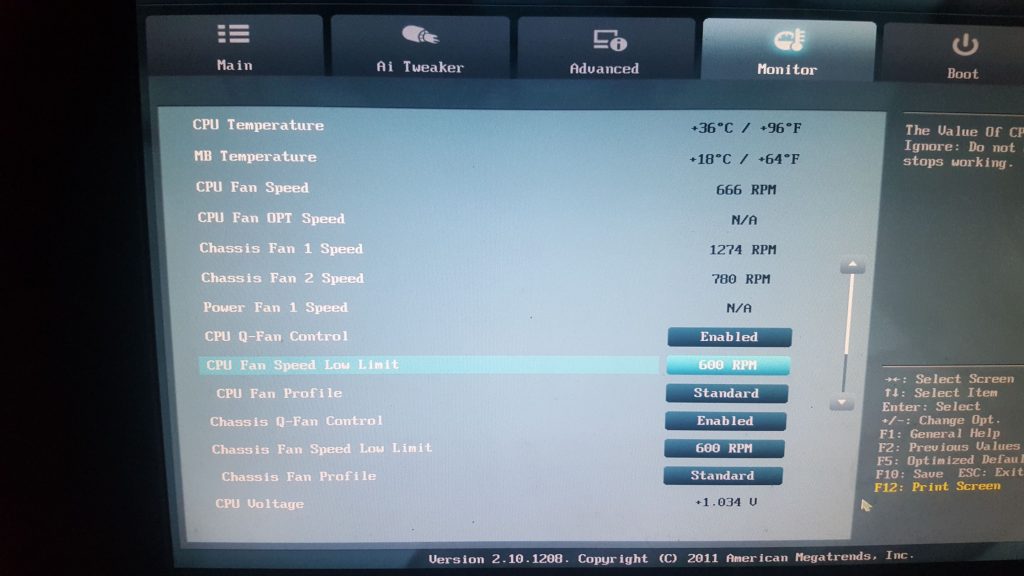
You can see above it is spinning at 581 RPM.  To check and change the trigger limit I had to go to advanced settings then click on the “monitor” tab which then had a setting called “CPU Fan Speed Low Limit” which was set to 600 RPM.

Checking the CPU Fan Low Limit

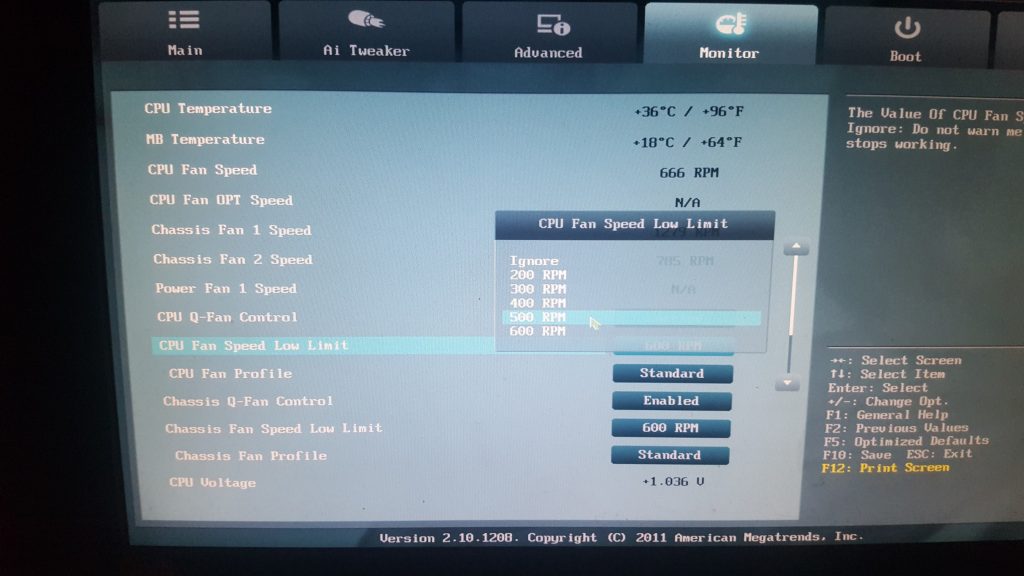
There is the reason we are getting the error, my fans spinning at 581 and the low limit is 600.  So I clicked the button and a drop down list appeared, simply select a lower value, I went for 500 RPM which solved the problem and meant my PC started fine every time.

Changing the CPU Fan Low Limit


Kerv Contactless Payment Ring Review

Well, I first saw this on Kickstarter in October 2015 and it sounded like a great idea for someone like me who travels through London every day constantly getting my card out to swipe through the gates at the train then the tube and sometimes the bus too. Estimated delivery was stated as April 2016, and well over two years later and some nagging via email it finally arrived at my door January 2018! So we had a bit of a bad start….but I have gone straight out and put it to the test and thought I would share my experience good and bad so that others can get a bit of information if they are looking at buying this product.

First Impressions – Look and Feel

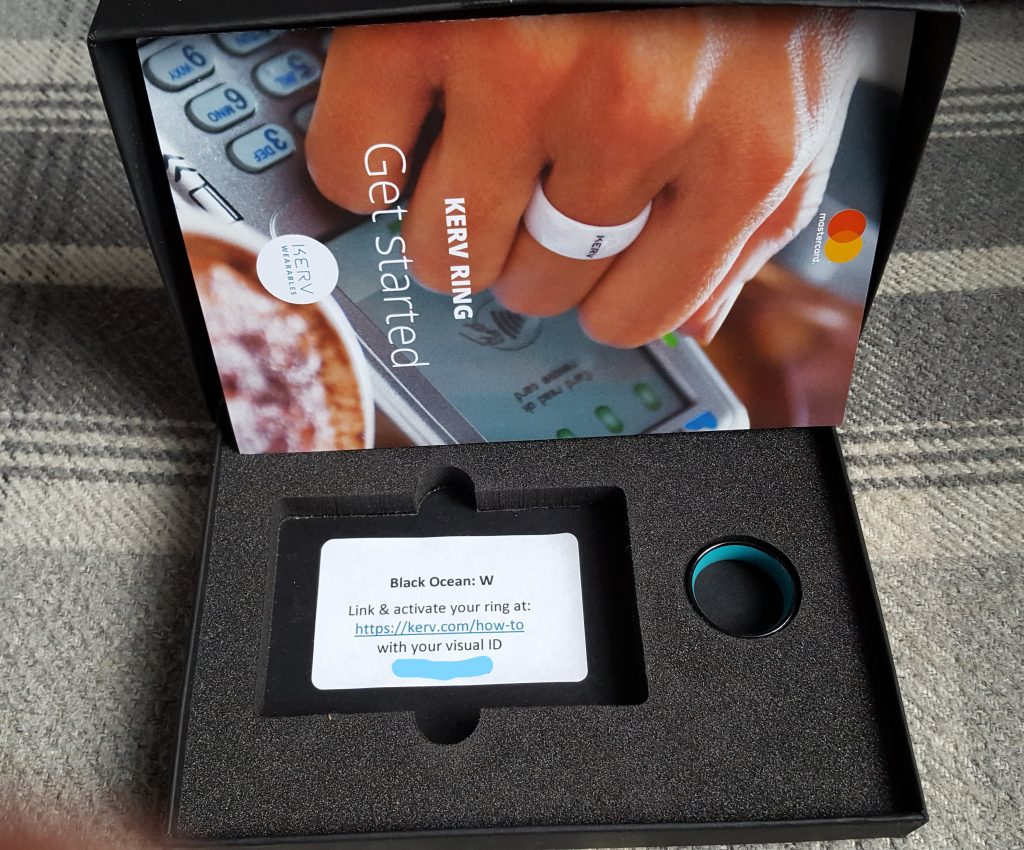
I must say the packaging looked amazing and when you open it looks very smartly presented.

Kerv Smart Ring Packaging

Kerv Smart Ring Inside Packaging

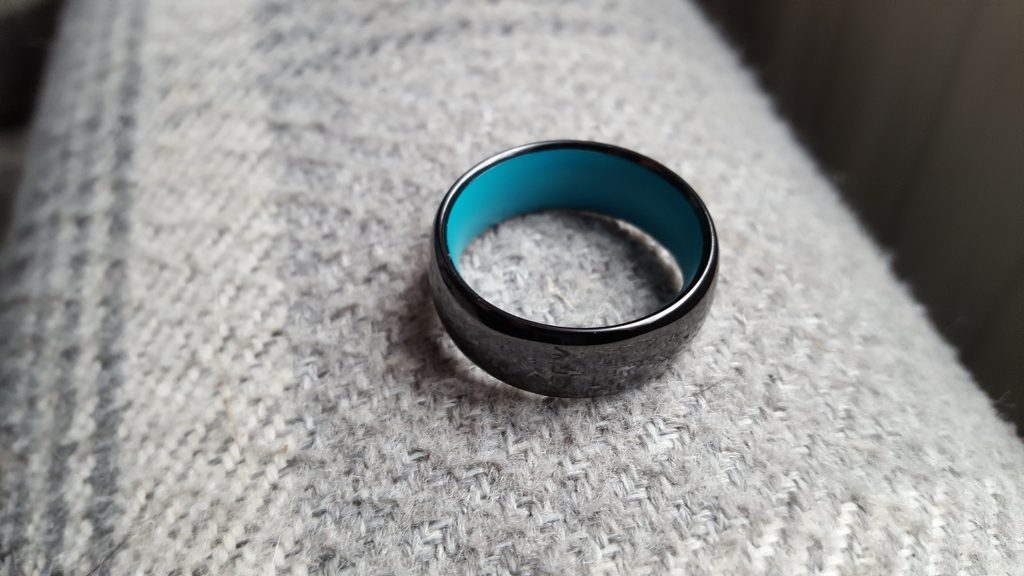
The ring looks nice and smart, feels smooth and weighs hardly anything.

Kerv Ring
Kerv Ring

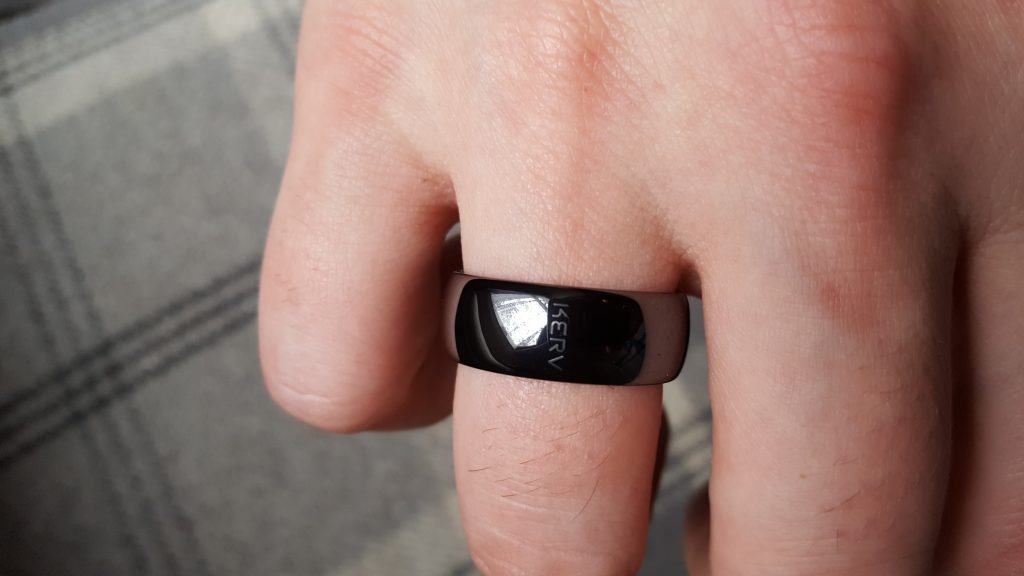
Generally I like it and the fit was perfect as measured using the Kerv sizing chart.

Kerv Smart Ring Look and Feel On My Finger

Initial Setup

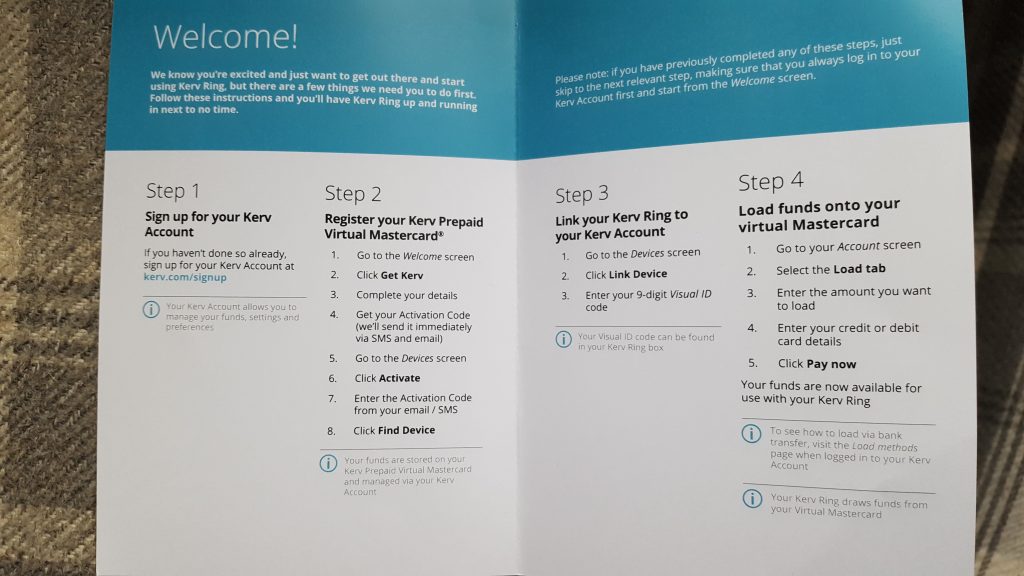
The box came with a set of instructions to set up your online account, associate it to your ring, then set up a virtual mastercard and add some money to get started.

Kerv Ring Instruction Leaflet

I found it very easy and was up and running in no time. I went straight for the auto top-up feature which is a bit of a pain as the lowest value is £30 to trigger an auto top up and the lowest value you can top up with is also £30 so every time it tops up you could have £60 on there waiting to be spent. I’d prefer if it were smaller values but there you go.

First Test

So I jumped straight in and tested it on my route to work. There is a contactless reader into the train and out the other side then a reader into the tube and out the other side, I hovered it over the first reader wondering if anything was going to happen and ping, it worked! It was a little slower than I was expecting but worked none the less. The other readers it was roughly the same but the last one it came up with the dreaded “seek assistance”. I stepped back and let the other people through then took it off and put the ring directly on the reader and it worked again. This led me to think I was using it wrong, if only I had read the instructions properly!

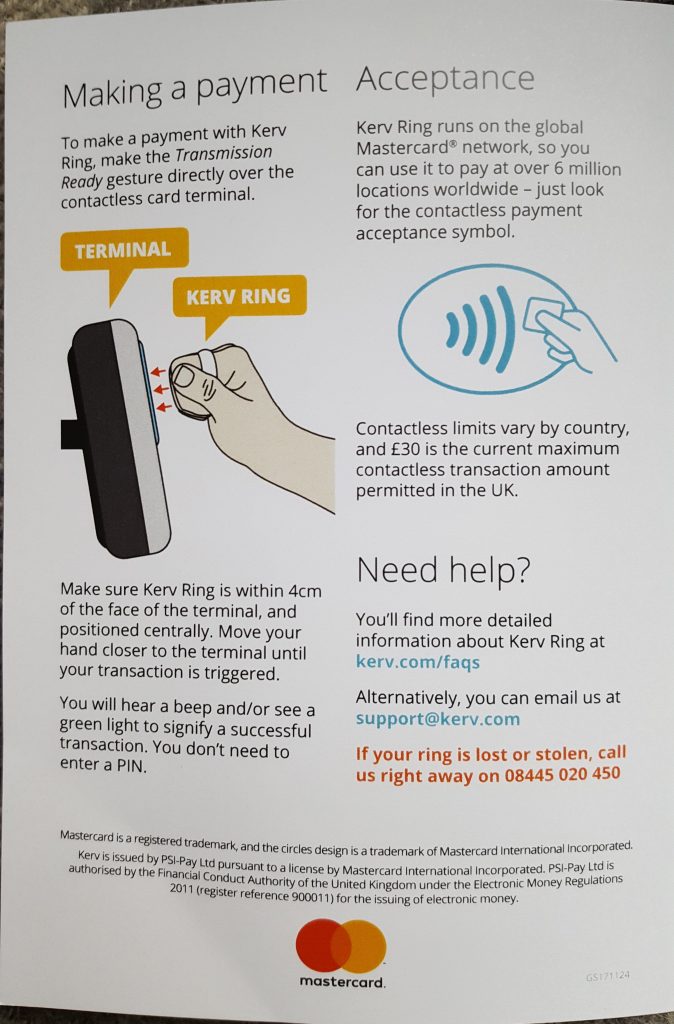
On the way home it was pretty much the same as above, when I got back I opened the instructions and there it was….It says clearly on the instructions how to use it and I had been doing it differently like a prize turnip!

Kerv transmission ready gesture for making a payment

Second Test

Well, this time fully prepared I approached the first reader and this time using the correct hand gesture it picked it up really quickly similar to using an actual card on the machine. I continued all the way to and through London and back again and it picked it up on every single one no problem at all. Was very impressed.

One of the main problems I found is that (at the time of writing) you cant use it with your TFL account to see journey history, payment history or to claim a refund. They do give you a virtual MasterCard number including the CVV number but if you put that into the TFL website it doesn’t pick up the data. This is because the chip in the ring has a separate card number but unfortunately they don’t give you that number on the website or anywhere else. I contacted support on this one and they said they are working on it and will update me when they have something.

Support

Support were very responsive and helpful in general, I first had a lot of contact with them as I was a Kickstarter backer and had the long delay I mentioned, they replied every time within 24 hours and did update me on progress. I do wonder if I would ever had received the ring now if I had not contacted them.

Summary

A good device if you don’t mind wearing the ring when you are travelling and don’t like getting your card out constantly. Use it properly on the reader and it will reward you by working as designed. I have fingers crossed that they will get the device chip number sorted for integration with the TFL website but even without that its a good gadget to show off and save you time.  Since this article was written Kerv has been re-branded to K-Ring.