Classic Games – Monkey Island II: Lechucks Revenge

Monkey Island II Loading Title Screen

THE STORY

Monkey Island 2: Lechucks Revenge: is harder, and even more hilarious than the first. This time Guybrush is looking for the treasure of Big Whoop but accidentally resurrects the Ghost Pirate Lechuck in the process but in the form of a zombie this time.

MONKEY ISLAND II TIPS

No walkthroughs/tips submitted for this game yet – be the first to submit one on the junglebiscuit.com forums

MONKEY ISLAND II QUOTES

Some of my favourite monkey island banter is between Guybrush and the Carpenter:

Guybrush: How much wood would a woodchuck chuck if a woodchuck could chuck wood?

Carpenter: A woodchuck would chuck no amount of wood since a woodchuck can’t chuck wood.

Guybrush: But if a woodchuck could chuck and would chuck some amount of wood, what amount of wood would a woodchuck chuck?

Carpenter: Even if a woodchuck could chuck wood and even if a woodchuck would chuck wood, should a woodchuck chuck wood?

Guybrush: A woodchuck should chuck wood if a woodchuck could chuck wood, as long as a woodchuck would chuck wood.

Carpenter: Oh shut up.

MONKEY ISLAND II SCREENSHOTS

Monkey Island II Screenshot

Monkey Island II Screenshot

Monkey Island II Game Cover

Monkey Island II Game Cover

Back To Top

Runescape – Mithril Dragons Guide

Requirements:

– You must be able to get in the Ancient Cavern after passing a certain stage in the Barbarian Training.
– 100+ combat is advised.
– Either high (80+ will do) melee or high (80+) ranged.
– 43 Prayer

Recommended Levels (minimum, best is 99 of course):

Melee: 80 attack, 80 strength, 75 defence, 80 hitpoints, 70 ranged, 70 prayer.

Ranged: 40 defence, 85 ranged, 44 prayer.

68+ Summoning is very useful, making trips longer.

Item Requirements:

– Decent mage defence (black hides, karil, armadyl)
– Antifire shield/Dragonfire shield

Recommended items:

– Prayer Potions
– Super/Extreme Melee Set(s)
– Sharks
– Unicorn Stallion Pouch + scrolls, or Fire/Moss/Ice Titan with Titan’s Constitution Scroll, or a Bunyip.
– Anti Fire potion
– Games Necklace

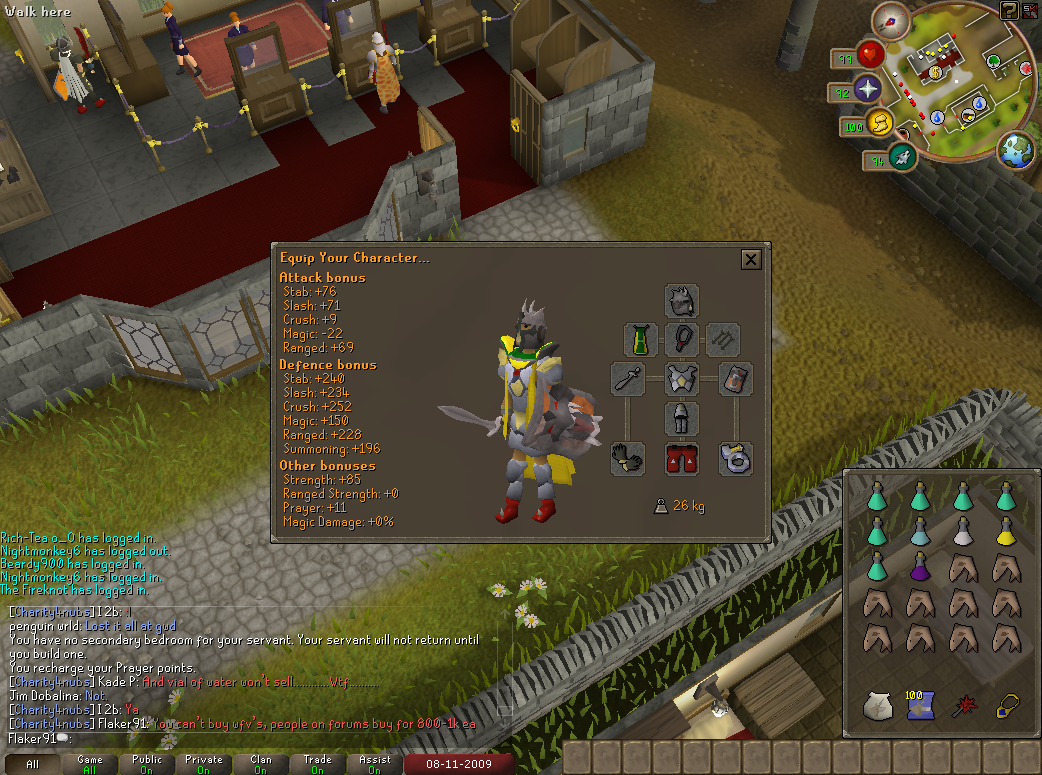
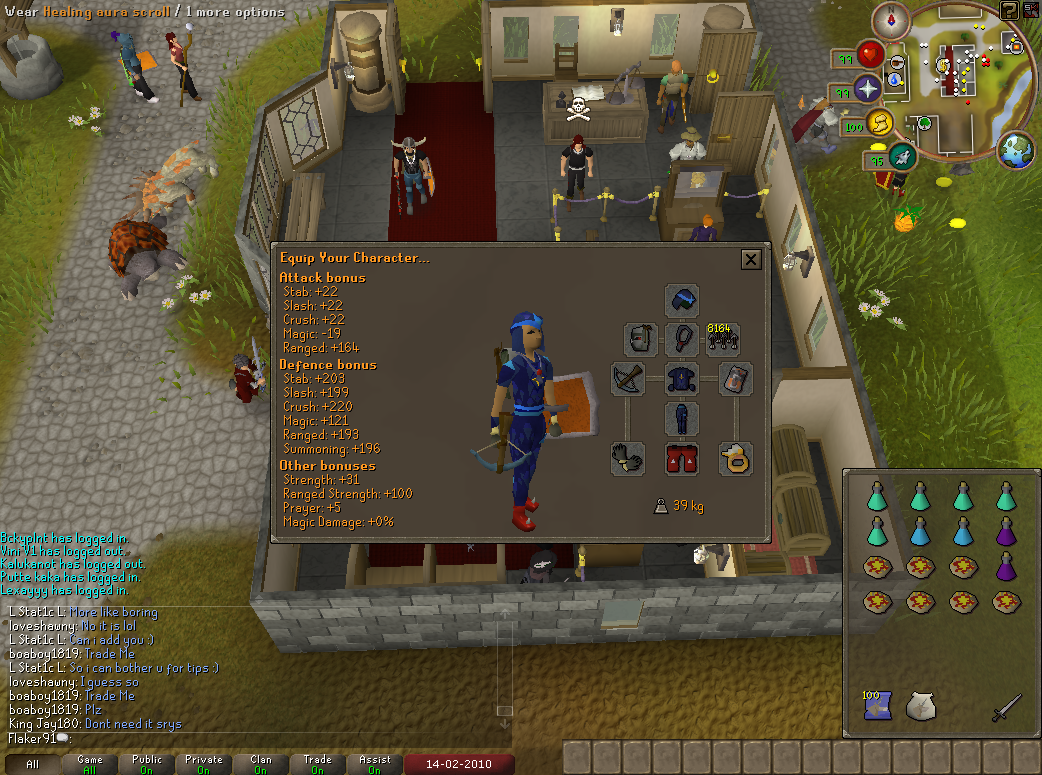
The Gear when Melee-ing for your slayer task:

Mithril Dragon Killing Melee Style

Mithril Dragon Killing Melee Style

This is pretty much the best you can have.

Alternatives:

Neitiznot when not on your task.

Armadyl Chestplate > Karil Leathertop > Black/God d’hide body

Bandos Tassets ~ Armadyl Plateskirt > Karil Leatherskirt > Black/God d’hide chaps

Fury > God Stole > Glory

Ardougne Cape 3(+elite) > Skillcape (t) > Skillcape (u) > Legends cape
Dragonfire Shield (DFS) > Anti-dragon shield

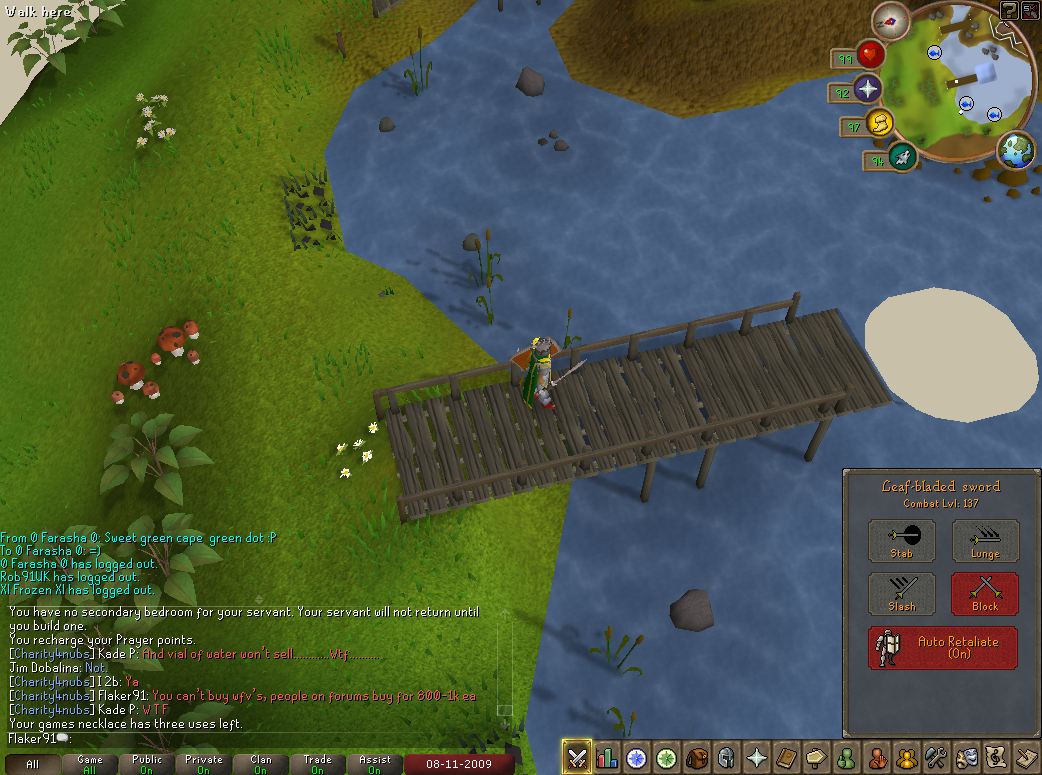
Leaf-bladed Sword > Whip* –> This is just my preference, as Leaf Bladed Swords have a stab option and supposedly, Mithril Dragons are weak to stab attacks.

Dragon Boots ~ Infinity Boots ~ Ranger Boots > Climbing Boots –> Dragon Boots, Infinity Boots and Ranger Boots all have their up- and downsides. If you have one of the three, just use the pair you have.

Barrow Gloves > Dragon Gloves > Dragon Gauntlets

Berserker Ring ~ Archers’ Ring ~ Seers Ring ~ Warrior ring –> Seeing Mithril dragons use three styles, any of these rings will do. Otherwise, use a Ring of Life if you don’t feel comfortable with the more expensive rings.

Inventory:

At 92 prayer and maxed melee, I use 6 Prayer potions (4) and 1 Extreme Melee set (3) or 2 Super Melee sets (4) for about 9 kills. It’s advised to go by trial and error. Take about this amount at first, see how many kills you’ll be able to get. When you know what’s missing or too much, you can adapt your inventory to your needs.

If you have a Unicorn Stallion or a Moss/Ice/Fire Titan, take about 100 scrolls. It’s more than enough, but it’s a bit annoying when you need to kill one more Mithril dragon and you’re out of food and scrolls.

When you’re taking a Bunyip, take more food (Sharks/Pineapple Pizza’s) and no scrolls, as Mithril dragons won’t drop raw food.

1 Antifire (3) or (4) is enough when using melee on your task. I have NOT tried super antifire potions, I doubt it’ll make a big difference.

Dragon Mace is one of the best special attack weapons against Mithril Dragons. Feel free to try other weapons, I suggest Dragon Mace, as you can hit almost/up to 60 with D mace when on task, after potting, using Piety.

The Gear when Ranging

Mithril Dragon Killing Range Style

Mithril Dragon Killing Range Style

Alternatives:

Focus Sight addition to Slayer helmet > Armadyl Helmet > Karil Coif > God Coif > Neitiznot

Armadyl Body and skirt> Karil top and skirt > Black/God d’hide body and chaps
Fury > God Stole > Glory

Dragonfire Shield (DFS) > Anti-dragon shield

Ava’s Accumulator > Ava’s Attractor –> You’ll end up shooting a lot of bolts. Walking around without something from Ava will end up in you wasting bolts, or prayer doses.

Diamond Bolts (e) > Broad Bolts ~ Ruby Bolts (e) > Emerald Bolts (e)

Dragon Boots ~ Infinity Boots ~ Ranger Boots > Climbing Boots –> Dragon Boots, Infinity Boots and Ranger Boots all have their up- and downsides. If you have one of the three, just use the pair you have.

Barrow Gloves > Dragon Gloves > Dragon Gauntlets

Archers’ Ring > Seers Ring > Berserker Ring ~ Warrior Ring –> Seeing you’re ranging mithril dragons, an Archers’ Ring is the best in this position.

Inventory:

At 92 prayer and 94 ranged, you’ll need about 5 prayer potions (4) and 3 ranging potions (3) or 1 extreme ranging (4) and 2 antifire (3) for 9 kills. It’s advised to go by trial and error. Take about this amount at first, see how many kills you’ll be able to get. When you know what’s missing or too much, you can adapt your inventory to your needs.

If you have a Unicorn Stallion or a Moss/Ice/Fire Titan, take about 100 scrolls. It’s more than enough, but it’s a bit annoying when you need to kill one more Mithril dragon and you’re out of food and scrolls.

When you’re taking a Bunyip, take more food (Sharks/Pineapple Pizza’s) and no scrolls, as Mithril dragons won’t drop raw food.

Seeing you’d want to stay away from the dragon’s melee attacks, it’s advised to take an (enhanced) Excalibur. Feel free to try other weapons to spec. with.

NOTE: You CAN! take a filled Bull Ant/Terrorbird/Tortoise/Pack Yak/other familiar from outside. Due to the new fairy ring and the ferocious ring, it is possible to enter with a familiar.

How to get there (The Old Way):

Teleport to Barbarian Outpost with your Games Necklace.

Bank your Games Necklace inside Barbarian Assault, if it didn’t turn to dust.

Walk back to the teleport spot again, then walk south to the pier.

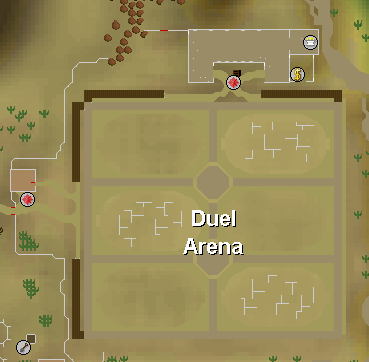
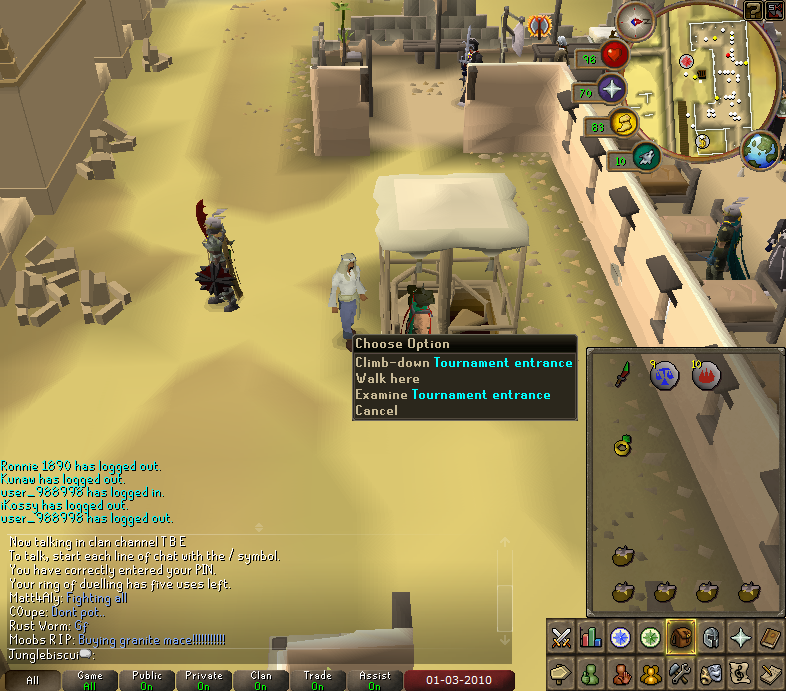
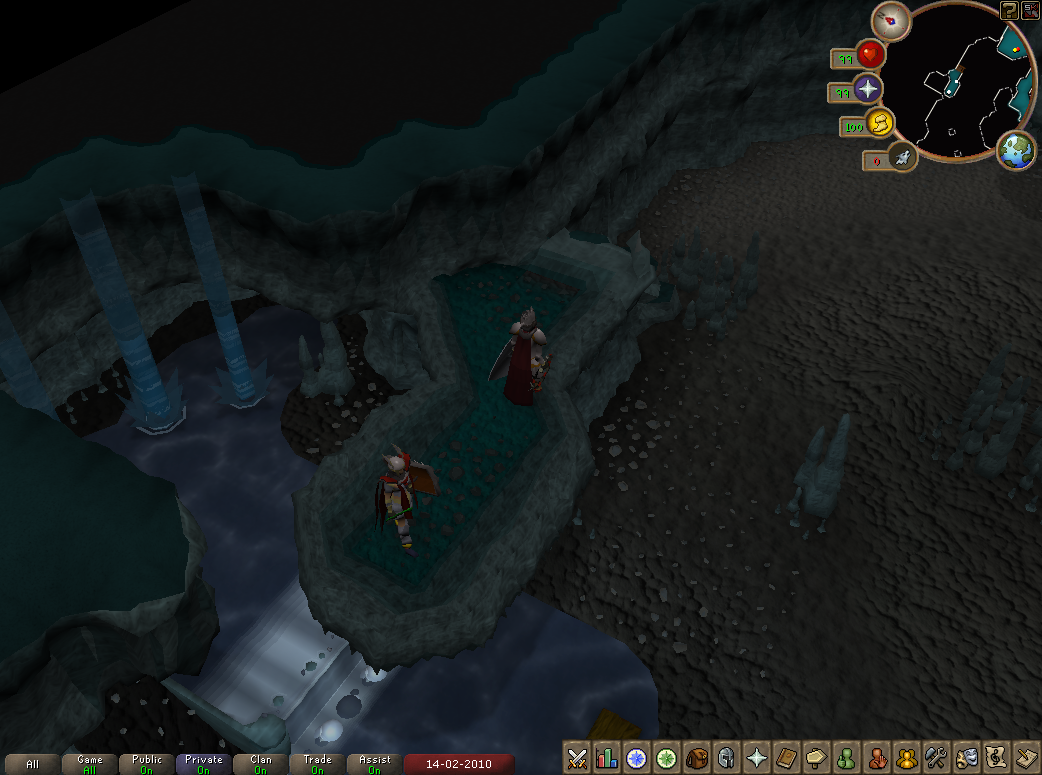
Jump into the whirlpool (This picture shows how the game is glitched, but this is the location)

How To Get To Mithril Dragons

How To Get To Mithril Dragons

When you get in, you’ll see this:

Inside The Mithril Dragon Lair!

Inside The Mithril Dragon Lair!

Get prepared to fight from now on.

Take a sip of your antifire potion now. You can also take a sip of your super/extreme melee set now, if you want to focus on the fight.

Put Protect from Magic on.

Go down the stairs. You’ll see some Brutal Green Dragons and most likely a few Waterfiends. Run north until you see the stairs in the wall.

How to get there (Ferocious Ring):

Use your Ferocious Ring to teleport to Kuradal. Take a sip of antifire, put Protect from Mage on and climb down the rough hewn rocks.

Run north-east towards the stairs. While you’re running, start potting.

How to get there (Fairy Ring):

Same as with the Ring. You take a sip of antifire right before you use the ring with the code BJQ, put Protect from Mage on and start running and potting.

Melee:

Climb up the stairs. As you do, put Protect from Melee and Piety (if you can) on.
Take your sip of your super/extreme melee set now, if you didn’t do that before.
Summon your familiar now, this is the best moment to do so.

Grab your special attack weapon and spec it four times. Proceed using your original weapon. Keep your prayer up. If you are clicking on your food and/or scroll-option regularly, you might forget about the prayer potion. This can end up in you either wasting a lot of food, or in the worst case even dying.

Watch your HP, keep it close to its maximum without wasting food/scrolls.
For instance, when you’re on 75/92 Hitpoints, don’t use a shark, but use a familiar scroll.

When the Mithril Dragon dies, put Piety/Turmoil off, keep Protect from/Deflect Melee on. Trust me, the few prayer points used while waiting for the spawn are worth it. When it spawns, and instantly combo’s you for a 25-18 with melee and mage, you’ll have to use more than you want.

While you’re waiting for the spawn, take another sip of your Super Melee set. It is very useful to stay on the limit of your levels, so the kills will be quicker. When you’re using Extreme Melee sets, take a sip when your attack falls below 119-120 when you’re 99.
You can also take another sip of Prayer Potion if your prayer is low, but don’t waste any.

As soon as the dragon spawns again, put Piety/Turmoil on again and start fighting it.
Keep repeating this, your task will be over in no-time.

Take a sip of antifire potion whenever the message says: Your protection against dragonfire has ran out.

Range:

Climb up the stairs. As you do, put Protect from/Deflect Missiles and Eagle Eye/Leech Ranged (if you can) on.

Take your sip of your (extreme) ranging potion now, if you didn’t do that before.
Summon your familiar now, this is the best moment to do so.

Keep your prayer up. If you are clicking on your food and/or scroll-option regularly, you might forget about the prayer potion. This can end up in you either wasting a lot of food, or in the worst case even dying.

Watch your HP, keep it close to its maximum without wasting food/scrolls.

For instance, when you’re on 75/92 Hitpoints, don’t use a shark, but use a familiar scroll.

When the Mithril Dragon dies, put Eagle Eye/Leech Ranged off, keep Protect from/Deflect Missiles on.

While you’re waiting for the spawn, take another sip of your ranging potion. It is very useful to stay on the limit of your levels, so the kills will be quicker. When you’re using extreme ranging potions, take a sip when your ranged falls below 115 when you’re 99.
You can also take another sip of Prayer Potion if your prayer is low, but don’t waste any.

As soon as the dragon spawns again, put Eagle Eye/Leech Ranged on again and start fighting it.

Keep repeating this, your task will be over in no-time.

Take a sip of antifire potion whenever the message says: Your protection against dragonfire has ran out.

Back To Top

Fallout 3 – Trophies and Tips

Fallout 3 – Trophies and Tips

Here are the names of the Fallout 3 trophies, and some tips on how you can achieve them. The tips were written based on my ps3 experience but lots of the tips are also relevant to the xbox and pc versions of the game.

51 Total Trophies: Platinum Trophy 1 Platinum Gold Trophy 2 Gold Silver Trophy 10 Silver Bronze Trophy 38 Bronze Hidden Trophy 0 of these are hidden

Bronze Trophy
Vault 101 Citizenship Award

Got the Pip-Boy 3000

You will get this one without trying, just start a new game and follow what it tells you.

Bronze Trophy
The G.O.A.T. Whisperer

Took the G.O.A.T.

When you are teenage in vault 101, go sit in the classroom and answer the questions. You can change any answer you are not happy with so don’t worry too much ๐Ÿ™‚

Bronze Trophy
Escape!

Completed ‘Escape!’

Take the G.O.A.T and the overseers daughter will wake you up and offer you a gun. Take the gun and go on until Butch asks you to save his mum. You should act here depending which way you are going to take your character – good, neutral or evil. Good save his mum, neutral then make him save his own mum, evil then murder him. When you see the overseer kill the guard captain and the overseer surrenders. Once again chose the option thats best for your character get the code and get out of there to get this trophy.

Bronze Trophy
Following in His Footsteps

Completed ‘Following in His Footsteps’

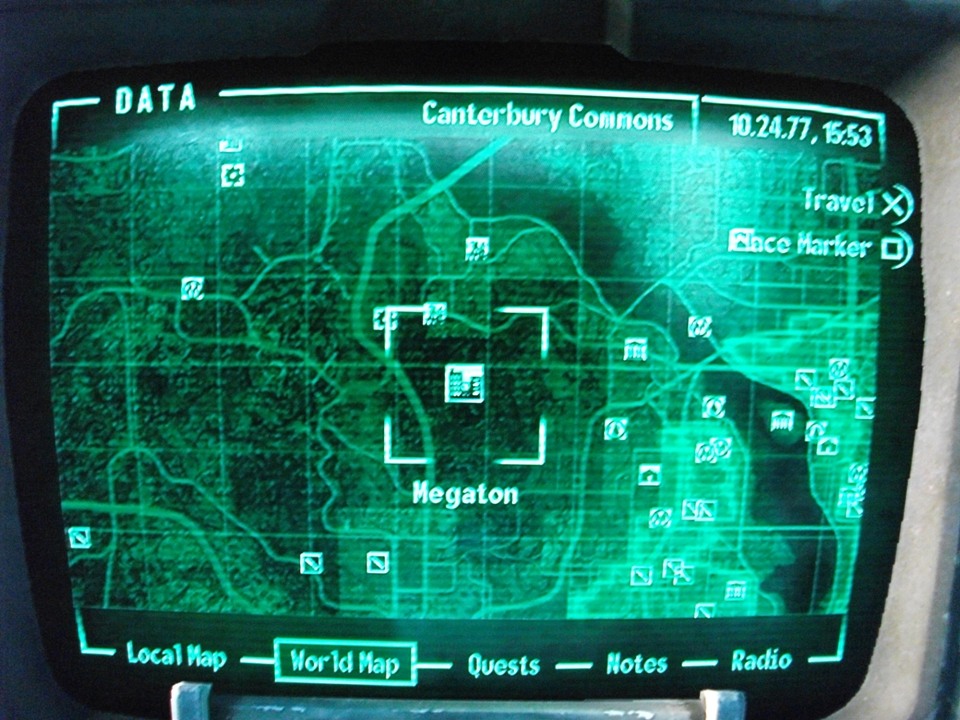
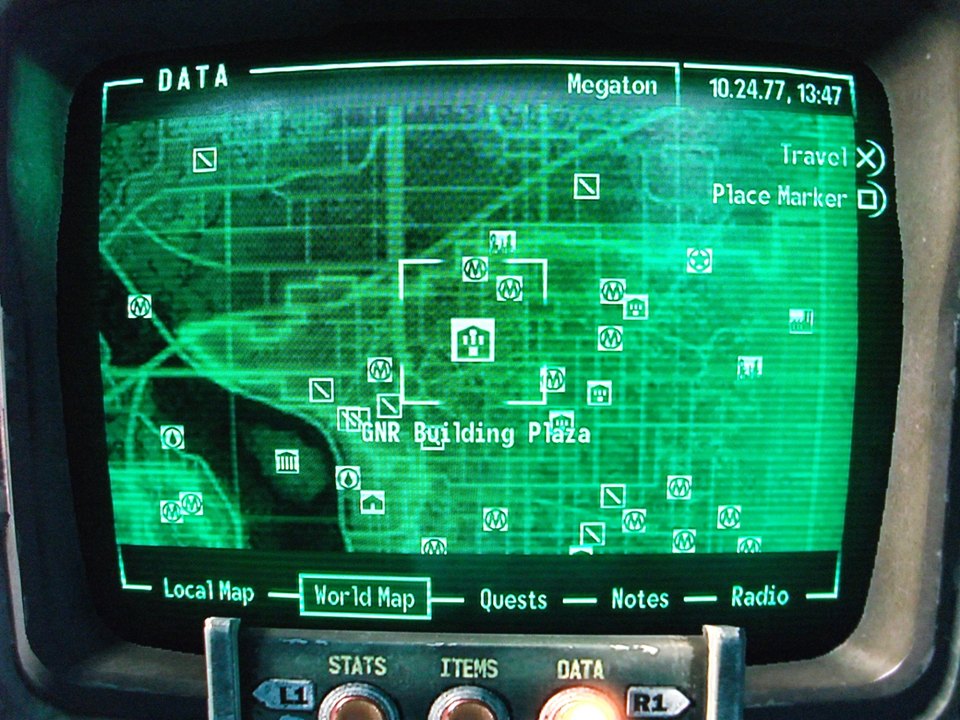
Go South of vault 101 to Megaton, see map:

Fallout 3 Map To Megaton

Fallout 3 Map To Megaton

After you have spoken to the sheriff then go to Moriarty’s saloon. Give Moriarty 100 caps, or hack his computer using the password in the wardrobe nearby. You will then have to go to Galaxy News Radio in DC, see map:

Fallout 3 Map To Galaxy News Radio

Fallout 3 Map To Galaxy News Radio


You will walk into a warzone between mutants and the brotherhood of steel. If you are new to the game I would hide somewhere and let the brotherhood of steel do as much damage as they can to the mutants. There is also a super mutant behemoth in this location, if the brotherhood of steel knights all die then you will have to steal their weapons and kill the behemoth. There is usually a fat man about somewhere so using that is probably the quickest way to kill it. Once the battle is over go into the building and up the stairs and talk to Three-Dog for the end of the mission and this trophy.

Bronze Trophy
Galaxy News Radio

Completed ‘Galaxy News Radio’

After the ‘Following in His Footsteps’ mission if you speak to Three-Dog again he will give you this one. No real need for tips as its pretty easy – follow the instructions.

Bronze Trophy
Scientific Pursuits

Completed ‘Scientific Pursuits’

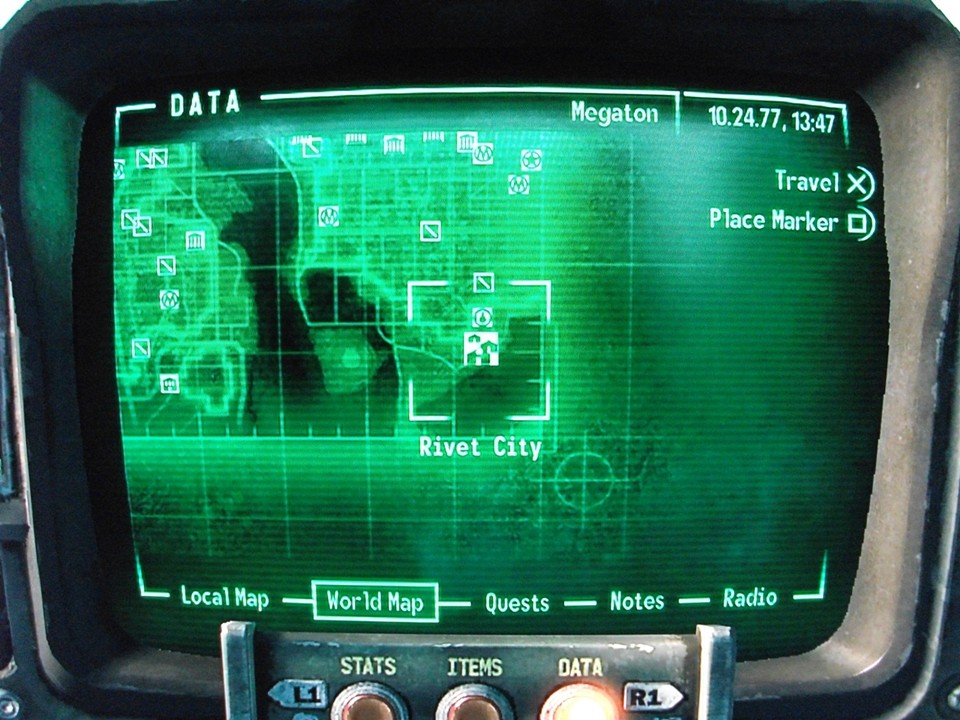
After you complete ‘Galaxy News Radio’ Three-Dog will tell you your dad headed to Rivet city. Travel there – see map:

Fallout 3 Map To Rivet City

Fallout 3 Map To Rivet City

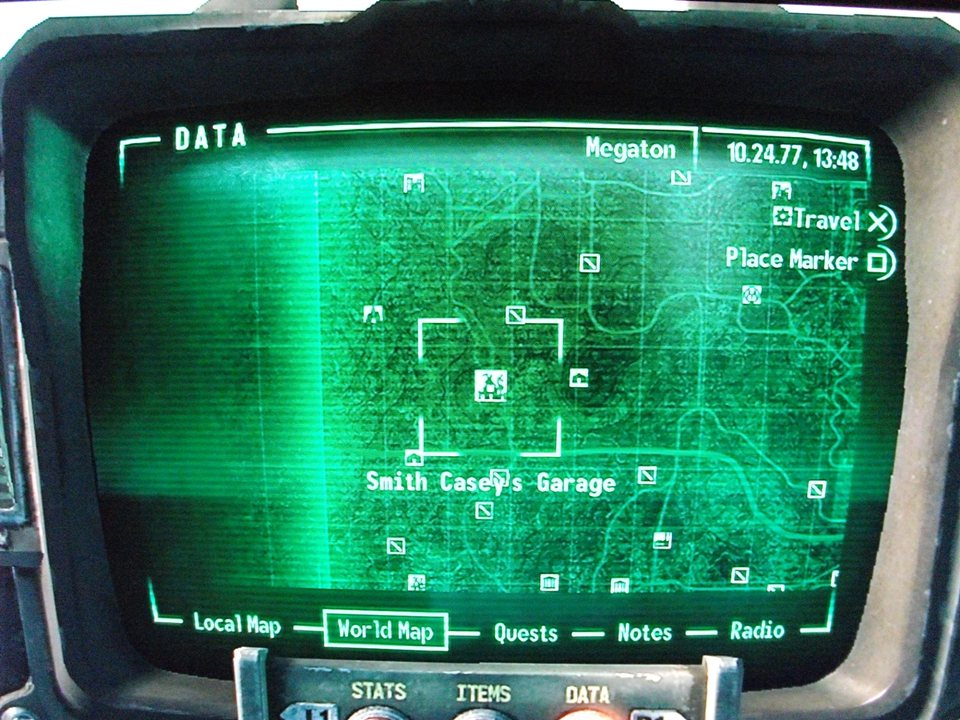
Go down to the science lab and talk to Dr. Li. She will send you to the Jefferson memorial, go there and get to the Rotunda. Collect all of the audio tapes you can see in the control room and tape # 10 says that your dad is in Vault 112. It will be marked on your Pip-Boy map, follow the marker to get there and finish this trophy. Note that is is not actually called vault 112, it is under smith casey’s garage so go there and down the stairs inside:

Fallout 3 Map To Smith Caseys Garage Vault 112

Fallout 3 Map To Smith Caseys Garage Vault 112

Bronze Trophy
Tranquility Lane

Completed ‘Tranquility Lane’

Inside vault 112 (See above trophy for how to get there). Get in the empty pod there and the Tranquility Lane quest will begin. There are two different ways to solve this quest, of course – good or evil.

Good way: You need to speak to Old Lady Dithers and listen to instructions. Next you should go to the abandoned house and click the items in this order to reveal the terminal:

Radio, Pitcher, Gnome, Pitcher, Cinder Block, Gnome, Bottle.

Activate the Chinese invasion and go back to the middle park area to complete it.

Bad way: You need to speak to Betty and listen to instructions. Basically involves being a very naughty boy and ending the life of all involved ๐Ÿ™‚

Bronze Trophy
The Waters of Life

Completed ‘The Waters of Life’

This is the next mission after Tranquility Lane and will start when you get to Rivet City (you can fast travel there as you have been before). In Rivet City go to the science lab and speak with your dad. He will tell you to go to the Jefferson Memorial clense it of bad people. Once you have done that speak to your dad again and follow them. You will get attacked by all sorts of nasties after this and you have to escort the party through the carnage. Move fast and kill stuff only when you need to! You will find yourself at a Brotherhood of Steel stronghold where the quest is complete.

Bronze Trophy
Picking up the Trail

Completed ‘Picking Up the Trail’

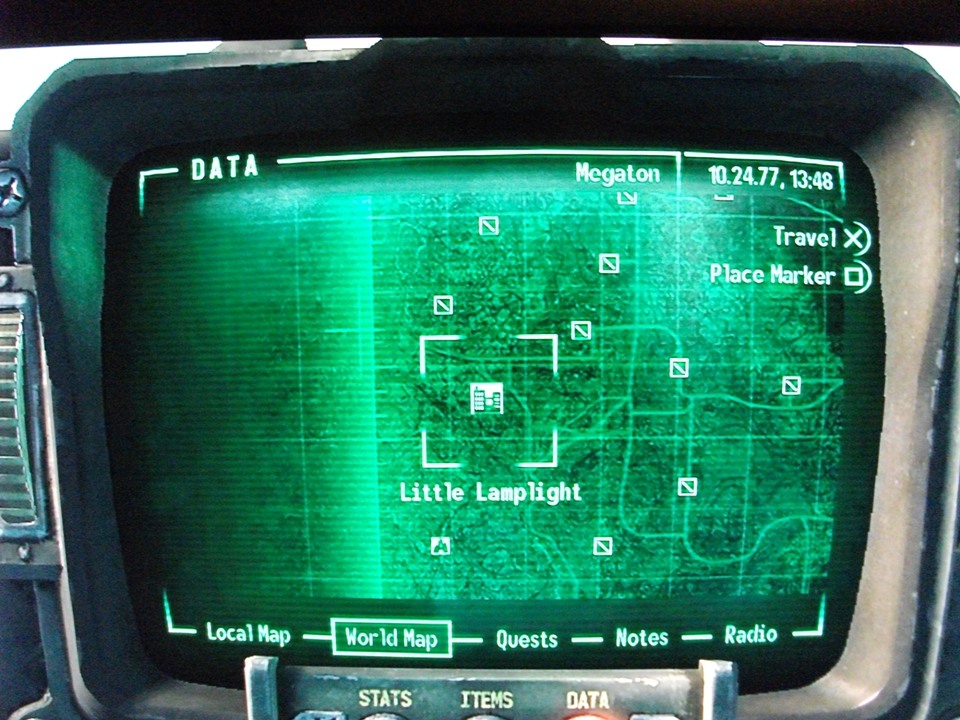
Owyn Lyons informs you that Scribe Rothchild knows where you can find the GECK. The device is in Vault 87 and the entrance is covered in radiation – you can get there through Little Lamplight.

Fallout 3 Map To Little Lamplight

Fallout 3 Map To Little Lamplight

Go to Little Lamplight (see above), you will probably not be able to get in until you complete “Rescue from Paradise” (see next trophy). Once you get in ask Joseph to restore the power and you can hack the terminal to get to the vault. If your hacking skills are not up to scratch then you will have to brave “murder pass”. Speak to Mayor MacCready or Princess and murder away in murder pass! Ask soon as you eventually get to vault 87 you will get this trophy/achievement.

Bronze Trophy
Rescue from Paradise

Completed ‘Rescuse from Paradise’

In Little Lamplight, Mayor MacCready will start this mission off, you will probably already have done it as part of the above trophy/achievement. Make your way to Paradise Falls and save the children from the slavers – easy ay? Try not to bypass the slaver killing and children saving with speech challenge or theres a chance you will not unlock this trophy/achievement.

Bronze Trophy
Finding the Garden of Eden

Completed ‘Finding the Garden of Eden’

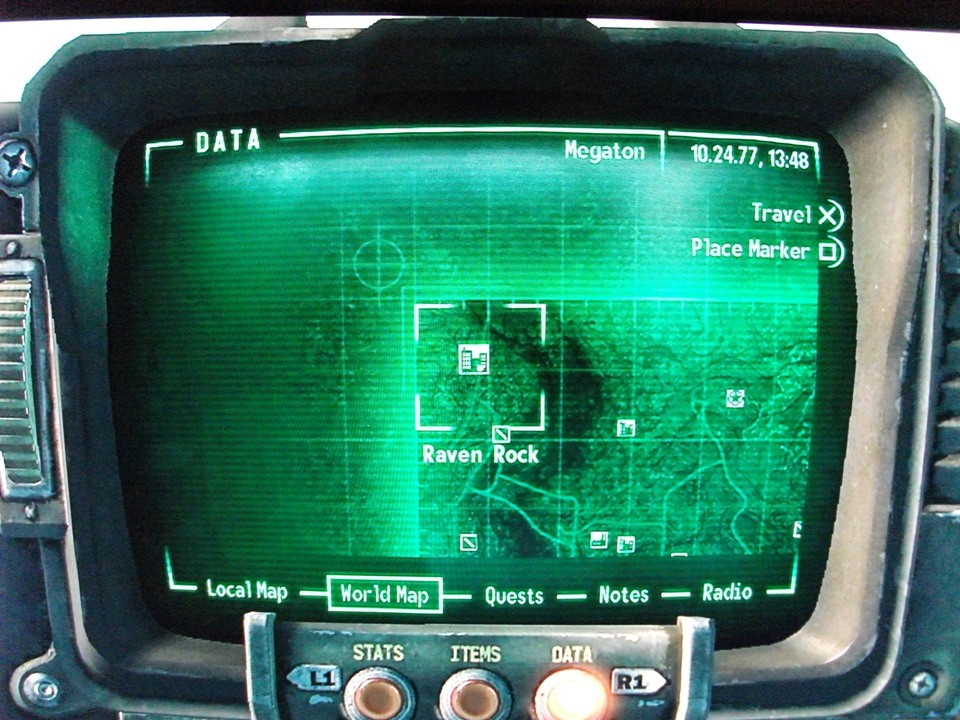
You get this mission in when you go in vault 87 – just work your way through until you find the Fawkes NPC. You can help him or not, either way there is a alternative way to complete this mission but Mr Fawkes is a helpful chap, also a great at shooting stuff so worth keeping in my opinion! If you leave him then go just to the left of his cell and murder all the bad guys, radiation suit up and get the GECK. Other than that Mr Fawkes will get it for you. Either way you will be taken prisoner and escorted to Raven Rock at the end of this mission. Lucky you! You will also get this trophy/achievement:

Fallout 3 Map To Raven Rock

Fallout 3 Map To Raven Rock

Bronze Trophy
The American Dream

Completed ‘The American Dream’

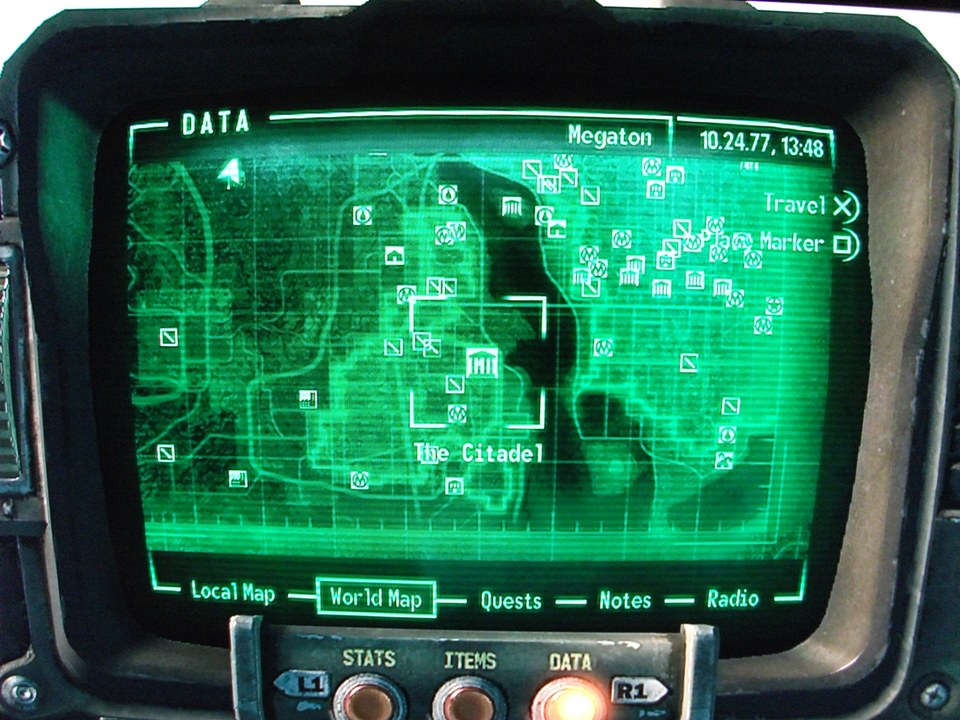
Following on from ‘Finding the Garden of Eden’ you will wake up in a cell in the Raven Rock Enclave Camp being questioned by Colonel Autumn. President Eden will stop him and tell you to go meet him in his office. Pick up your bits and bobs and when you head off to find it the evil president will order your death. Murder all of the Enclave troops and continue your journey to the office anyway. Once up the stairs talk to him, do one of the three options, you can tell him to kill himself, get the FEV virus or don’t get it. Pick any option and after you will have to make your way to the Citadel to get this trophy/achievement.

Fallout 3 Map To The Citadel

Fallout 3 Map To The Citadel

Bronze Trophy
Big Trouble in Big Town

Completed ‘Big Trouble in Big Town’

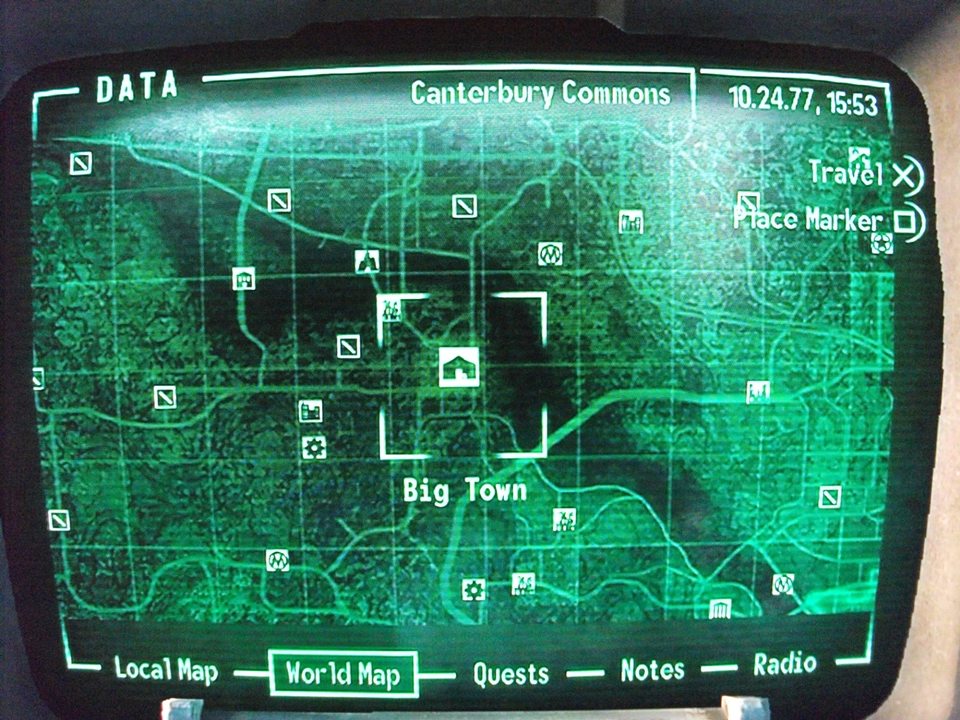
Heres how to get to Big Town:

Fallout 3 Map To Big Town

Fallout 3 Map To Big Town

Speak to any of the ladies or gents in Big Town to start this off. They will ask you to go to Germantown police HQ and recuce some people. Tough battle – Kill everything there (except the people you are trying to rescue!) then get them back to Big Town. Trophy Complete!

Bronze Trophy
The Superhuman Gambit

Completed ‘The Superhuman Gambit’

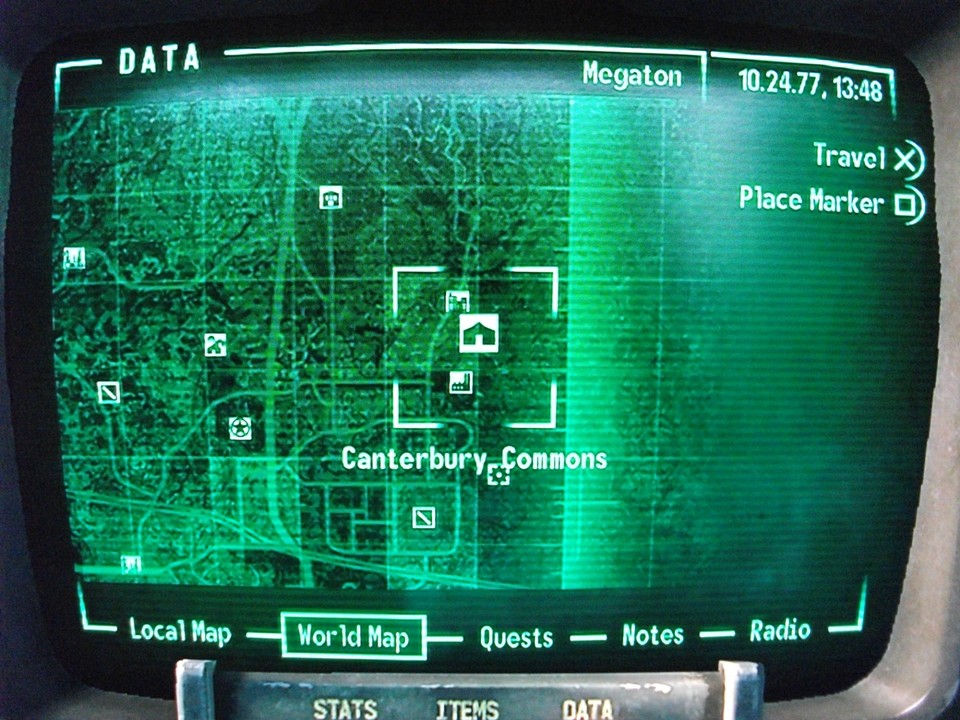
Make your way to Canterbury Commons:

Fallout 3 Map To Canterbury Commons

Fallout 3 Map To Canterbury Commons

When you get there you will see two strange people having an arguement/fight, one dressed like an ant and one dressed like a robot. Uncle Roe will ask you to put an end to their constant fighting. If you speak to Derek Pacion he will tell you where to find them, you can kill one of them or both of them to end this mission and get the trophy/achievement.

Bronze Trophy
The Wasteland Survival Guide

Completed ‘The Wasteland Survival Guide’

In Megaton you will find a shop called “Craterside Supply” – Speak to the lady who owns it to start this mission. There are many tasks you have to do to complete each section of the guide and its a bit of a long one. Most people do this at the start of the game and of course you can just mess about and not do the tasks properly, you will still get the trophy but will get bad karma.

Bronze Trophy
Those!

Completed ‘Those!’

No tips yet

Bronze Trophy
The Nuka-Cola Challenge

Completed ‘The Nuka-Cola Challenge’

No tips yet

Bronze Trophy
Head of State

Completed ‘Head of State’

No tips yet

Bronze Trophy
The Replicated Man

Completed ‘The Replicated Man’

No tips yet

Bronze Trophy
Blood Ties

Completed ‘Blood Ties’

No tips yet

Bronze Trophy
Oasis

Completed ‘Oasis’

No tips yet

Bronze Trophy
The Power of the Atom

Completed ‘The Power of the Atom’

No tips yet

Bronze Trophy
Tenpenny Tower

Completed ‘Tenpenny Tower’

No tips yet

Bronze Trophy
Strictly Business

Completed ‘Strictly Business’

No tips yet

Bronze Trophy
You Gotta Shoot ‘Em in the Head

Completed ‘You Gotta Shoot ‘Em in the Head’

No tips yet

Bronze Trophy
Stealing Independence

Completed ‘Stealing Independence’

No tips yet

Bronze Trophy
Trouble on the Homefront

Completed ‘Trouble on the Homefront’

No tips yet

Bronze Trophy
Agatha’s Song

Completed ‘Agatha’s Song’

No tips yet

Bronze Trophy
Reilly’s Rangers

Completed ‘Reilly’s Rangers’

No tips yet

Bronze Trophy
Reaver

Reached Level 8 with Bad Karma

When you start the game go for the route of your choice be it good, evil or the middle man. Just before you get to level 8, 14, or 20 make sure you save it. This way you can get one trophy and then reload, make your character murder a few people to go evil and get the next trophy. To become good again you can give some purified water to the chap on the floor outside megaton and you gain karma each time.

Bronze Trophy
Mercenary

Reached Level 8 with Neutral Karma

When you start the game go for the route of your choice be it good, evil or the middle man. Just before you get to level 8, 14, or 20 make sure you save it. This way you can get one trophy and then reload, make your character murder a few people to go evil and get the next trophy. To become good again you can give some purified water to the chap on the floor outside megaton and you gain karma each time.

Bronze Trophy
Protector

Reached Level 8 with Good Karma

When you start the game go for the route of your choice be it good, evil or the middle man. Just before you get to level 8, 14, or 20 make sure you save it. This way you can get one trophy and then reload, make your character murder a few people to go evil and get the next trophy. To become good again you can give some purified water to the chap on the floor outside megaton and you gain karma each time.

Bronze Trophy
Harbinger of War

Reached Level 14 with Bad Karma

Same tricks as the Reaver trophy/achievement.

Bronze Trophy
Pinnacle of Survival

Reached Level 14 with Neutral Karma

Same tricks as the Mercenary trophy/achievement.

Bronze Trophy
Ambassador of Peace

Reached Level 14 with Good Karma

Same tricks as the Protector trophy/achievement.

Bronze Trophy
Doesn’t Play Well with Others

Killed 300 people

No tips yet

Bronze Trophy
Slayer of Beasts

Killed 300 creatures

No tips yet

Bronze Trophy
Psychotic Prankster

Placed a grenade or mine while pickpocketing

No tips yet

Bronze Trophy
Devil

Reached Level 30 with Bad Karma

Same tricks as the Reaver trophy/achievement.

Bronze Trophy
True Mortal

Reached Level 30 with Neutral Karma

Same tricks as the Mercenary trophy/achievement.

Bronze Trophy
Messiah

Reached Level 30 with Good Karma

Same tricks as the Protector trophy/achievement.

Silver Trophy
Take it Back!

Completed ‘Take it Back!’

No tips yet

Silver Trophy
Scourge of Humanity

Reached Level 20 with Bad Karma

No tips yet

Silver Trophy
Paradigm of Humanity

Reached Level 20 with Neutral Karma

No tips yet

Silver Trophy
Last, Best Hope of Humanity

Reached Level 20 with Good Karma

No tips yet

Silver Trophy
Weaponsmith

Made one of every custom weapon

No tips yet

Silver Trophy
Silver-Tongued Devil

Won 50 Speech Challenges

No tips yet

Silver Trophy
Data Miner

Hacked 50 terminals

No tips yet

Silver Trophy
Keys are for Cowards

Picked 50 locks

No tips yet

Silver Trophy
One-Man Scouting Party

Discovered 100 locations

No tips yet

Silver Trophy
Yes, I Play with Dolls

Collected 10 Vault-Tec Bobbleheads

No tips yet

Silver Trophy
Aiding the Outcasts

Completed ‘Aiding the Outcasts’

No tips yet

Silver Trophy
The Guns of Anchorage

Completed ‘The Guns of Anchorage’

No tips yet

Silver Trophy
Paving the Way

Completed ‘Paving the Way’

No tips yet

Silver Trophy
Into the Pitt

Completed ‘Into the Pitt’

No tips yet

Silver Trophy
Unsafe Working Conditions

Completed ‘Unsake Working Conditions’

No tips yet

Silver Trophy
Mill Worker

Found all 100 Steel Ingots

No tips yet

Silver Trophy
Death From Above

Complete ‘Death From Above’

No tips yet

Silver Trophy
Shock Value

Completed ‘Shock Value’

No tips yet

Silver Trophy
The Local Flavor

Completed ‘The Local Flavor’

No tips yet

Silver Trophy
Walking With Spirits

Completed ‘Walking With Spirits’

No tips yet

Silver Trophy
Bog Walker

Discovered all Locations within Point Lookout

No tips yet

Silver Trophy
Not of This World

Completed ‘Not of This World’

No tips yet

Silver Trophy
Among the Stars

Completed ‘Among the Stars’

No tips yet

Silver Trophy
Alien Archivist

Collected all Alien Captive Recordings

No tips yet

Gold Trophy
The Bigger They Are…

Kill all the Super Mutant Behemoths

No tips yet

Gold Trophy
Vault-Tec C.E.O.

Collected 20 Vault-Tec Bobbleheads

No tips yet

Gold Trophy
Operation: Anchorage!

Completed ‘Operation: Anchorage!’

No tips yet

Gold Trophy
Free Labor

Completed ‘Free Labor’

No tips yet

Gold Trophy
Who Dares Wins

Completed ‘Who Dares Wins’

No tips yet

Gold Trophy
A Meeting of the Minds

Completed ‘A Meeting of the Minds’

No tips yet

Gold Trophy
This Galaxy Ain’t Big Enough…

Completed ‘This Galaxy Ain’t Big Enough…’

No tips yet

Platinum Trophy
Platinum Trophy

Collect all other 50 Trophies for this Trophy

No tips required!

Back To Top

Classic Games – Elite

Elite Loading Title Screen

THE STORY

Elite is a space trading and fighting game with a basic aim of raising your pilots status to the rank of “Elite”. The game uses an open ended game engine which means the game uses an algorithm to generate lots of the detail used when you enter one of the systems, saving on memory.

You play as “Commander Jameson” and start at Lave Station with 100 credits and a lightly armed trading ship – the Cobra Mark III. From here you can basically do what you want, whether it be trading, mining, piracy, missions or anti-piracy.

Elite was a revolutionary game and way ahead of its time, ever since its release it has enspired people to develop many other modern games using similar engine techniques. Some of the more recent include games like Eve online and Infinity: The Quest For Earth.

ELITE TIPS

Cheat mode

Enter SARA or SUZANNE when prompted for a word from the manual during the copy protection check. Then, enter a valid word when the prompt appears again. Press [Keypad Plus] and/or [Keypad Asterisk] during game play to display the cheat screen. A prompt for a byte and new value will appear. Enter the first number of the set, press [Enter], enter the second number, press [Enter], then press [Esc] to resume game play. Note: Press [Help] to edit the amount of arms and cargo. Additionally, this will not work in the Space Legends compilation version of the game.

Code: Result:

12/00-FF Create a new galaxy


13/00-FF Create a new galaxy


18/FF Extra credits


1F/46 7 light years fuel


20/01 Escape capsule


23/02 Large cargo bay


24/01 ECM system; press L to toggle


26/01 Pulse laser


28/01 Galactic hyperdrive or Beam Laser

2C/01 Escape pod

2F/01 Energy bomb

31/01 ECM jammer

31/0C Naval energy unit


32/01 Docking computer

34/03 Galactic hyperdrive

36/01 Mining laser

38/01 Military laser


3F/01 Cloaking; press Y to toggle


40/01 Food

47/01 Textiles


49/01 Radioactives


4C/01 Slaves


50/01 Wine


54/01 Narcotics


5C/01 Computers


63/01 Machinery

67/01 Alloys

69/01 Firearms


6C/01 Furs

2/01 Minerals

75/01 Gold


79/01 Platinum

83/01 Gem stones

84/01 Alien items

88/01 Refugees from Super Nova


8C/01 Important Thargoid doc


91/00 Clean legal status (may be 97 – 01)

97/00-08 Harmless – Elite ranking


98/FF Loads of combat points

9D/01 Seek & destroy

9D/03 Rescue Refugees


9D/04 Destroy Cougar

9D/05 Destroy Space Station

Control ship preview

Press A when the rotating ships appear on the opening screen to stop their movement. Use the cursor keys to rotate the ships. Hold A and press a cursor key to rotate them differently. Press O or I to zoom in and out. Press D to continue.

Longer song

Press H to jump into hyperspace, then engage the docking computer when the counter is below 5. The song, The Blue Danube will play until your ship reaches the next station.

View credits

Press W when flying to view your score and the credits.

Elite Game Cover

Elite Game Cover

Back To Top

Classic Games – Dizzy 1

Title Page

Dizzy 1 Loading Title Screen

THE STORY

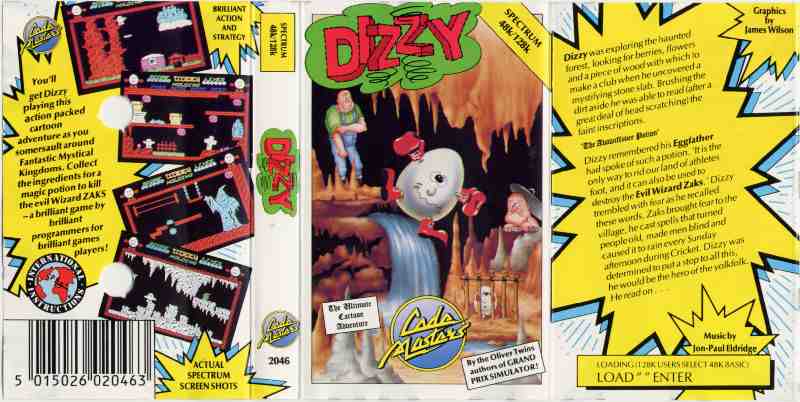
Dizzy was exploring the haunted forest, looking for some berries, flowers and a piece of wood with which to make a club when he uncovered a mystifying stone slab. Brushing the dirt aside he was able to read (after a great deal of head scratching) the faint inscription ‘The Avawiffovee Potion’.

Dizzy remembered his Eggfather had spoke of such a potion. ‘It is the only way to rid our land of athletes foot, and it can also be used to destroy the Evil Wizard Zaks’.

Dizzy trembled with fear as he recalled these words. Zaks brought fear to the village, he cast spells that turned people old, made men blind and caused it to rain every Sunday afternoon during Cricket.

Dizzy was determined to put a stop to all this, he would be the hero of the yolkfolk. He read on… ‘Fill a potion bottle with cooked Leprechauns wig, cloud silver lining, Vampire dux feather and some troll brew – cook the potion and throw it at Zaks to dissolve his reign.’ He covered it up and quickly made ready to liberate the land of KATMANDU.

WALKTHROUGH

RIGHT

GET THE GREASE GUN

RIGHT, RIGHT

USE THE GUN ON THE CART

DOWN

GET THE KEY

UP, 10 SCREENS LEFT

USE THE KEY ON THE DOOR

RIGHT, RIGHT, UP

GET THE SPADE

DOWN, RIGHT

USE THE SPADE BELOW THE SPIDER

DOWN

GET THE TROWEL, USE THE TROWEL ON THE UPPER MUSHROOM

RIGHT, RIGHT

GET THE CUTTERS

LEFT, LEFT, UP, SEVEN SCREENS LEFT, DOWN, LEFT, LEFT

DROP THE CUTTERS ON THE CHAINS

LEFT, LEFT

GET THE WIG

FOUR SCREENS RIGHT, UP, THREE SCREENS RIGHT

DROP THE WIG IN THE POT

THREE SCREENS LEFT, DOWN, DOWN

GET THE RAINCOAT

UP, UP, THREE SCREENS LEFT, UP

TAKE THE DRY ICE

DOWN, THREE SCREENS RIGHT, DOWN, FOUR SCREENS LEFT

USE THE DRY ICE

LEFT

TAKE THE AMULET

FIVE SCREENS RIGHT, UP

DROP THE AMULET

DOWN, RIGHT

GET THE GUN

LEFT, DOWN

KILL THE GHOST

RIGHT, DOWN

GET THE GOLD

UP, LEFT, UP, UP, NINE SCREENS RIGHT

DROP THE GOLD IN THE BUCKET, GET THE LINING

SIX SCREENS LEFT

DROP THE LINING IN THE POT

THREE SCREENS LEFT, DOWN, DOWN, THREE SCREENS RIGHT

GET THE OIL

THREE SCREENS LEFT, UP, UP, THIRTEEN SCREENS RIGHT

DROP THE OIL ON THE DRAWBRIDGE, TAKE THE FEATHER

TEN SCREENS LEFT

DROP THE FEATHER IN THE POT

TWELVE SCREENS RIGHT

TAKE THE TROLL BREW

TWELVE SCREENS LEFT

DROP THE BREW IN THE POT

RIGHT

TAKE THE TORCH

LEFT

LIGHT THE FIRE UNDER THE POT

RIGHT, RIGHT

TAKE THE FLASK

LEFT, LEFT

DROP THE FLASK ON THE POT

LEFT, LEFT, LEFT

TAKE THE AMULET

FOURTEEN SCREENS RIGHT, UP, RIGHT

DESTROY THE FIREBALLS

LEFT, DOWN, ELEVEN SCREENS LEFT

TAKE THE FLASK

ELEVEN SCREENS RIGHT, UP, RIGHT

DROP THE FLASK BY ZAKS……Job Done!!

Note: Several objects are useful in this game, but are not vital
to complete the adventure. Just for the record, these are:

CLOVE OF GARLIC – Kills bats

INSECTICIDE – Kills Spiders

BIRD SEED – Kills…er…Birds

PICKAXE – Unblocks tunnel, to get dagger

HARD HAT – Destroys falling stalactites

EMERALD – Drop on yellow statue to enter tomb

There is also the following cheat:
Pause the game and type in NOOTRAC 4571. Dizzy will disappear and
you can move around thr screens using Z and X. Press space to
make Dizzy reappear in your chosen screen.

Not sure if the cheat works with the C64.

Title Page
Dizzy 1 Game Cover

Back To Top

Classic Games – Fantasy World Dizzy

Treasure Island Dizzy Loading Title Screen
Fantasy World Dizzy Loading Title Screen

THE STORY

Dizzy & Daisy strolled through the enchanted forest without a care in the world… BUT SUDDENLY the Evil King’s trolls seized poor Daisy! She was send to Wizard Weirdo’s Tallest Tower, while Dizzy was dragged away and thrown into the deepest, darkest, dankest of the Kings Dungeons in the bowels of Fantasy World.

DIZZY was frightened! Who knew what fate awaited him… and he still hadn’t done this week’s homework! But then he remembered that he had a fresh green apple that he had planned to give his teacher to escape detention, and he cheered up. And there was some bread and water on the table! A cunning plan began to brew in his mind…

But DIZZY can’t do everything on his own… you must help him!

WALKTHROUGH

THE CASTLE DUNGEON

GIVE APPLE TO TROLL-GET JUG OF COLD WATER-GET LEAF OF BREAD-DROP WATER IN FIRE-WEST

SMUGGLERS HIDEOUT

GET BOULDER-WEST

SECRET PASSAGE

-W-

SMUGGLERS CAVE

GET DIAMONDS-E-E- UP

CASTLES DUNGEON

DROP BREAD FOR RAT-E-UP-

ENTRANCE HALL

E- JUMP OVER CROCODILE-GET BOULDER-JUMP OVER CROCODILE-W

ENTRANCE HALL

DROP BOULDERS-JUMP ON RIGHT BALCONY-GET COIN-E-UP-GET COIN-DOWN-W-JUMP ON LEFT BALCONY-GET DIAMOND-PRESS LEVER-UP-GET COIN-JUMP OVER HOLE-E-

BANQUET HALL

JUMP ON TABLE-GET COIN-JUMP ON TABLE-JUMP WEST UP-GET DIAMOND-JUMP EAST UP-

CASTLE STAIRCASE

GET COIN-UP

ATTIC

GET BONE-DOWN-E-GET KEY-GET DIAMOND-W-DOWN-W-DOWN-E-DROP KEY-GET BOULDER-W-GET COIN-WALK OVER BRIDGE WEST-DROP BOULDER-NOW GO VERY QUICK DOWN AND GET THE BOULDER AND VERY QUICK RETURN TO THE OTHER BOULDER-DROP BOULDER- E-E

ENTRANCE HALL

GET BOULDERS-W-WEST OVER BRIDGE-JUMP FOR ARMAROG-DROP BONE AND QUICKLY JUMP BACK TO THE BOULDERS-GET BOULDER-W

GUARD HOUSE

GET COIN-W-DROP BOULDER-DROP BOULDER

THE WATER COMES HIGHER

E-E-GET BOULDER-W-W-DROP BOULDER

IN WATER

NOW JUMP TO THE KEY ON THE OTHER SIDE-GET KEY-W-UP-W- DOWN-GET COIN-W

LOOKING OUT TO THE SEA

TALK TO DOZY-GET SLEEPING POTION-E-E-E-E-E

ARMOROGS DEN

E-E-E-JUMP OVER CROCODILE-E-DROP SLEEPING NEAR BY THE DRAGON-DROP KEY-W-JUMP OVER CROCODILE-W-GET KEY-E-JUMP OVER CROCODILE-E-GET KEY-E-GET BAG-GET COIN-E

LIFT CONTROLL HUT

E-GET COIN-E-E

LARGE OAK TREE

E-GET KEY-W-W-W

LIFT CONTROLL HUT

PUT KEY IN THE LOCK FROM THE MACHINE-WALK LEFT THROUGH ELEVATOR-PUT KEY IN THE LOCK FROM THE MACHINE-ENTER ELEVATOR-UP-PUT KEY IN THE LOCK FROM THE LEFT MACHINE-ENTER ELEVATOR-DOWN-E-E-JUMP UP-JUMP UP WEST-W-GET COIN-E-JUMP UP-JUMP UP-JUMP UP WEST-W

DOZY’S HUT

ENTER ELEVATOR-UP-E-GET COIN-AT THE TORCH BY THE TREE:JUMP UP-WALK THROUGH ELEVATOR EAST-GET COIN-W-ENTER ELEVATOR-UP-E-GET BRASS DOOR KNOCKER-W-WALK THROUGH THE ELEVATOR-TALK TO GRAND DIZZY-GET CROWBAR-W-GET PICKAXE-E-ENTER ELEVATOR-D-NOW GO DOWN TO THE BASE OF THE TREEHOUSE-E-GET CUIE PIGMY COW-JUMP UP-JUMP UP WEST-W

LIFT CONTROLL HUT

W

BOTTOMLESS WELL

USE STRONG CROWBAR-DOWN

STRANGE NEW WORLD

W-WALK IN THIS SCREEN UNTIL THE SHOPKEEPER APPEARS-GIVE CUIE PIGMY COW TO THE SHOPKEEPER-GET GREEN BEAN-GET COIN-E-E-GET COIN-GET KEY-GET EXTRA LIFE-W-JUMP IN THE WELL-DROP KEY-W-W-JUMP OVER CROCODILE-W-JUMP ON LEFT BALCONY-W-UP-JUMP OVER HOLE-E-JUMP ON TABLE-JUMP UP WEST-JUMP UP EAST-UP-USE BRASS DOOR KNOCKER ON DOOR-ENTER DOOR-GET LITTLE BAG-GET BUCKET-E-NOW GO DOWN TO THE ENTRANCE HALL-E-JUMP OVER CROCODILE-E

DRAGON

E-GET KEY-UP EAST-E-DOWN

BASE OF TREEHOUSE

W-ENTER ELEVATOR-UP-PUT KEY IN LOCK FROM THE RIGHT MACHINE-ENTER ELEVATOR-DOWN-E-E

THE SMELLY ALLOTMENT

WALK TO MANURE-PUT BEAN IN DRY MANURE-E-E-FILL BUCKET WITH WATER-GET BUCKET-W-W-USE BUCKET ON MANURE-NOW GO UP ONE SCREEN-IN THIS SCREEN JUMP EAST-GET COIN-GET LITTLE BAG-JUMP DOWN

LARGE OAK TREE

W-UP ONE SCREEN-JUMP EAST-UP ONE SCREEN-E- GET COIN-JUMP EAST-GET EGG-JUMP WEST-GET COIN-E-W-JUMP MOUNTAIN- GET COIN-W-DOWN-W-W-W-W

LIFT CONTROLL HUT

NOW JUMP DOWN WHEN THE ELVATOR IS UP

DRAGONS LAIR

GET COIN-ENTER ELEVATOR-DOWN- DROP EGG IN NEST-E-GET DIAMONDS AND COIN-JUMP TO ROCKS-USE PICKAXE-W-GET RUG-E-W-ENTER ELEVATOR-UP-JUMP UP WHEN THE ELEVATOR IS UP

LIFT CONTROLL HUT

E-E-UP ONE SCREEN-JUMP EAST-UP ONE SCREEN-JUMP EAST

CLOUD CASTLE

E

GUARDED HALLWAY

USE RUG-UP- GET DIAMOND-DOWN-E

CLOUD TOWER

UP ONE SCREEN-W-GET DIAMOND-UP ONE SCREEN

WEST RAMPARD

GET DIAMOND-E-GET DIAMOND-GET EXTRA LIFE-DOWN

DAISY’S PRISON

GET DIAMOND-PULL LEVER-TALK TO DAISY- GET COIN-UP-GET THE MAP OF THE GAME-NOW USE THE SPACE BAR TO LOOK ON THE MAP, YOU CAN SEE WERE THE MISSING COINS ARE, COLLECT THEM AND THAT’S THE END OF THE GAME!

Title Page
Fantasy World Dizzy Game Cover

Back To Top

Classic Games – Dizzy prince of the Yolkfolk

Dizzy Prince of the Yolkfolk Loading Title Screen

THE STORY

Grand Dizzy was feeling very down one day, so Dizzy and Daisy decided to cheer him up by baking him his favourite food, cherry pie! So off went Daisy to get some cherries from her cupboard and there was none to be seen! “Pogie’s pinched the cherries!” she cried, as she saw Pogie’s pawprint in the cupboard, “That darned Fluffle. Come here you!” and Pogie promptly darted of into the enchanted forest to escape Daisy’s rage.

Dizzy and Daisy decided to go into the forest to catch Pogie and gather some more cherries at the same time.

Whilst searching for Pogie they got lost and found a castle, where they thought they would find help, but it seemed deserted. They looked in the castle for Pogie, but Daisy caught herself on a mystic spinning wheel. She started feeling really sleepy, so she found a bed and went to sleep.

“Wake up Daisy, wake up!” shouted Dizzy. But before he could wake her up, Rockwart the Troll caught him and locked him up underground!

WALKTHROUGH

Escape from cave, the easy bit !

Get pickaxe from by troll.

Get cage from by lion.

Get bridge kit.

Go down avoiding the bat then use pickaxe to break into cave.

Drop pickaxe.

Up, get gold.

Down, give gold to ferryman.

Dropcage by fluffle up, up, stand on edge of ledge and jump onto clouds and into the castle.

Get harp, jump across clouds to heaven and give harp to St.Peter.

Go back to fluffle, drop cheese in cage, pick up cage and take back to troll, drop cage, go into castle go up, up, get key, down get motor.

Back to ferryman give him motor, get scythe, go up trees and jump into castle again.

Use scythe on thorns, get bugle, up, unlock door with key, go across the top and get the tweezers.

Jump off edge then go back to lion and use tweezers, get thorn and go back to castle, go to doppelganger room, drop thorn and make doppelganger walk across thorn and die.

Get spanner and go left until you reach the bloke.

Give him the bugle and go left to where the troll used to be.

Go across upper bit and use spanner on drawbridge, go over drawbridge, see princess and get flag.

Go back across upper bit. Go up, put flag on flagpole.

Get knighted.

Go all the way back to daisy kiss her.

CONGRATULATIONS!

Dizzy Prince of the Yolkfolk Game Cover
Magicland Dizzy Game Cover

Back To Top