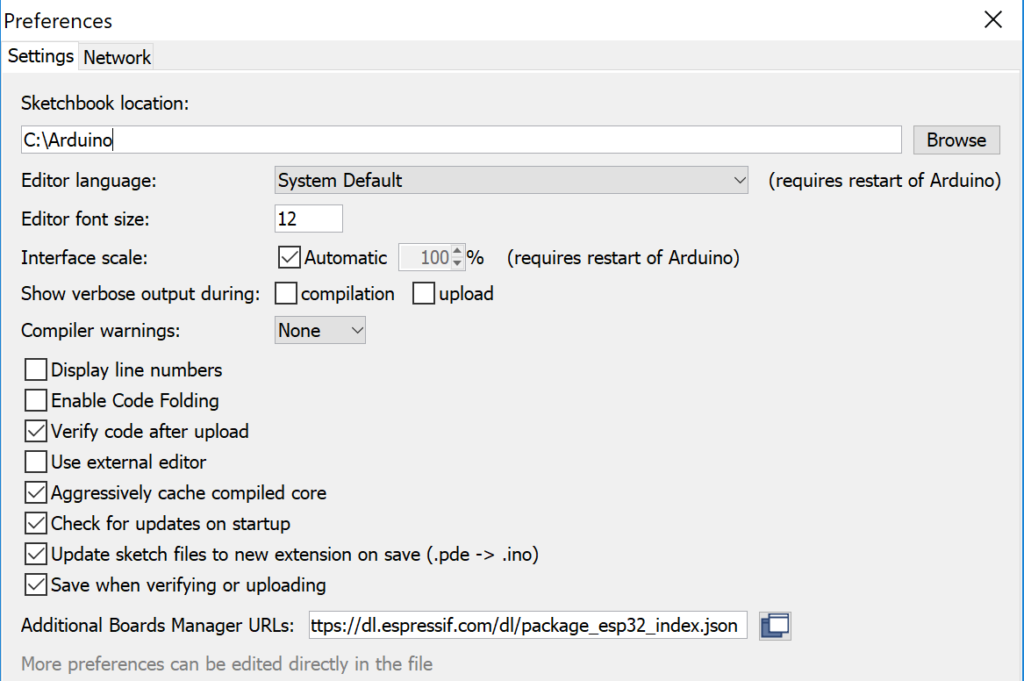
Got youself a new ESP-32 development board and wondering how you talk to it? The good news is that someone has done a lot of the hard work required to set up ESP-32 support in the Arduino IDE. The first thing we need to do is add the board manager files so that settings and boards relating to ESP-32 show up in the Arduino IDE. Go to File -> Preferences then enter https://dl.espressif.com/dl/package_esp32_index.json into the “Additional Board Manager URLs” field:
Adding ESP-32 additional boards manager to Arduino IDE
Note: if you already have the ESP8266 boards URL, you can separate the URLs with a comma in the above.
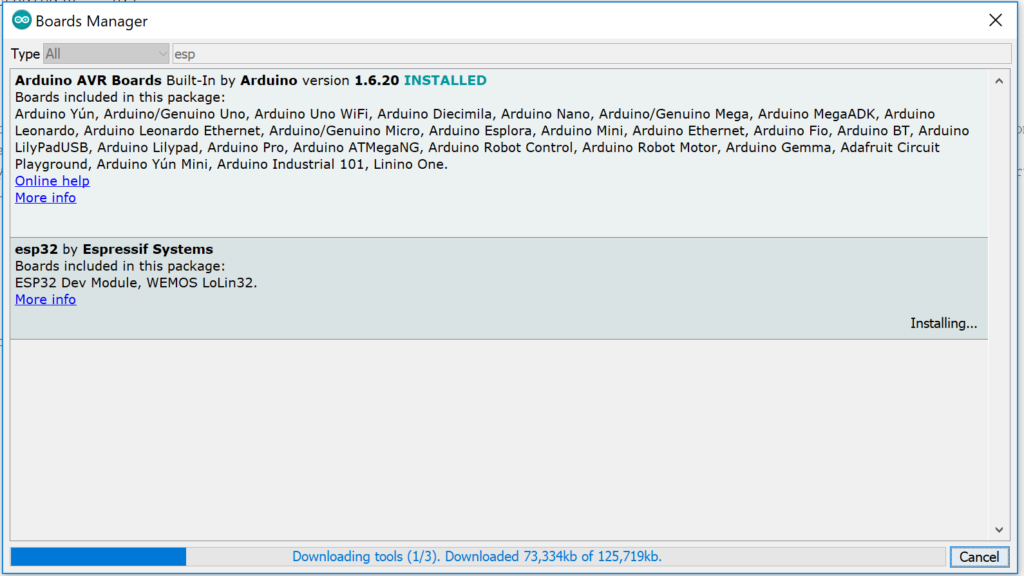
Open boards manager. Go to Tools > Board > Boards Manager…
Search for ESP32 and press install button for the “ESP32 by Espressif Systems“ and hit install:
Installing ESP-32 Board In The Boards Manager
Select your Board in Tools > Board menu (in my case it’s the DOIT ESP32 DEVKIT V1)
Plug in the ESP-32 with USB cable to your computer.
Select the Port (if you don’t see the COM Port in your Arduino IDE) (tools->port).
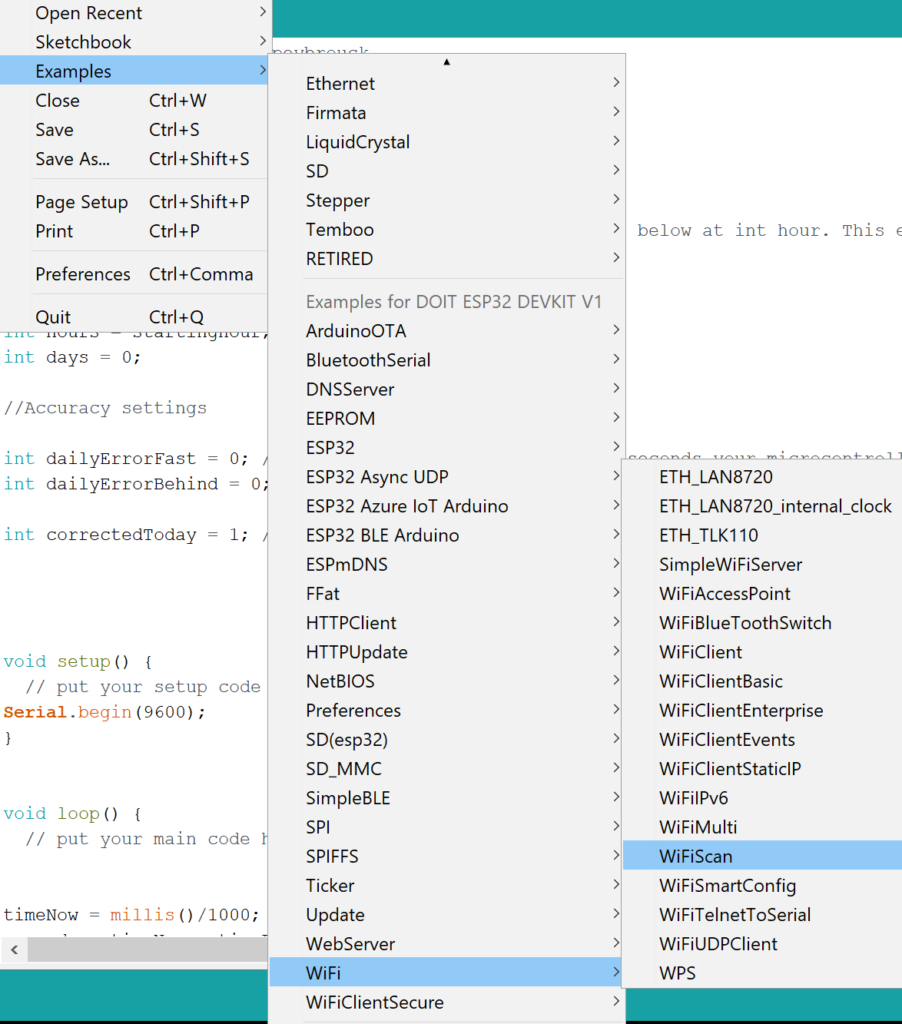
Open the following example under File > Examples > WiFi (ESP32) > WiFi Scan
Testing Your ESP-32 By Opening the WIFI Scan Example Project
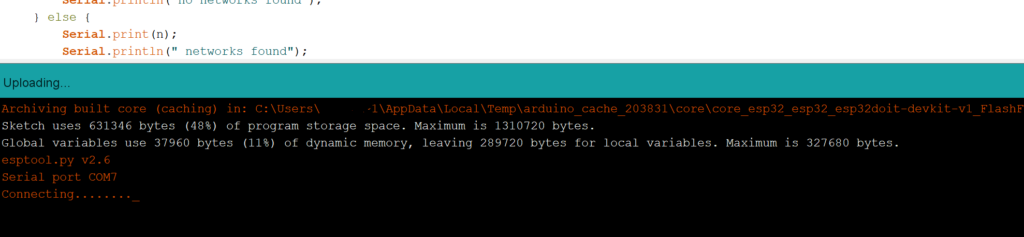
Press the Upload button in the Arduino IDE. Wait a few seconds while the code compiles and uploads to your board. When it says connecting…… press the boot button on the board and release. If that didn’t work hold the boot button before you press upload and release when it says connecting. I’ve even had some dev boards that need the enable button pressed instead, doing one of these will work, you just have to find which one.
ESP-32 In The IDE Waiting For Boot Button Press
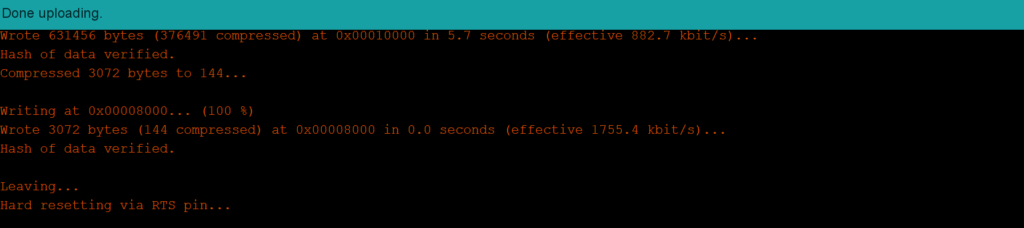
If everything went as expected, you should see a “Done uploading.” message.
ESP-32 Done Uploading In The Arduino IDE
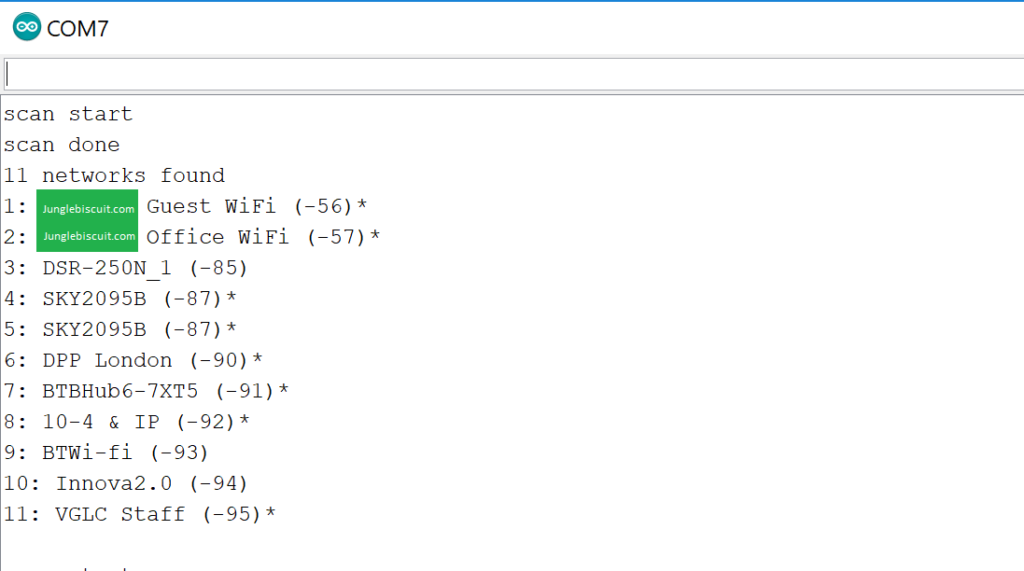
Finally just open the Arduino IDE Serial Monitor at a baud rate of 115200 and hey presto you should see it scaning for WIFI networks. You may need to press enable/reset button first:
Testing The ESP-32 Using WIFI Scan On The Serial Monitor
So, you have bought your ESP-01 and are not sure if its pre-flashed or you need to do something with it, you may just want to make sure you have the latest firmware anyway. The best bet is to open your favourite programming software and try the module. If it’s not working at all or behaving weirdly then the chances are that you need to flash a new version of the firmware onto it. This is something that’s relatively easy but only when you know how and if you type it in a search engine there are lots of websites out there trying to get you to use weird versions of the ESP firmware so you need to be careful. I’ll go through what hardware to use to flash it, where to get the firmware and where to get the tool to upload the firmware to the chip.
The good news is that the tools and firmware are all free on the Espressif website but even then it’s not completely clear what to get and even the documentation provided isn’t too clear on what to do for beginners so I will go through it all here.
What hardware do I need?
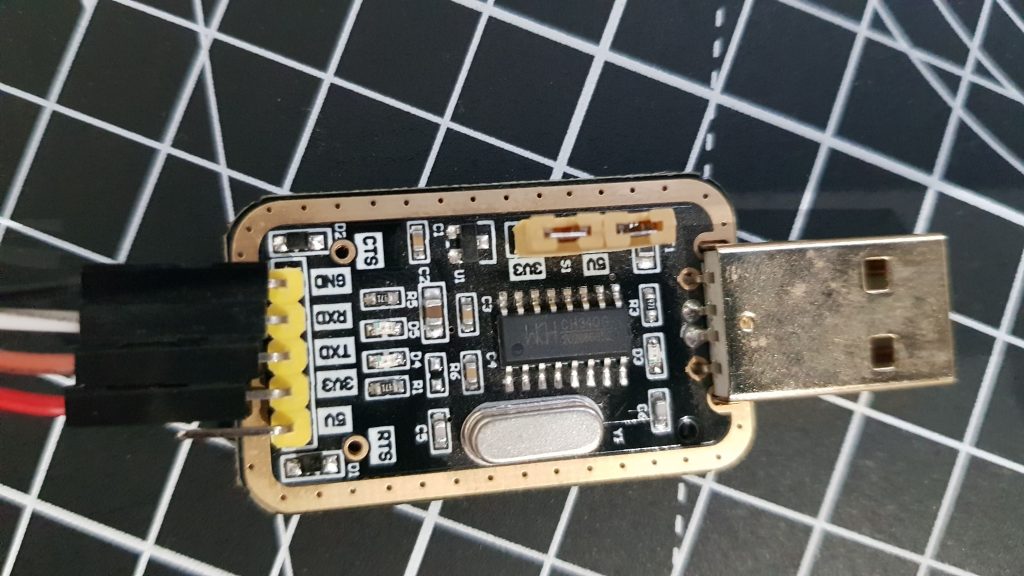
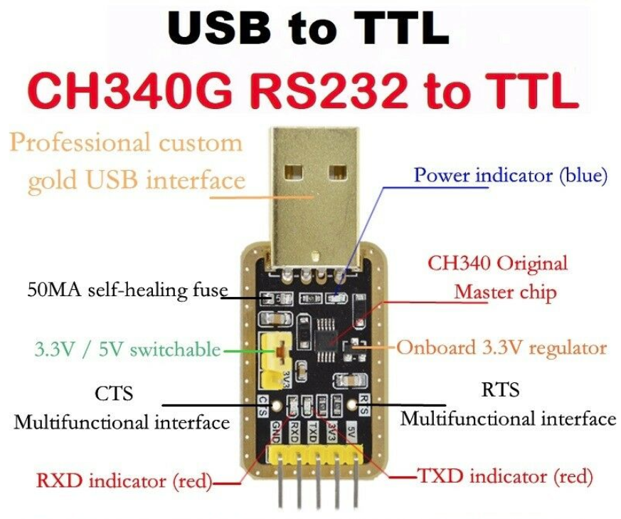
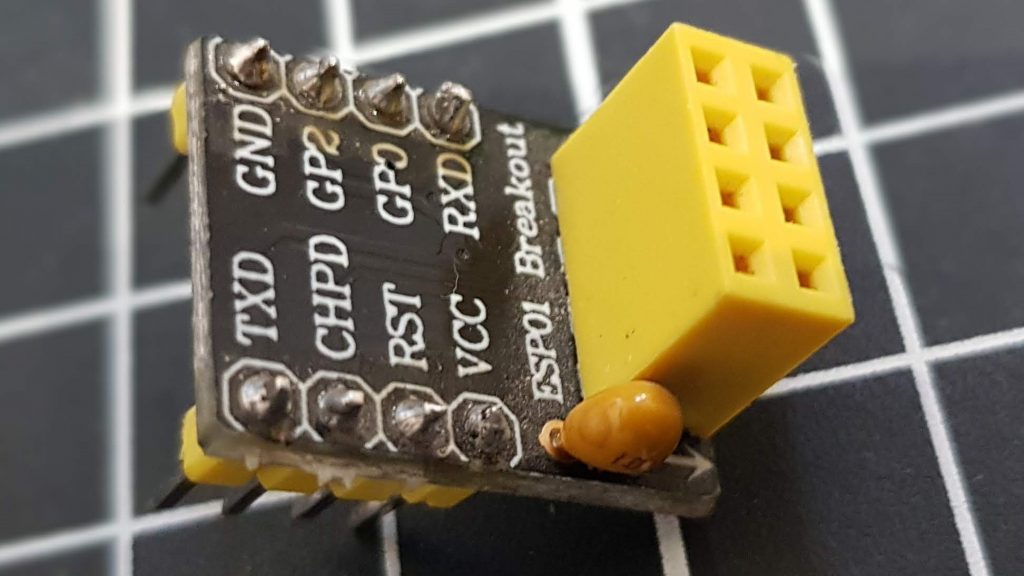
I put together a flashing circuit specially for this purpose and keep it set up on my breadboard so that it’s there when I need it. The two main odd looking items you will need are a USB-to-TTL converter so that you can plug in your USB port on your PC to upload the firmware and the ESP-01 has a weird pinout so I find its best to use an ESP-01 breakout board/adapter. Other than that, it’s just a couple of buttons and resistors. Here is the USB to TTL (sometimes called FTDI) converter I use, it’s a couple of pounds on your favourite electronics or auction site and has a 3.3v option which is ideal for the ESP-01 though there are plenty of other options out there:
USB to TTL Converter
USB to TTL Converter
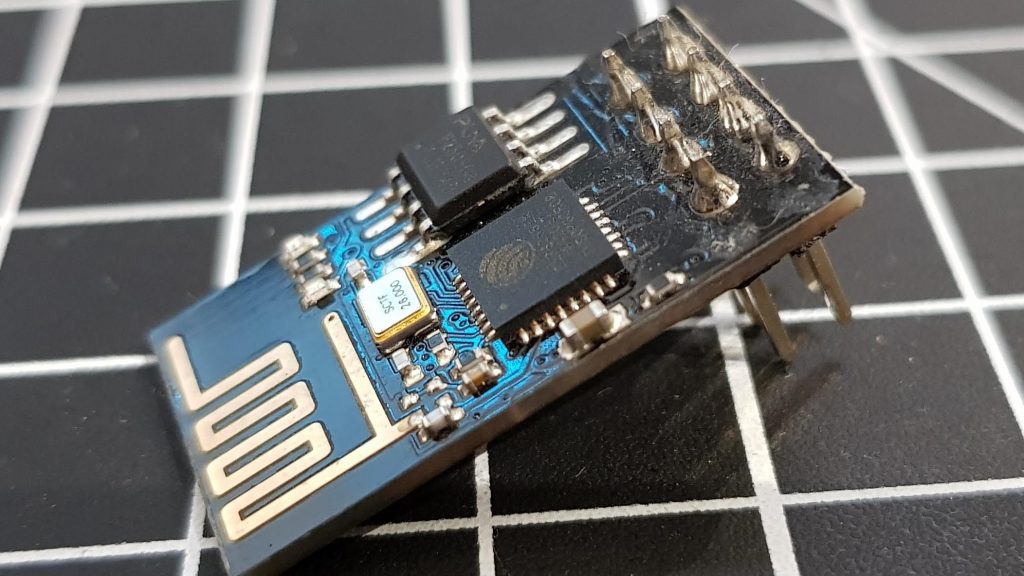
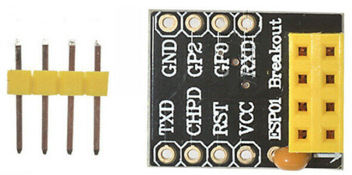
ESP-01 Breakout Adapter
ESP-01 Breakout Adapter
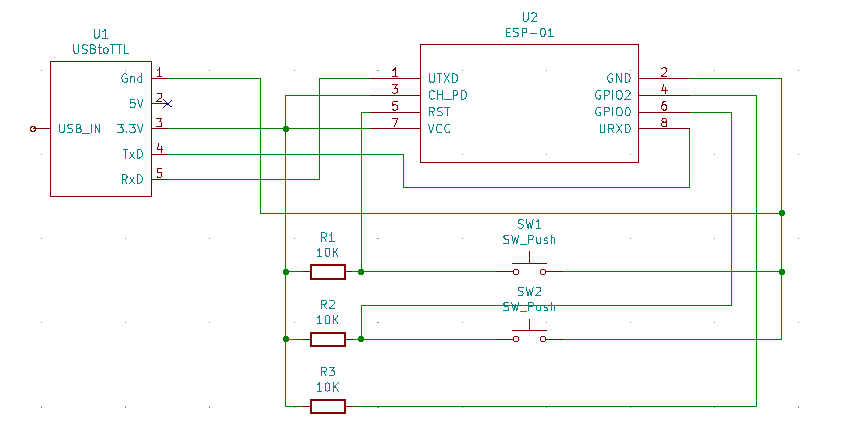
Here is the schematic:
ESP-01 Flashing Schematic
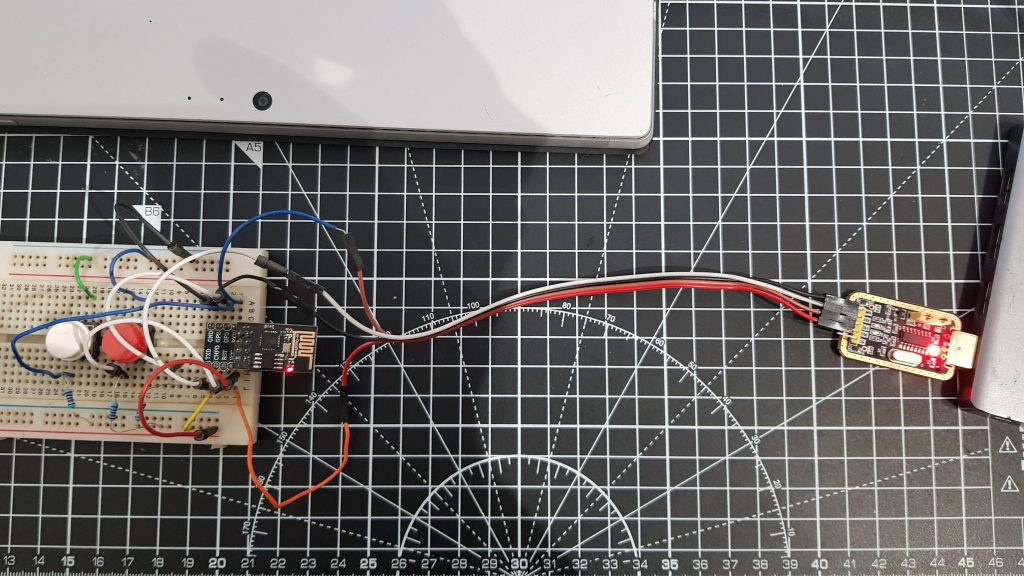
And finally, here is a picture of it all setup on the breadboard:
ESP-01 Flashing Circuit on Breadboard
DON’T PLUG IT IN WITHOUT READING THE INSTRUCTIONS BELOW FIRST
What tool do I need to download to flash the ESP?
To flash the ESP-01 you need the Espressif Flash Download Tool which you can download for free from their website in the support -> download -> tools section. Link here:
Downloading the Espressif Flash Download Tool From the Website
It’s not just for ESP-01, works for others too as you can see. Download that to a folder of your choice and unzip that file. Next you need to download the firmware files you are going to flash.
What firmware do I need and where do I get it?
There are lots of different firmware versions out there and they all have different functionality, some fix bugs and some improve performance. Obviously, some may induce bugs and decrease performance too, so I try to go for a stable version rather than the absolute latest issue. The firmware files can be downloaded individually or as part of a software development kit, I normally go for the software development kit as it has all the files that work together. You can download these again from the Espressif website in the support -> download -> SDK & Demos section. Link here:
Downloading the ESP-01 Firmware From the Espressif Website
All of the stable versions should be shown, you can see the latest at the time of writing is ESP8266 NONOS SDK V3.0.0. Simply hit download and save it to a location on your computer, if it redirects to a github page then scroll down to the bottom and download the source code .zip file from there. Unzip the file and now you have all the things you need to flash the chip. All of the binary files you need to flash are in there, you may need to navigate around the files to locate all the ones you need but you should be able to find the following:
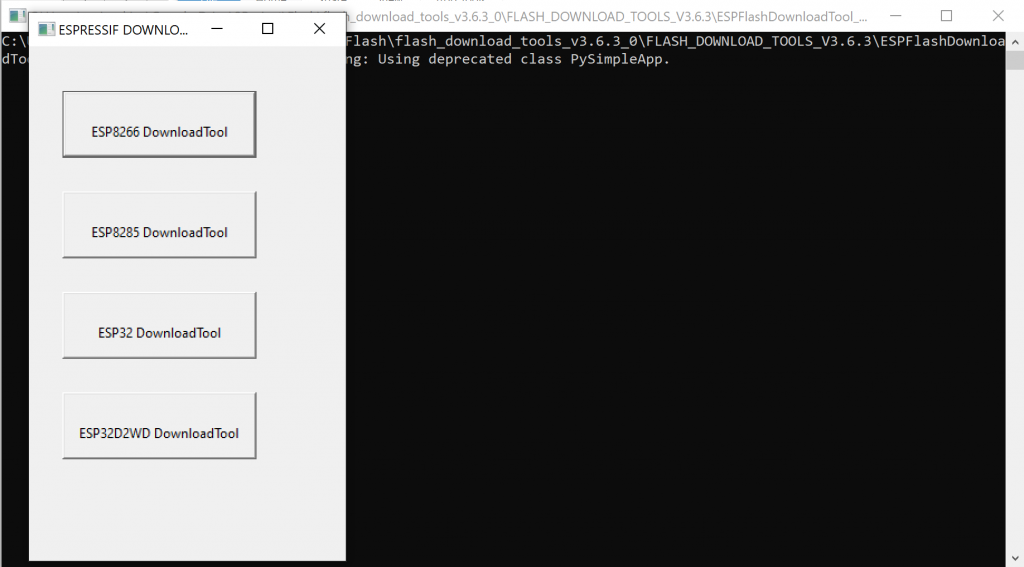
Now you have done all the groundwork to flash this thing its time to put it all together and do the job, exciting times! Open up the Espressif Flash Download Tool, you should be able to open the file straight from the folder you downloaded without having to install anything and it will open something like this:
Opening up the Espressif ESP flash download tool
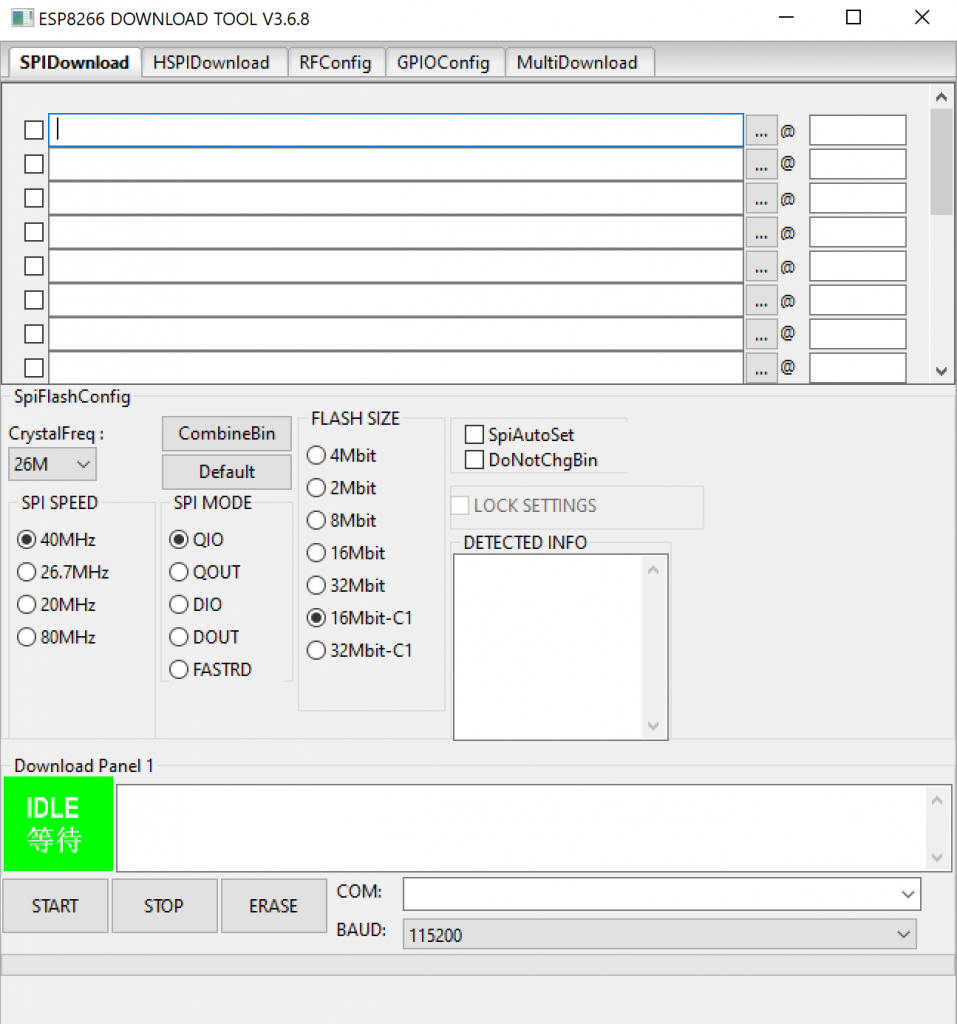
Click the top one for the ESP8266 Download Tool and it should open up this page:
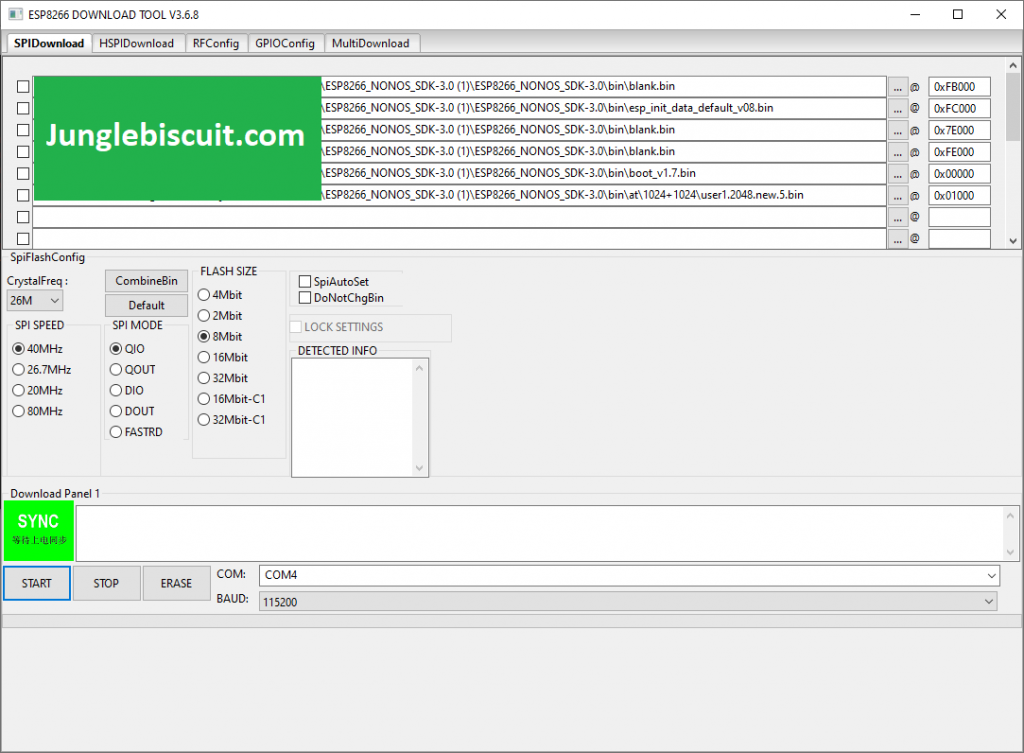
ESP8266 Download Tool Window
Some of those may be blank and you may have different boxes ticked, don’t worry, I’ll run through what to tick.
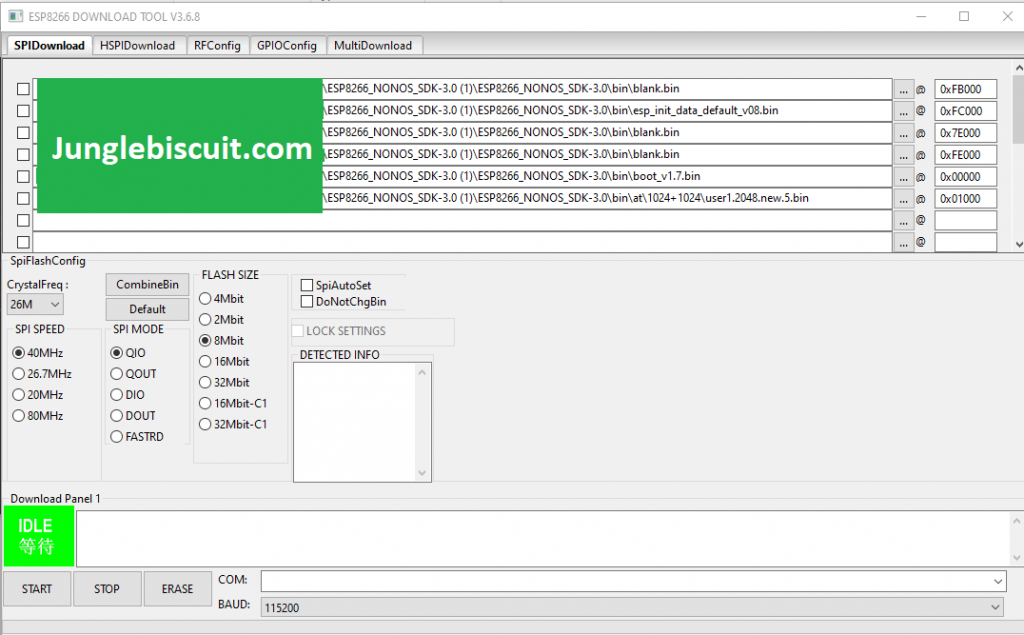
Assign the binary files to the flash address as above.
Pick CrystalFreq as 26M from the dropdown
Click the SPI SPEED button 40MHz
Click the SPI MODE button QIO.
Click the FLASH SIZE radio button for 8Mbit.
So now it should look like this:
ESP8266 Download Tool Window Adding Binary Files
Ok now you are ready to plug in, when you plug the USB in you need to do the following to put the ESP into programming mode:
Hold down the reset switch (SWI 1)
Hold down the flash switch (SW 2)
Release the reset switch (SWI 1)
Release the flash switch (SWI 2)
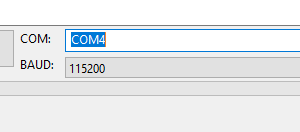
Make sure you select the COM port you are using from the drop down and set the baud rate to 115200:
ESP8266 Download Tool Select COM port and baud rate
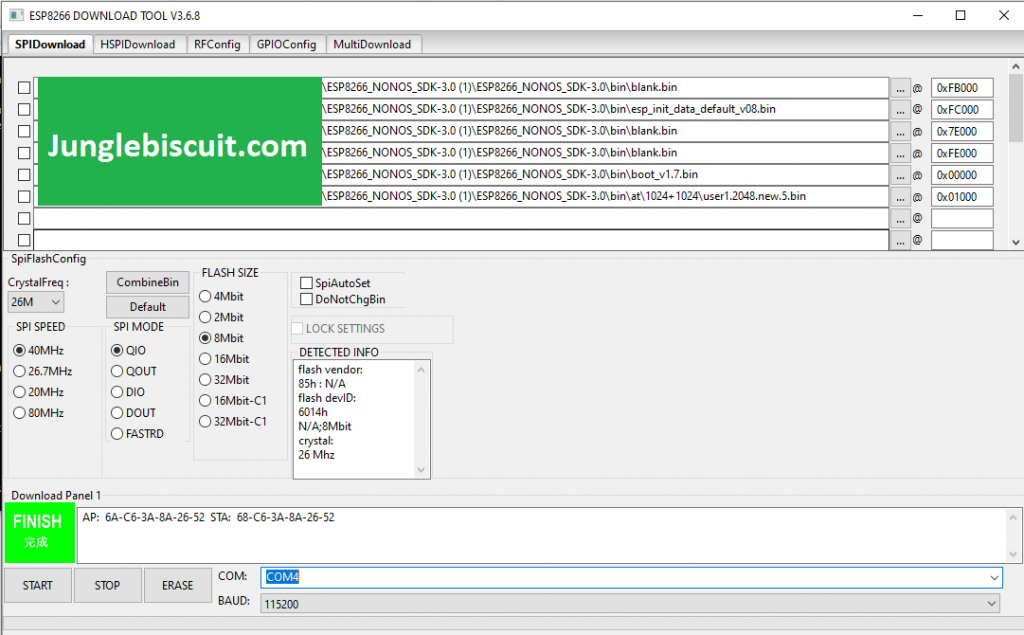
Now just press start and it will sync then download then finish the flash!
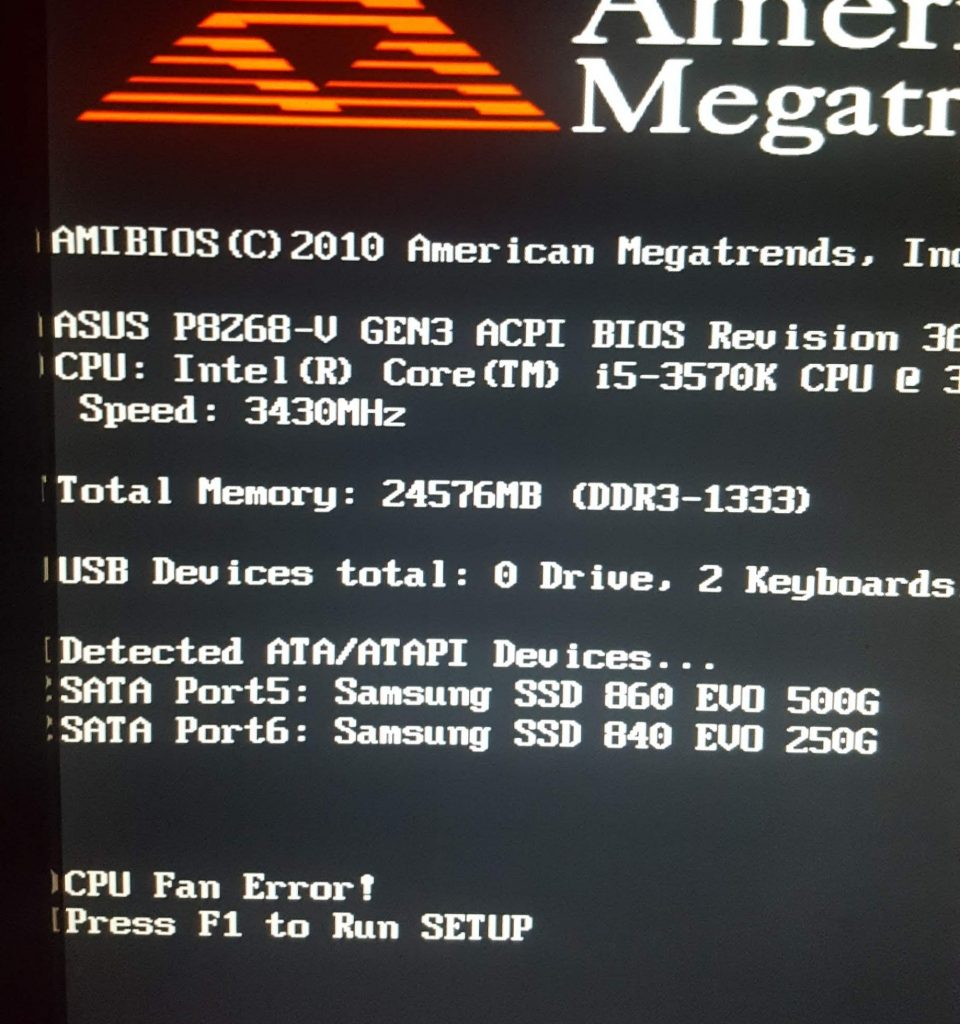
So, you have lots to do, you go to turn your PC on and before it even considers starting you are hit with an error:
“CPU Fan Error!”
CPU Fan Error On Bootup
The first thing to do is check the fan is ok and is plugged in correctly but if you have done that and it seems good then this can be an annoying problem to solve. On my computer I would restart a few times and then all of a sudden for what seems like no reason it would work and go straight through as if everything is normal.
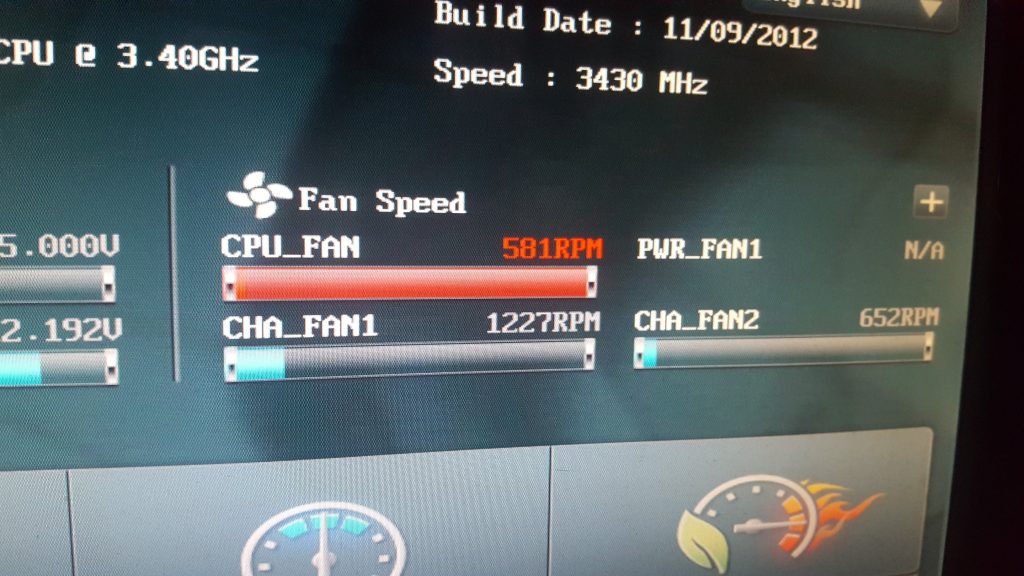
That error alarm is normally triggered when the RPM of the fan goes below a set speed. Luckily that speed is configurable in the BIOS settings on most systems. So when the computer starts up press DEL or F1 or whatever button it is to get to the BIOS. Once there on my PC I could see the actual fan speed reported on the main page as below:
Checking The Fan Speed From BIOS
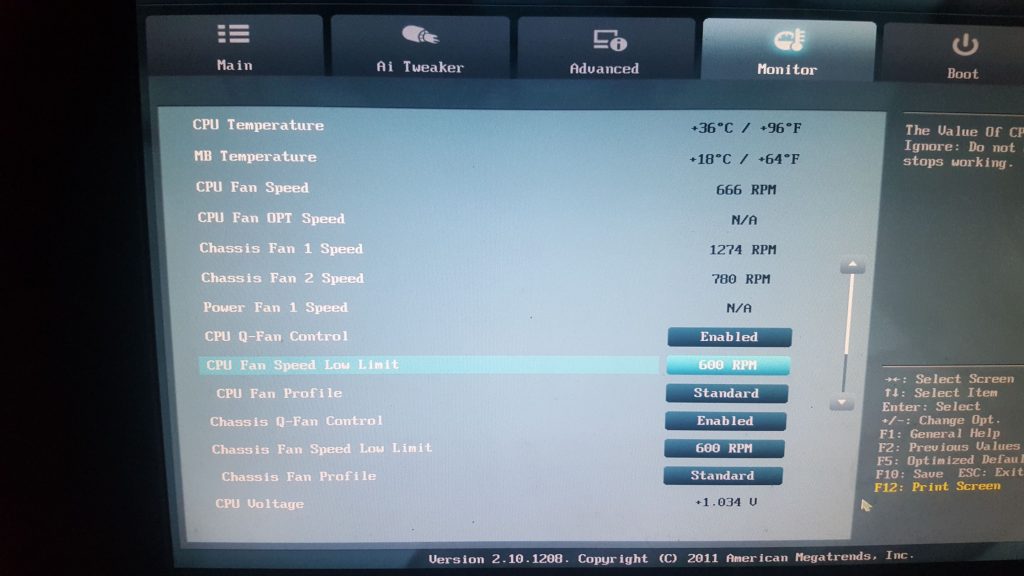
You can see above it is spinning at 581 RPM. To check and change the trigger limit I had to go to advanced settings then click on the “monitor” tab which then had a setting called “CPU Fan Speed Low Limit” which was set to 600 RPM.
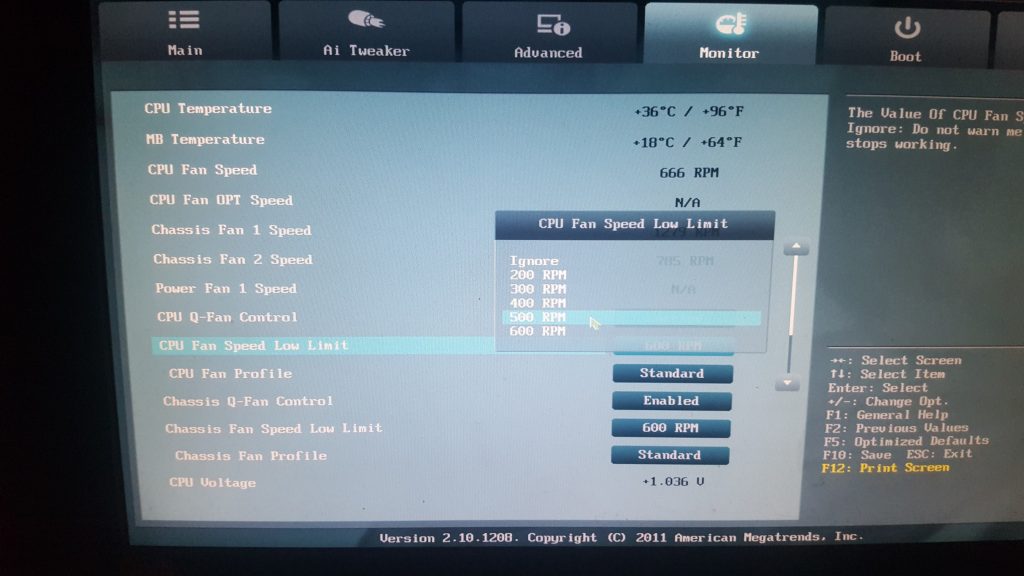
Checking the CPU Fan Low Limit
There is the reason we are getting the error, my fans spinning at 581 and the low limit is 600. So I clicked the button and a drop down list appeared, simply select a lower value, I went for 500 RPM which solved the problem and meant my PC started fine every time.
Well, I first saw this on Kickstarter in October 2015 and it sounded like a great idea for someone like me who travels through London every day constantly getting my card out to swipe through the gates at the train then the tube and sometimes the bus too. Estimated delivery was stated as April 2016, and well over two years later and some nagging via email it finally arrived at my door January 2018! So we had a bit of a bad start….but I have gone straight out and put it to the test and thought I would share my experience good and bad so that others can get a bit of information if they are looking at buying this product.
First Impressions – Look and Feel
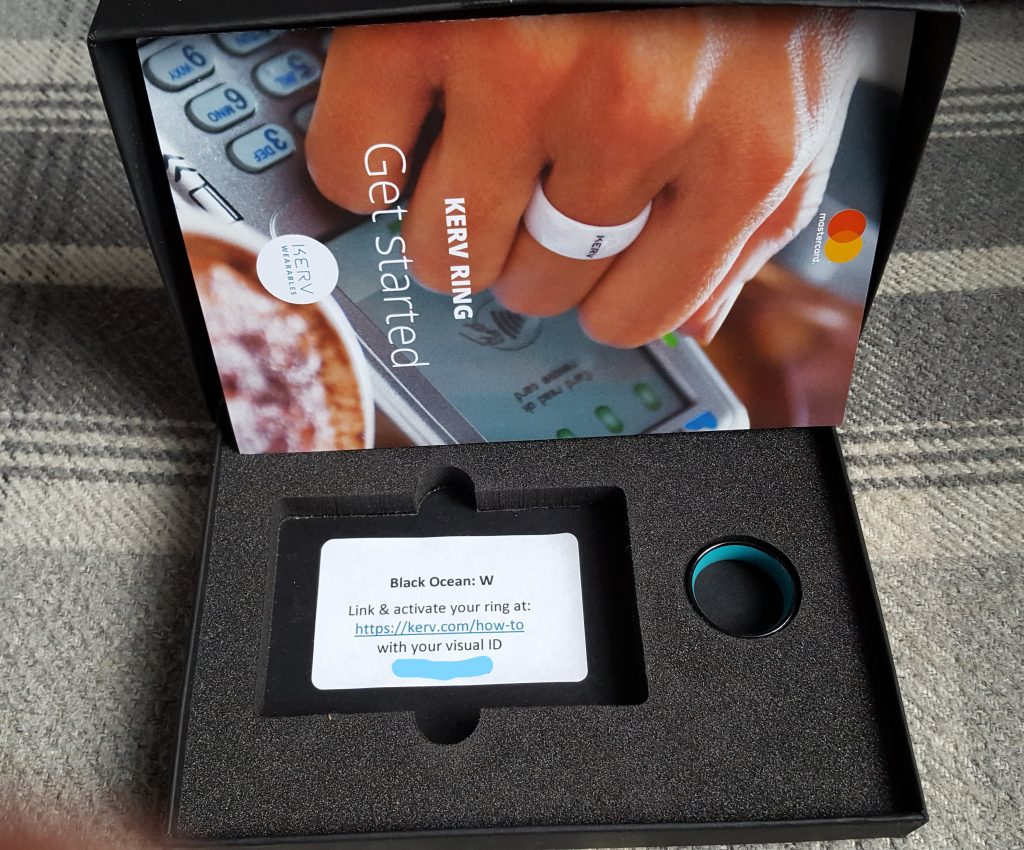
I must say the packaging looked amazing and when you open it looks very smartly presented.
Kerv Smart Ring Packaging
Kerv Smart Ring Inside Packaging
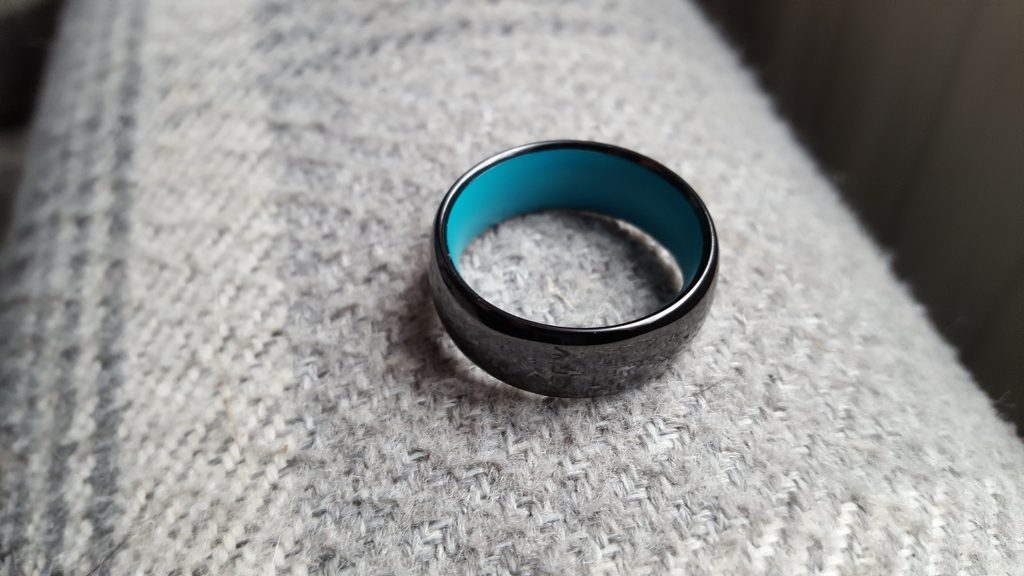
The ring looks nice and smart, feels smooth and weighs hardly anything.
Kerv Ring
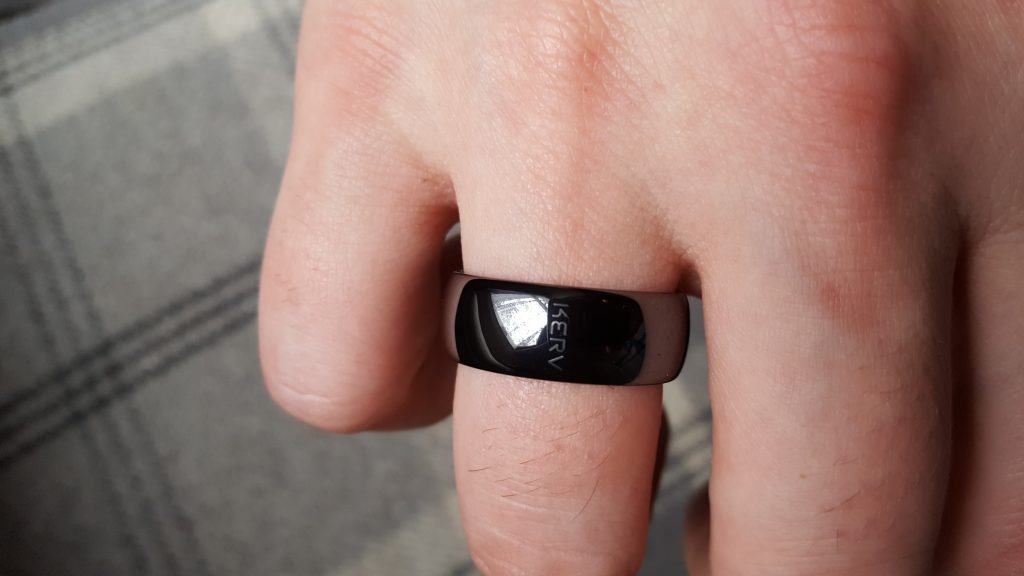
Generally I like it and the fit was perfect as measured using the Kerv sizing chart.
Kerv Smart Ring Look and Feel On My Finger
Initial Setup
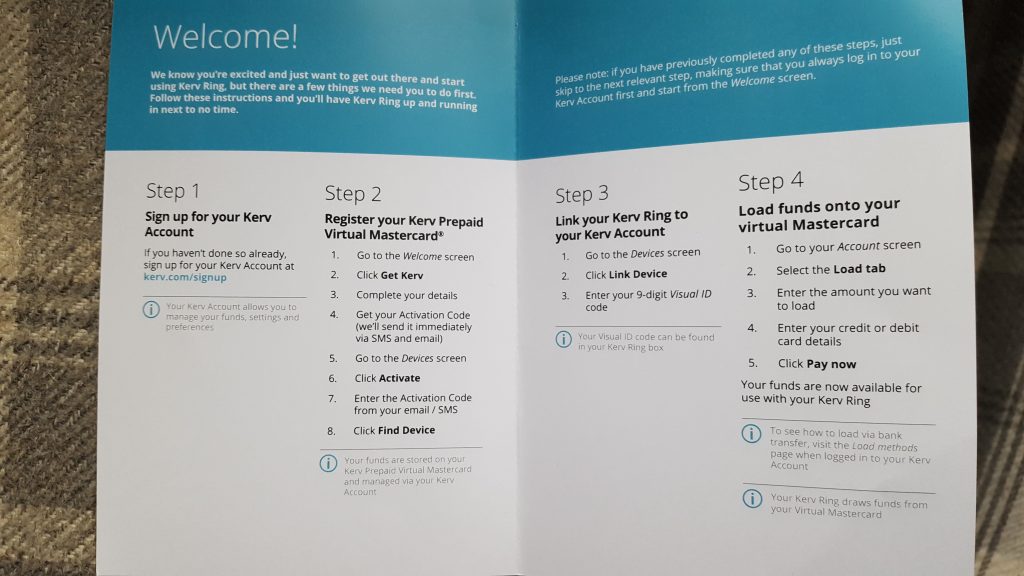
The box came with a set of instructions to set up your online account, associate it to your ring, then set up a virtual mastercard and add some money to get started.
Kerv Ring Instruction Leaflet
I found it very easy and was up and running in no time. I went straight for the auto top-up feature which is a bit of a pain as the lowest value is £30 to trigger an auto top up and the lowest value you can top up with is also £30 so every time it tops up you could have £60 on there waiting to be spent. I’d prefer if it were smaller values but there you go.
First Test
So I jumped straight in and tested it on my route to work. There is a contactless reader into the train and out the other side then a reader into the tube and out the other side, I hovered it over the first reader wondering if anything was going to happen and ping, it worked! It was a little slower than I was expecting but worked none the less. The other readers it was roughly the same but the last one it came up with the dreaded “seek assistance”. I stepped back and let the other people through then took it off and put the ring directly on the reader and it worked again. This led me to think I was using it wrong, if only I had read the instructions properly!
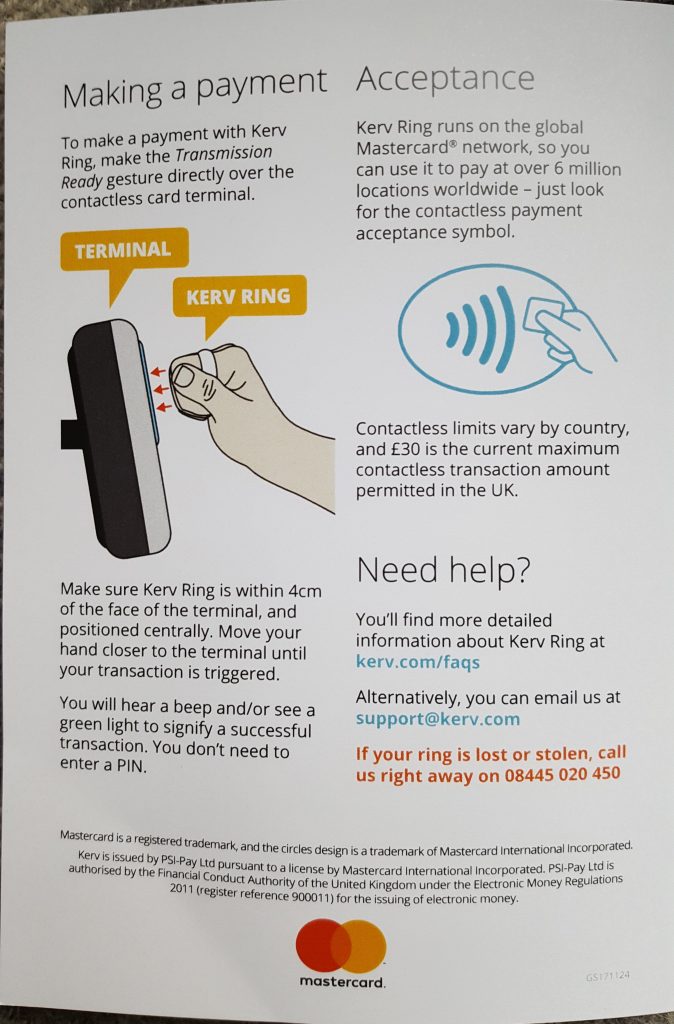
On the way home it was pretty much the same as above, when I got back I opened the instructions and there it was….It says clearly on the instructions how to use it and I had been doing it differently like a prize turnip!
Kerv transmission ready gesture for making a payment
Second Test
Well, this time fully prepared I approached the first reader and this time using the correct hand gesture it picked it up really quickly similar to using an actual card on the machine. I continued all the way to and through London and back again and it picked it up on every single one no problem at all. Was very impressed.
One of the main problems I found is that (at the time of writing) you cant use it with your TFL account to see journey history, payment history or to claim a refund. They do give you a virtual MasterCard number including the CVV number but if you put that into the TFL website it doesn’t pick up the data. This is because the chip in the ring has a separate card number but unfortunately they don’t give you that number on the website or anywhere else. I contacted support on this one and they said they are working on it and will update me when they have something.
Support
Support were very responsive and helpful in general, I first had a lot of contact with them as I was a Kickstarter backer and had the long delay I mentioned, they replied every time within 24 hours and did update me on progress. I do wonder if I would ever had received the ring now if I had not contacted them.
Summary
A good device if you don’t mind wearing the ring when you are travelling and don’t like getting your card out constantly. Use it properly on the reader and it will reward you by working as designed. I have fingers crossed that they will get the device chip number sorted for integration with the TFL website but even without that its a good gadget to show off and save you time. Since this article was written Kerv has been re-branded to K-Ring.
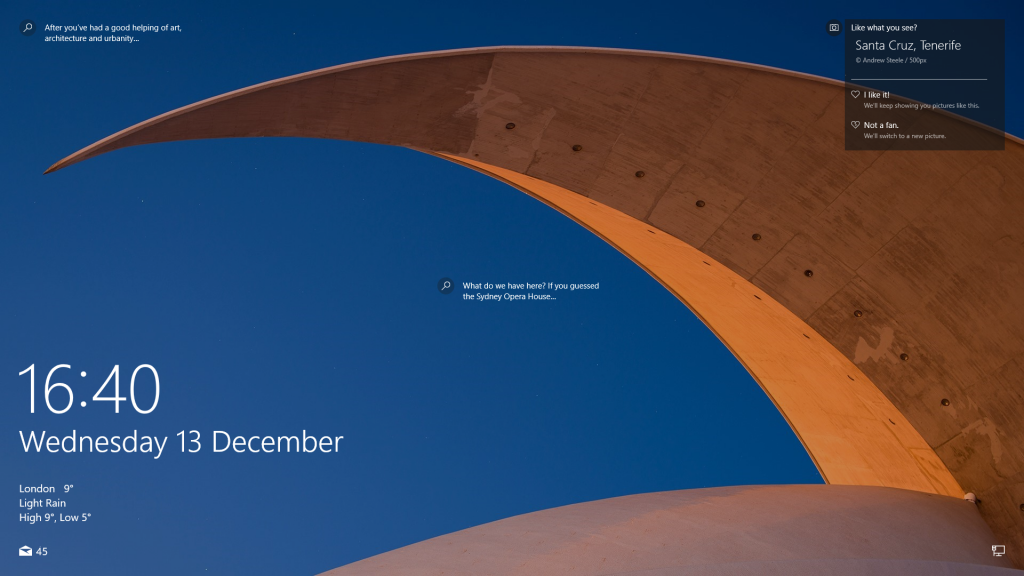
I had a certain image two days in a row on windows spotlight lock screen that looked like a half crescent moon like sand dune structure and wondered where it was, for reference, here is the image I was talking about:
Windows spotlight lock screen image
Now after a bit of googling for things like “what is the big sand half crescent on the windows spotlight” and “what is the big desert structure/sculpture on the windows spotlight” with no luck I pressed CTRL+L to get back to the lock screen and investigate further. When you look at the top right of the lock screen there is an icon “like what you see?”, if you hover over it it tells you where this is:
Icon “like what you see?
Even better than that, if you click on the middle icon “What do we have here?” it will take you to a bing search for the building or location in question:
Icon “What do we have here?”
For those that are interested, it turns out this is actually not a “half crescent moon like sand dune structure” but in fact its the Auditorio de Tenerife in Santa Cruz, Tenerife (Canary Islands, Spain). An auditorium, who’d have thought it?
Samsung have tried a mixture of canal-type earphones that are inserted in the ear canal and open-type earphones. This new type are called In-ear Fit and comes with the Samsung Galaxy S6 and a few other models. When I first opened the box I put them in and wore them to work but I found they didn’t quite fit properly and were falling out a lot, also the sound wan’t great because of the way they fitted they were hanging out of the ear. When I looked into this later I saw they had L1 and R1 written on the rubber ear tip. When I looked in the box there was a second set of rubber ear tips with L2 and R2 written on them. At first glance they didn’t look too different but up close they L2 and R2 set were slightly bigger. I removed the L1 and R1 rubber parts and replaced them with the L2 and R2, although the sizes weren’t a lot different it did make a huge difference wearing them. They fitted more snugly and the sound was a lot better – Before throwing them away make sure you try the above 🙂
I found a solution to my problem when Windows would search for updates, but then when it started downloading it would stay at 0% forever. I started by stopping the Windows Update service (in my case the service proved to be frozen so I restarted my computer and disabled the service before it starts) and the Application Experience service. After that I went to the C:\Windows\SoftwareDistribution folder and pressed ctrl+a and shift+delete to empty its contents. Mine contained more than 70,000 files so it took a while. I started Application Experience and enabled Windows Update. I let it check for updates and try to download them. It worked perfectly.
Do not worry about deleting important windows files in this case. The contents of SoftwareDistribution is used as a cache and data for Windows Update. When Windows Update starts again it rebuilds the cache repopulating it with up-to-date versions of the files and chewing up a ton of harddisk space again.